这篇文章主要讲解了“ElementUI中的el-dropdown传入多参数的实现方法是什么”,文中的讲解内容简单清晰,易于学习与理解,下面请大家跟着小编的思路慢慢深入,一起来研究和学习“ElementUI中的el-dropdown传入多参数的实现方法是什么”吧!

但是ElementUi官方文档中的handleCommand方法只允许接入一个参数,这个参数用于触发你选择的是哪一个选项。而我们实际中还需要传入一个当前行数(如果和我一样,也是用table显示数据的话)的对象进去,后面要使用这个对象的某些字段传给后台进行一些增删改查的操作。
ElementUi官方文档中el-dropdown的样例如下:
el-dropdown 官方文档
<el-dropdown @command="handleCommand"> <span class="el-dropdown-link"> 下拉菜单<i class="el-icon-arrow-down el-icon--right"></i> </span> <el-dropdown-menu slot="dropdown"> <el-dropdown-item command="a">黄金糕</el-dropdown-item> <el-dropdown-item command="b">狮子头</el-dropdown-item> <el-dropdown-item command="c">螺蛳粉</el-dropdown-item> <el-dropdown-item command="d" disabled>双皮奶</el-dropdown-item> <el-dropdown-item command="e" divided>蚵仔煎</el-dropdown-item> </el-dropdown-menu></el-dropdown><style> .el-dropdown-link { cursor: pointer; color: #409EFF; } .el-icon-arrow-down { font-size: 12px; }</style><script> export default { methods: { handleCommand(command) { this.$message('click on item ' + command); } } }</script>我们必须在执行handleCommand方法之前,对这个command参数进行重新封装成一个对象,使其内部包含我们想要的数据方便后面调用。
代码如下:
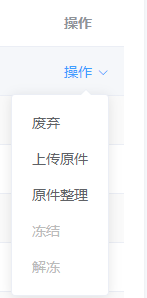
<el-table-column label="操作1"> <template slot-scope="scope"> <el-dropdown split-button type="primary" @command="handleCommand"> 其他操作 <el-dropdown-menu slot="dropdown" > <el-dropdown-item :command="beforeHandleCommand(scope.$index, scope.row,'a')">废弃</el-dropdown-item> <el-dropdown-item :command="beforeHandleCommand(scope.$index, scope.row,'b')">上传原件</el-dropdown-item> <el-dropdown-item :command="beforeHandleCommand(scope.$index, scope.row,'c')">原件整理</el-dropdown-item> <el-dropdown-item disabled :command="beforeHandleCommand(scope.$index, scope.row,'d')">冻结</el-dropdown-item> <el-dropdown-item disabled :command="beforeHandleCommand(scope.$index, scope.row,'e')">解冻</el-dropdown-item> </el-dropdown-menu> </el-dropdown> </template></el-table-column>因为我们是写在表格里的,所以需要一个插槽,具体的根据实际情况进行修改。给标签的command属性绑定一个方法,这个方法就可以传入我们想要的参数,然后利用这个方法封装成一个对象,再将这个对象传入handleCommand方法。
<script>export default { methods: { handleAbandon(index, row) { //todo }, handleUpload (index, row) { //todo }, handleSettle(index, row){ //todo }, beforeHandleCommand(index, row,command){ return { 'index': index, 'row': row, 'command':command } }, handleCommand(command) { switch (command.command) { case "a"://废弃 this.handleAbandon(command.index,command.row); break; case "b"://上传原件 this.handleUpload (command.index,command.row); break; case "c"://原件整理 this.handleSettle(command.index,command.row); break; } } },}</script>感谢各位的阅读,以上就是“ElementUI中的el-dropdown传入多参数的实现方法是什么”的内容了,经过本文的学习后,相信大家对ElementUI中的el-dropdown传入多参数的实现方法是什么这一问题有了更深刻的体会,具体使用情况还需要大家实践验证。这里是编程网,小编将为大家推送更多相关知识点的文章,欢迎关注!


