这篇“Spring源码解析容器初始化构造的方法是什么”文章的知识点大部分人都不太理解,所以小编给大家总结了以下内容,内容详细,步骤清晰,具有一定的借鉴价值,希望大家阅读完这篇文章能有所收获,下面我们一起来看看这篇“Spring源码解析容器初始化构造的方法是什么”文章吧。
在开始进行源码学习前,首先再回顾一下三种Spring编程风格:
基于
Schema,即通过xml标签的配置方式基于
Annotation的注解技术,使用@Component等注解配置bean基于
Java Config,简单来说就是使用@Configuration和@Bean进行配置
基于注解的方式需要通过xml或java config来开启。
在使用xml时,需要手动开启对注解的支持:
<context: annotation-config/>当然,如果在xml中配置了扫描包,现在也可以光添加下面这一行,这行代码中已经包含了注解的开启功能。
<context: component-sacn base-package="com"/>如果你使用的是下面AnnotationConfigApplicationContext这种方式,那么就不需要添加任何操作了,其中已经包含了对注解的支持。
AnnotationConfigApplicationContext ctx=new AnnotationConfigApplicationContext(SpringConfig.class);在实际使用过程中,三种方式是可以混合使用的,不存在冲突。按照下面这种方式作为AnnotationConfigApplicationContext传入的配置文件,即可实现三种风格的统一使用:
@Configuration@ComponentScan("com")@ImportResource("classpath:spring.xml") public class SpringConfig{}之前也有小伙伴对我说,在开始学习Spring的时候,差点因为配置繁杂的xml被劝退,我也翻阅了一下网上spring入门的技术文章,确实很多还是停留在使用xml的方式上。但是其实如果你翻阅一下spring5的官方文档,可以看出官方是推荐我们使用注解的方式的。
尤其是现在的Spring Boot更多的是基于注解,省略了很多配置的过程,对新手更加友好,降低了劝退率,所以本文将基于注解的方式进行源码解析,另外再说明一下本文基于spring-framework-5.0.x源码。
使用注解的方式初始化一个Spring环境,只需要下面一行代码:
AnnotationConfigApplicationContext context = new AnnotationConfigApplicationContext(SpringConfig.class);如果看一下它的构造方法,那么可以将它做的工作拆分为三步,为了便于理解可以写成下面的形式,并分为三大模块分别进行说明。
构造方法
首先看一下AnnotationConfigApplicationContext的继承关系:

AnnotationConfigApplicationContext继承了GenericApplicationContext,那么我们先看GenericApplicationContext的构造方法:
public GenericApplicationContext() { this.beanFactory = new DefaultListableBeanFactory();}在这里初始化了一个beanFactory的实现类DefaultListableBeanFactory,这就是我们常提到的spring中重要的bean工厂,这里面存放了很多非常重要的数据结构。这里先列出比较重要的beanDefinitionMap,会在后面频繁使用:
private final Map<String, BeanDefinition> beanDefinitionMap = new ConcurrentHashMap<>(256);private volatile List<String> beanDefinitionNames = new ArrayList<>(256);在上面的这个beanDefinitionMap中就维护了beanName及BeanDefinition的对应关系,beanDefinitionNames则是一个存放beanName的List。
从AnnotationConfigApplicationContext的构造方法开始分析:
public AnnotationConfigApplicationContext() { this.reader = new AnnotatedBeanDefinitionReader(this); this.scanner = new ClassPathBeanDefinitionScanner(this);}首先实例化了一个AnnotatedBeanDefinitionReader对象,看一下AnnotatedBeanDefinitionReader的构造函数:
public AnnotatedBeanDefinitionReader(BeanDefinitionRegistry registry) { this(registry, getOrCreateEnvironment(registry));}那么,为什么在这能够将AnnotationConfigApplicationContext对象作为BeanDefinitionRegistry传入呢?
回头看一下继承关系那张图,AnnotationConfigApplicationContext继承了BeanDefinitionRegistry,并且最终实现了接口BeanFactory,BeanFactory可以说是Spring中的顶层类,它是一个工厂,能够产生bean对象,提供了一个非常重要的方法getBean,会在后面讲到。
到这,我们可以得出一个结论:
BeanDefinitionRegistry可以等同于AnnotationConfigApplicationContext,看做spring的上下文环境。
AnnotatedBeanDefinitionReader在实例化时,会调用registerAnnotationConfigProcessors方法。先看前半段代码:
public static Set<BeanDefinitionHolder> registerAnnotationConfigProcessors( BeanDefinitionRegistry registry, @Nullable Object source) { DefaultListableBeanFactory beanFactory = unwrapDefaultListableBeanFactory(registry); if (beanFactory != null) { if (!(beanFactory.getDependencyComparator() instanceof AnnotationAwareOrderComparator)) { beanFactory.setDependencyComparator(AnnotationAwareOrderComparator.INSTANCE); } if (!(beanFactory.getAutowireCandidateResolver() instanceof ContextAnnotationAutowireCandidateResolver)) { beanFactory.setAutowireCandidateResolver(new ContextAnnotationAutowireCandidateResolver()); }}在这里先获取在父类构造函数中实例好的beanFactory,并为它填充一些属性:
AnnotationAwareOrderComparator:主要用于排序,解析@order和@Priority注解ContextAnnotationAutowireCandidateResolver:提供处理延迟加载的功能
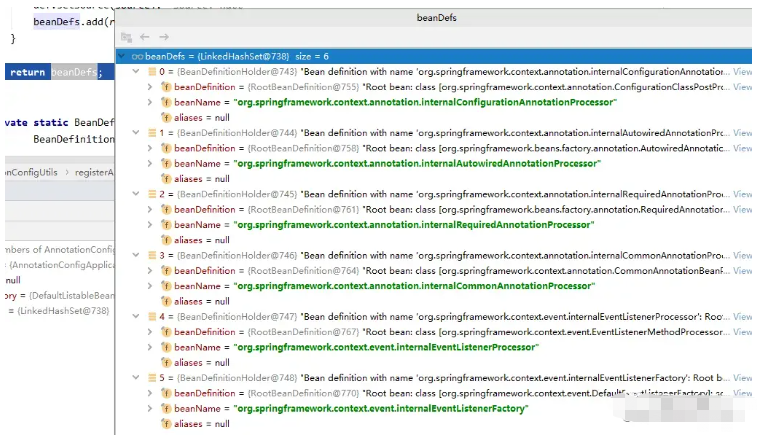
再看后半段代码,下面生成了6个重要类的BeanDefinitionHolder,并存放到一个Set中:
Set<BeanDefinitionHolder> beanDefs = new LinkedHashSet<>(8); if (!registry.containsBeanDefinition(CONFIGURATION_ANNOTATION_PROCESSOR_BEAN_NAME)) { RootBeanDefinition def = new RootBeanDefinition(ConfigurationClassPostProcessor.class); def.setSource(source); beanDefs.add(registerPostProcessor(registry, def, CONFIGURATION_ANNOTATION_PROCESSOR_BEAN_NAME)); } if (!registry.containsBeanDefinition(AUTOWIRED_ANNOTATION_PROCESSOR_BEAN_NAME)) { RootBeanDefinition def = new RootBeanDefinition(AutowiredAnnotationBeanPostProcessor.class); def.setSource(source); beanDefs.add(registerPostProcessor(registry, def, AUTOWIRED_ANNOTATION_PROCESSOR_BEAN_NAME)); } if (!registry.containsBeanDefinition(REQUIRED_ANNOTATION_PROCESSOR_BEAN_NAME)) { RootBeanDefinition def = new RootBeanDefinition(RequiredAnnotationBeanPostProcessor.class); def.setSource(source); beanDefs.add(registerPostProcessor(registry, def, REQUIRED_ANNOTATION_PROCESSOR_BEAN_NAME)); } // Check for JSR-250 support, and if present add the CommonAnnotationBeanPostProcessor. if (jsr250Present && !registry.containsBeanDefinition(COMMON_ANNOTATION_PROCESSOR_BEAN_NAME)) { RootBeanDefinition def = new RootBeanDefinition(CommonAnnotationBeanPostProcessor.class); def.setSource(source); beanDefs.add(registerPostProcessor(registry, def, COMMON_ANNOTATION_PROCESSOR_BEAN_NAME)); } // Check for JPA support, and if present add the PersistenceAnnotationBeanPostProcessor. if (jpaPresent && !registry.containsBeanDefinition(PERSISTENCE_ANNOTATION_PROCESSOR_BEAN_NAME)) { RootBeanDefinition def = new RootBeanDefinition(); try { def.setBeanClass(ClassUtils.forName(PERSISTENCE_ANNOTATION_PROCESSOR_CLASS_NAME, AnnotationConfigUtils.class.getClassLoader())); } catch (ClassNotFoundException ex) { throw new IllegalStateException( "Cannot load optional framework class: " + PERSISTENCE_ANNOTATION_PROCESSOR_CLASS_NAME, ex); } def.setSource(source); beanDefs.add(registerPostProcessor(registry, def, PERSISTENCE_ANNOTATION_PROCESSOR_BEAN_NAME)); } if (!registry.containsBeanDefinition(EVENT_LISTENER_PROCESSOR_BEAN_NAME)) { RootBeanDefinition def = new RootBeanDefinition(EventListenerMethodProcessor.class); def.setSource(source); beanDefs.add(registerPostProcessor(registry, def, EVENT_LISTENER_PROCESSOR_BEAN_NAME)); } if (!registry.containsBeanDefinition(EVENT_LISTENER_FACTORY_BEAN_NAME)) { RootBeanDefinition def = new RootBeanDefinition(DefaultEventListenerFactory.class); def.setSource(source); beanDefs.add(registerPostProcessor(registry, def, EVENT_LISTENER_FACTORY_BEAN_NAME)); } return beanDefs; }这里是使用RootBeanDefinition来将普通类转换为BeanDefinition,并进一步封装成BeanDefinitionHolder。封装成BeanDefinitionHolder的操作在registerPostProcessor方法中:
private static BeanDefinitionHolder registerPostProcessor( BeanDefinitionRegistry registry, RootBeanDefinition definition, String beanName) { definition.setRole(BeanDefinition.ROLE_INFRASTRUCTURE); registry.registerBeanDefinition(beanName, definition); return new BeanDefinitionHolder(definition, beanName); }通过registerBeanDefinition方法将BeanDefinition注册到spring环境中,这个操作其实就是执行了上面的beanDefinitionMap的put操作:
this.beanDefinitionMap.put(beanName, beanDefinition);在上面的操作全部完成后,在还没有实例化用户自定义的bean前,已经有了6个spring自己定义的beanDefinition,
用于实现spring自身的初始化:

这里有必要对BeanDefinition进行一下说明,它是对具有属性值的bean实例的一个说明,或者说是定义。就像是在java类加载的过程,普通java文件要先生成字节码文件,再加载到jvm中生成class对象,spring初始化过程中首先要将普通类转化为BeanDefinition,然后再实例化为bean。
在实例化AnnotatedBeanDefinitionReader完成后,实例化了一个ClassPathBeanDefinitionScanner,可以用来扫描包或者类,并将扫描到的类转化为BeanDefinition。但是翻阅源码,我们可以看到实际上扫描包的工作不是这个scanner对象来完成的,而是在后面spring自己实例化了一个ClassPathBeanDefinitionScanner来负责的。
这里的scanner仅仅是对外提供一个扩展,可以让我们能够在外部调用AnnotationConfigApplicationContext对象的scan方法,实现包的扫描,
例如:
context.scan("com.hydra");以上就是关于“Spring源码解析容器初始化构造的方法是什么”这篇文章的内容,相信大家都有了一定的了解,希望小编分享的内容对大家有帮助,若想了解更多相关的知识内容,请关注编程网行业资讯频道。


