本篇内容主要讲解“如何使用@PropertySource读取配置文件”,感兴趣的朋友不妨来看看。本文介绍的方法操作简单快捷,实用性强。下面就让小编来带大家学习“如何使用@PropertySource读取配置文件”吧!
@PropertySource读取配置文件通过@Value参数注入
有参数文件如下test.properties
project.author=wpfcproject.create_time=2018/3/29在系统中读取对应的数据,并注入到属性中
@Configuration@ComponentScan("cn.edu.ntu")@PropertySource("classpath:test.properties")public class ElConfig { @Value("#{systemProperties['os.name']}") private String osName; //要想使用@Value 用${}占位符注入属性,这个bean是必须的(PropertySourcesPlaceholderConfigurer), //这个就是占位bean, //另一种方式是不用value直接用Envirment变量直接getProperty('key') @Value("${project.author}") public String author; @Autowired private Environment environment; //You need this if you use @PropertySource + @Value @Bean public static PropertySourcesPlaceholderConfigurer propertySourcesPlaceholderConfigurer() { return new PropertySourcesPlaceholderConfigurer(); } public void printProperties(){ System.out.println("os name : " + osName); System.out.println("author : " + author); System.out.println("env : " + environment.getProperty("project.create_time")); } }测试方法:
public class MainApplication { public static void main(String[] args){ AnnotationConfigApplicationContext context = null; context = new AnnotationConfigApplicationContext(ElConfig.class); ElConfig bean = context.getBean(ElConfig.class); bean.printProperties(); } }测试结果:
os name : Windows 7author : wpfcenv : 2018/3/29
@Import引入javaConfig配置的配置类@ImportResource引入xml对应的配置文件
Spring读取配置@Value、@PropertySource、@ConfigurationProperties使用
Spring (Boot)获取参数的方式有很多,其中最被我们熟知的为@Value了,它不可谓不强大。
今天就针对我们平时最长使用的@Value,以及可能很少人使用的@PropertySource、@ConfigurationProperties等相关注解进行一个详细的扫盲,希望能够帮助到到家,使用起来更加顺畅
@Value
@Value注解的注入非常强大,可以借助配置文件的注入、也可以直接注入
注入普通字符串
@Value("normal") private String normal; // normal (显然这种注入的意义不大)注入操作系统属性
@Value("#{systemProperties['os.name']}") private String systemPropertiesName; //效果等同于 是因为spring模版把系统变量否放进了Enviroment@Value("${os.name}") private String systemPropertiesName;注入表达式结果
@Value("#{ T(java.lang.Math).random() * 100.0 }") private double randomNumber; //41.29185128620939注入其它Bean的属性:Person类的name属性
@Bean public Person person() { Person person = new Person(); person.setName("fangshixiang"); return person; } //注入属性 @Value("#{person.name}") private String personName; @Test public void contextLoads() { System.out.println(personName); //fangshixiang }注入文件资源
在resources下放置一个jdbc.properties配置文件。然后可以直接注入
@Value("classpath:jdbc.properties") private Resource resourceFile; // 注入文件资源 @Test public void contextLoads() throws IOException { System.out.println(resourceFile); //class path resource [jdbc.properties] String s = FileUtils.readFileToString(resourceFile.getFile(), StandardCharsets.UTF_8); System.out.println(s); //输出: //db.username=fangshixiang //db.password=fang //db.url=jdbc:mysql://localhost:3306/mytest //db.driver-class-name=com.mysql.jdbc.Driver }注入Url资源
@Value("http://www.baidu.com") private Resource testUrl; // 注入URL资源 @Test public void contextLoads() { System.out.println(testUrl); //URL [http://www.baidu.com] }@Value中$和#的区别
语法:
${ properties }和#{ SpEL }的语法区别
${ property : default_value }
#{ obj.property? : default_value } 表示SpEl表达式通常用来获取bean的属性,或者调用bean的某个方法。当然还有可以表示常量
正常使用的情况,这里不做过多的介绍了,现在介绍一些异常情况
${ properties }`:这种比较简单,如果key找不到,启动会失败。如果找不到的时候也希望正常启动,可以采用冒号+默认值的方式
#{ obj.property? : default_value }
@Value("#{person}") private Person value; @Test public void contextLoads() { System.out.println(value); //Person(name=fangshixiang, age=null, addr=null, hobby=null) }我们发现这个很强大,可以直接把容器的里的一个对象直接注入进来。只是我们可能一般不这么做。
如果改成person1,在容器里找不到这个bean,也是会启动报错的。@Value("#{person1?:null}")这样也是不行的,因为person1找不到就会报错
@Value("#{person.name}") private String personName; @Value("#{person.age}") private String perAge; //注入默认值 @Value("#{person.age?:20}") private String perAgeDefault; //如果age22这个key根本就不存在,启动肯定会报错的 //@Value("#{person.age22?:20}") //private String perAgeDefault22; @Test public void contextLoads() { System.out.println(personName); //fangshixiang System.out.println(perAge); //null System.out.println(perAgeDefault); //20 }获取级联属性,下面两种方法都是ok的:
@Value("#{person.parent.name}") private String parentName1; @Value("#{person['parent.name']}") private String parentName2; @Test public void contextLoads() { System.out.println(parentName1); //fangshixiang System.out.println(parentName2); //fangshixiang }二者结合使用:#{ ‘${}’ }
注意结合使用的语法和单引号,不能倒过来。
两者结合使用,可以利用SpEL的特性,写出一些较为复杂的表达式,如:
@Value("#{'${os.name}' + '_' + person.name}") private String age; @Test public void contextLoads() { System.out.println(age); //Windows 10_fangshixiang }@PropertySource:加载配置属性源
此注解也是非常非常的强大,用好了,可以很好的实现配置文件的分离关注,大大提高开发的效率,实现集中化管理
最简单的应用,结合@Value注入属性值(也是最常见的应用)
通过@PropertySource把配置文件加载进来,然后使用@Value获取
@Configuration@PropertySource("classpath:jdbc.properties")public class PropertySourceConfig { @Value("${db.url}") private String dbUrl; @PostConstruct public void postConstruct() { System.out.println(dbUrl); //jdbc:mysql://localhost:3306/mytest }}@PropertySource各属性介绍
value:数组。指定配置文件的位置。支持classpath:和file:等前缀 Spring发现是classpath开头的,因此最终使用的是Resource的子类ClassPathResource。如果是file开头的,则最终使用的类是FileSystemResourceignoreResourceNotFound:默认值false。表示如果没有找到文件就报错,若改为true就不报错。建议保留falseencoding:加载进来的编码。一般不用设置,可以设置为UTF-8等等factory:默认的值为DefaultPropertySourceFactory.class。
@Overridepublic PropertySource<?> createPropertySource(String name, EncodedResource resource) throws IOException {return (name != null ? new ResourcePropertySource(name, resource) : new ResourcePropertySource(resource));}源码其实也没什么特别的。其重难点在于:
DefaultPropertySourceFactory什么时候被Spring加载呢?
name和resource都是什么时候被赋值进来的?
本文抛出这两个问题,具体原因会在后续分析源码的相关文章中有所体现。
需要注意的是PropertySourceFactory的加载时机早于Spring Beans容器,因此实现上不能依赖于Spring的IOC。
@PropertySource多环境配置以及表达式使用(spring.profiles.active)
方法一:可以这么配置
@PropertySource(“classpath:jdbc-${spring.profiles.active}.properties”)程序员在开发时不需要关心生产环境数据库的地址、账号等信息,一次构建即可在不同环境中运行
@ConfigurationProperties
注意:上面其实都是Spring Framwork提供的功能。而@ConfigurationProperties是Spring Boot提供的。包括@EnableConfigurationProperties也是Spring Boot才有的。它在自动化配置中起到了非常关键的作用
ConfigurationPropertiesBindingPostProcessor会对标注@ConfigurationProperties注解的Bean进行属性值的配置。
有时候有这样子的情景,我们想把配置文件的信息,读取并自动封装成实体类,这样子,我们在代码里面使用就轻松方便多了,这时候,我们就可以使用@ConfigurationProperties,它可以把同类的配置信息自动封装成实体类
该注解在Spring Boot的自动化配置中得到了大量的使用
如SpringMVC的自动化配置:
@ConfigurationProperties(prefix = "spring.mvc")public class WebMvcProperties {} //加载方式@Configuration@Conditional(DefaultDispatcherServletCondition.class)@ConditionalOnClass(ServletRegistration.class)// 此处采用这个注解,可议把WebMvcProperties这个Bean加载到容器里面去~~~// WebMvcProperties里面使用了`@ConfigurationProperties(prefix = "spring.mvc")`@EnableConfigurationProperties(WebMvcProperties.class) //加载MVC的配置文件protected static class DispatcherServletConfiguration {}似乎我们能看出来一些该注解的使用方式。
说明:这里说的两种,只是说的最常用的。其实只要能往容器注入Bean,都是一种方式,比如上面的@EnableConfigurationProperties方式也是ok的
关于@EnableConfigurationProperties的解释,在注解驱动的Spring相关博文里会有体现
加在类上,需要和@Component注解,结合使用.代码如下
com.example.demo.name=${aaa:hi}com.example.demo.age=11com.example.demo.address[0]=北京 # 注意数组 List的表示方式 Map/Obj的方式各位可以自行尝试com.example.demo.address[1]=上海com.example.demo.address[2]=广州com.example.demo.phone.number=1111111java代码:
@Component@ConfigurationProperties(prefix = "com.example.demo")public class People { private String name; private Integer age; private List<String> address; private Phone phone;}通过@Bean的方式进行声明,这里我们加在启动类即可,代码如下
@Bean @ConfigurationProperties(prefix = "com.example.demo") public People people() { return new People(); }此些方式并不需要使用@EnableConfigurationProperties去开启它。
细节:Bean的字段必须有get/set方法,请注意~~~
另外还有一种结合@PropertySource使用的方式,可谓完美搭配
@Component@PropertySource("classpath:config/object.properties")@ConfigurationProperties(prefix = "obj")public class ObjectProperties {}其余属性见名之意,这里一笔带过:
ignoreInvalidFieldsignoreNestedPropertiesignoreUnknownFields

简单理解:
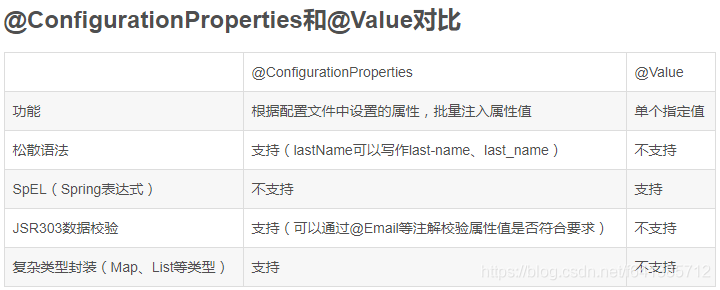
@ConfigurationProperties是将application配置文件的某类名下所有的属性值,自动封装到实体类中。@Value是将application配置文件中,所需要的某个属性值,封装到java代码中以供使用。
应用场景不同:
如果只是某个业务中需要获取配置文件中的某项值或者设置具体值,可以使用@Value;
如果一个JavaBean中大量属性值要和配置文件进行映射,可以使用@ConfigurationProperties;
到此,相信大家对“如何使用@PropertySource读取配置文件”有了更深的了解,不妨来实际操作一番吧!这里是编程网网站,更多相关内容可以进入相关频道进行查询,关注我们,继续学习!


