这篇文章主要介绍了SpringBoot怎么整合Mybatis的相关知识,内容详细易懂,操作简单快捷,具有一定借鉴价值,相信大家阅读完这篇SpringBoot怎么整合Mybatis文章都会有所收获,下面我们一起来看看吧。
Mybatis的简单介绍
MyBatis 本是apache的一个开源项目iBatis, 2010年这个项目由apache software foundation 迁移到了google code,并且改名为MyBatis 。2013年11月迁移到Github。
iBATIS一词来源于“internet”和“abatis”的组合,是一个基于Java的持久层框架。iBATIS提供的持久层框架包括SQL Maps和Data Access Objects(DAOs)
MyBatis 是一款优秀的持久层框架,它支持定制化 SQL、存储过程以及高级映射。MyBatis 避免了几乎所有的 JDBC 代码和手动设置参数以及获取结果集。MyBatis 可以使用简单的 XML 或注解来配置和映射原生信息,将接口和 Java 的 POJOs(Plain Ordinary Java Object,普通的 Java对象)映射成数据库中的记录。
思想:ORM:Object Relational Mapping
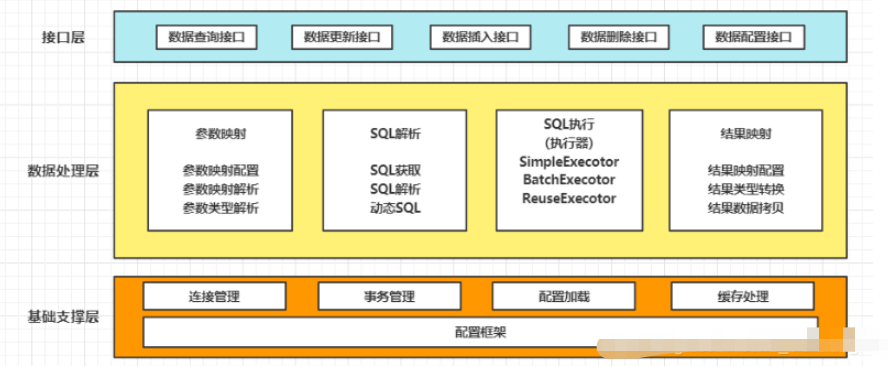
Mybatis基本框架:

1 环境搭建
新建Spring Boot项目,引入依赖
pom.xml
<!--mysql--><dependency> <groupId>mysql</groupId> <artifactId>mysql-connector-java</artifactId> <version>5.1.47</version></dependency><!--mybatis--><dependency> <groupId>org.mybatis.spring.boot</groupId> <artifactId>mybatis-spring-boot-starter</artifactId> <version>1.3.2</version></dependency><!--Druid数据源--><dependency> <groupId>com.alibaba</groupId> <artifactId>druid-spring-boot-starter</artifactId> <version>1.1.9</version></dependency><!--测试--><dependency> <groupId>org.springframework.boot</groupId> <artifactId>spring-boot-starter-test</artifactId> <scope>test</scope></dependency>DB-sql
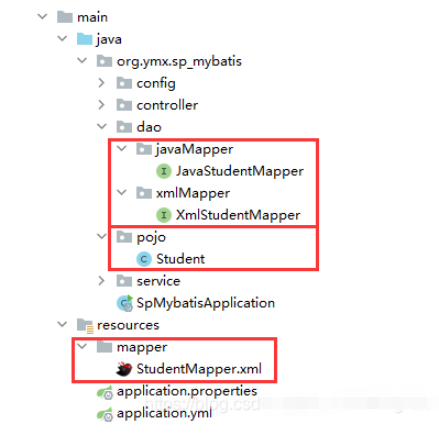
CREATE TABLE `student` ( `id` int(11) NOT NULL AUTO_INCREMENT, `name` varchar(255) DEFAULT NULL, `age` int(11) DEFAULT NULL, PRIMARY KEY (`id`)) ENGINE=InnoDB AUTO_INCREMENT=13 DEFAULT CHARSET=utf8;项目结构

2 整合方式一:注解版
2.1 配置
server: port: 8081spring: datasource: # 配置数据库 username: root password: 12345 driver-class-name: com.mysql.jdbc.Driver url: jdbc:mysql://localhost:3306/test #数据库名 type: com.alibaba.druid.pool.DruidDataSource2.2 编码
@Mapper@Repositorypublic interface JavaStudentMapper { @Insert("insert into student(name, age) " + "values (#{name}, #{age})") public int saveStudent(Student student); @Select("select * " + "from student " + "where id = #{id}") public Student findStudentById(Integer id); @Select("select * " + "from student") @Results({ @Result(property = "id", column = "id"), @Result(property = "name", column = "name"), @Result(property = "age", column = "age") }) public List<Student> findAllStudent(); @Delete("delete " + "from student " + "where id = #{id}") public int removeStudentById(Integer id); @Update("update set name=#{name},age=#{age} " + "where id=#{id}") public int updateStudentById(Student student);}2.3 测试
@Autowiredprivate JavaStudentMapper studentMapper;@Testvoid testJavaMapperInsert() { Student student = new Student("张三", 22); System.out.println(studentMapper.saveStudent(student));}@Testvoid testJavaMapperFind() { System.out.println(studentMapper.findStudentById(2));}@Testvoid testJavaMapperFindAll() { System.out.println(studentMapper.findAllStudent());}@Testvoid testJavaMapperUpdate() { Student student = new Student(2, "张三", 22); System.out.println(studentMapper.updateStudentById(student));}@Testvoid testJavaMapperDelete() { System.out.println(studentMapper.removeStudentById(2));}3 整合方式二:XML版
3.1 配置
server: port: 8081spring: application: name: hospitalManager #项目名 datasource: # 配置数据库 username: root password: 12345 driver-class-name: com.mysql.jdbc.Driver url: jdbc:mysql://localhost:3306/test #数据库名 type: com.alibaba.druid.pool.DruidDataSourcemybatis: mapper-locations: classpath:mapper@Mapper@Repositorypublic interface XmlStudentMapper { public int saveStudent(Student student); public Student findStudentById(Integer id); public List<Student> findAllStudent(); public int removeStudentById(Integer id); public int updateStudentById(Student student);}xml文件(StudentMapper.xml)
<?xml version="1.0" encoding="UTF-8" ?><!DOCTYPE mapper PUBLIC "-//mybatis.org//DTD Mapper 3.0//EN" "http://mybatis.org/dtd/mybatis-3-mapper.dtd"><mapper namespace="org.ymx.sp_mybatis.dao.xmlMapper.XmlStudentMapper"> <!-- 添加学生--> <insert id="saveStudent" parameterType="org.ymx.sp_mybatis.pojo.Student" useGeneratedKeys="true" keyProperty="id"> insert into student(name, age) values (#{name}, #{age}) </insert> <!--查看学生根据ID--> <select id="findStudentById" parameterType="integer" resultType="org.ymx.sp_mybatis.pojo.Student"> select * from student where id = #{id} </select> <!--查看全部学生--> <select id="findAllStudent" resultMap="studentResult"> select * from student </select> <!--删除学生根据ID--> <delete id="removeStudentById" parameterType="integer"> delete from student where id = #{id} </delete> <!--修改学生根据ID--> <update id="updateStudentById" parameterType="org.ymx.sp_mybatis.pojo.Student"> update student set name=#{name}, age=#{age} where id = #{id} </update> <!--查询结果集--> <resultMap id="studentResult" type="org.ymx.sp_mybatis.pojo.Student"> <result column="id" javaType="INTEGER" jdbcType="INTEGER" property="id"/> <result column="name" javaType="STRING" jdbcType="VARCHAR" property="name"/> <result column="age" javaType="INTEGER" jdbcType="INTEGER" property="age"/> </resultMap></mapper>3.3 测试
@Autowiredprivate XmlStudentMapper studentMapper;@Testvoid testJavaMapperInsert() { Student student = new Student("张三", 22); System.out.println(studentMapper.saveStudent(student));}@Testvoid testJavaMapperFind() { System.out.println(studentMapper.findStudentById(2));}@Testvoid testJavaMapperFindAll() { System.out.println(studentMapper.findAllStudent());}@Testvoid testJavaMapperUpdate() { Student student = new Student(2, "张三", 22); System.out.println(studentMapper.updateStudentById(student));}@Testvoid testJavaMapperDelete() { System.out.println(studentMapper.removeStudentById(2));}4 总结
基本步骤:

注意事项:
(1)相比注解方式,更推荐使用xml方式,因为注解方式将SQL语句嵌套到Java代码中,一旦需要修改则需要重新编译项目,而xml方式则不需要重新编译项目
(2)xml方式需要在主启动函数或配置类中配置接口的扫描路径
关于“SpringBoot怎么整合Mybatis”这篇文章的内容就介绍到这里,感谢各位的阅读!相信大家对“SpringBoot怎么整合Mybatis”知识都有一定的了解,大家如果还想学习更多知识,欢迎关注编程网行业资讯频道。


