这期内容当中小编将会给大家带来有关怎么在Android中利用Activity实现单元测试,文章内容丰富且以专业的角度为大家分析和叙述,阅读完这篇文章希望大家可以有所收获。
对Acitivity的测试
对于Activity,我们大致有两种测试需求:
在Activity正常启动后,查看界面布局是否正确,包括View的点击事件等是否正确。
需要在Activity启动前完成各种数据的部署,然后查看Activity的效果。
对于这两种需求,笔者分别做了两个示例解说:
检测一个布局中的button和TextView是否正确。
从网络动态获取String到Activity界面显示,并且这个图片的URL是由Intent传递过来的。
环境部署
首先要导入expresso-core的包,如下:
dependencies { // Other dependencies ... androidTestCompile 'com.android.support.test.espresso:espresso-core:2.2.2'}当然在目前的项目架构中一般已经自动导入了这个包,所以不需要自己导入,笔者项目中自动导入的包如下如下:
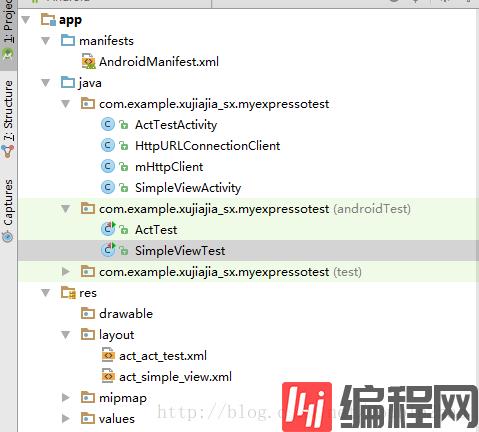
dependencies { compile fileTree(include: ['*.jar'], dir: 'libs') androidTestCompile('com.android.support.test.espresso:espresso-core:2.2.2', { exclude group: 'com.android.support', module: 'support-annotations' }) compile 'com.android.support:appcompat-v7:26.0.0-alpha1' compile 'com.android.support.constraint:constraint-layout:1.0.2' testCompile 'junit:junit:4.12'}项目结构如下:

布局View的测试:
package com.example.xujiajia_sx.myexpressotest;import android.app.Activity;import android.os.Bundle;import android.support.annotation.Nullable;import android.view.View;import android.widget.Button;import android.widget.TextView;public class SimpleViewActivity extends Activity{ private TextView tv; private Button btn; @Override protected void onCreate(@Nullable Bundle savedInstanceState) { super.onCreate(savedInstanceState); setContentView(R.layout.act_simple_view); initView(); } private void initView() { tv=findViewById(R.id.tv_simple_view); btn=findViewById(R.id.btn_simple_view); tv.setText("111"); btn.setText("222"); btn.setOnClickListener(new View.OnClickListener() { @Override public void onClick(View view) { tv.setText("777"); } }); }}<?xml version="1.0" encoding="utf-8"?><LinearLayout xmlns:android="http://schemas.android.com/apk/res/android" android:layout_width="match_parent" android:layout_height="match_parent" android:orientation="vertical"> <TextView android:id="@+id/tv_simple_view" android:layout_width="wrap_content" android:layout_height="wrap_content" /> <Button android:id="@+id/btn_simple_view" android:layout_width="wrap_content" android:layout_height="wrap_content" /></LinearLayout>package com.example.xujiajia_sx.myexpressotest;import android.support.test.rule.ActivityTestRule;import org.junit.Rule;import org.junit.Test;import static android.support.test.espresso.Espresso.onView;import static android.support.test.espresso.action.ViewActions.click;import static android.support.test.espresso.assertion.ViewAssertions.matches;import static android.support.test.espresso.matcher.ViewMatchers.withId;import static android.support.test.espresso.matcher.ViewMatchers.withText;public class SimpleViewTest { @Rule public ActivityTestRule<SimpleViewActivity> mActivityTestRule = new ActivityTestRule<SimpleViewActivity>(SimpleViewActivity.class); @Test public void textViewTest() throws Exception { onView(withId(R.id.tv_simple_view)) .check(matches(withText("111"))); } @Test public void buttonTest() throws Exception { onView(withId(R.id.btn_simple_view)) .check(matches(withText("222"))) .perform(click()); onView(withId(R.id.tv_simple_view)) .check(matches(withText("777"))); }}测试主要逻辑:
首先要使用ActivityTestRule初始化你要测试的Activity。
编写测试方法,测试View是否是我们预期的样子。
两个测试方法逻辑如下:
textViewTest():
在Activity中查找id为tv_simple_view的View,检查它的text是否为“111”。
buttonTest():
在Activity中查找id为btn_simple_view的View,检查它的text是否为“222”。然后执行点击事件,点击事件的逻辑是在Activity的OnCreate中设置的,是把TextView的text设置为777。在执行完点击事件后,测试方法中继续测试TextView的text是否为“777”。
读者可能阅读到对View的测试非常陌生,不用担心,此处主要要理解测试的逻辑即可,笔者会在下篇文章具体讲解View的各种测试方法。
网络获取String的Activity测试:
package com.example.xujiajia_sx.myexpressotest;import android.app.Activity;import android.os.Bundle;import android.support.annotation.Nullable;import android.widget.TextView;public class ActTestActivity extends Activity{ private TextView tv; @Override protected void onCreate(@Nullable Bundle savedInstanceState) { super.onCreate(savedInstanceState); setContentView(R.layout.act_act_test); initView(); } private void initView() { tv= findViewById(R.id.tv_act_test); new Thread(new Runnable() { @Override public void run() { String url =getIntent().getStringExtra("url"); final String s=mHttpClient.getInstance().get(url); runOnUiThread(new Runnable() { @Override public void run() { tv.setText(s); } }); } }).start(); }}package com.example.xujiajia_sx.myexpressotest;public class mHttpClient { private static HttpURLConnectionClient mClient = null; public static void setClient(HttpURLConnectionClient client) { mClient = client; } public static HttpURLConnectionClient getInstance() { return mClient; }}package com.example.xujiajia_sx.myexpressotest;import android.util.Log;import java.io.BufferedReader;import java.io.IOException;import java.io.InputStream;import java.io.InputStreamReader;import java.net.HttpURLConnection;import java.net.URL;import static android.content.ContentValues.TAG;public class HttpURLConnectionClient { public String get(String url) { HttpURLConnection conn = null; try { URL mURL = new URL(url); conn = (HttpURLConnection) mURL.openConnection(); conn.setRequestMethod("GET"); conn.setConnectTimeout(2000); conn.connect(); InputStream is = conn.getInputStream(); StringBuilder sb = new StringBuilder(); BufferedReader reader = new BufferedReader(new InputStreamReader(is)); String line; while ((line = reader.readLine()) != null) { sb.append(line).append("\n"); } reader.close(); return sb.toString(); } catch (IOException e) { Log.e(TAG, "network error for mini program ", e); return ""; } finally { //最后将conn断开连接 if (conn != null) { conn.disconnect(); } } }}<?xml version="1.0" encoding="utf-8"?><LinearLayout xmlns:android="http://schemas.android.com/apk/res/android" android:layout_width="match_parent" android:layout_height="match_parent" android:orientation="vertical"> <TextView android:id="@+id/tv_act_test" android:layout_width="wrap_content" android:layout_height="wrap_content" /></LinearLayout>package com.example.xujiajia_sx.myexpressotest;import android.content.Intent;import android.support.test.rule.ActivityTestRule;import org.junit.Rule;import org.junit.Test;public class ActTest { @Rule public ActivityTestRule<ActTestActivity> mActivityTestRule= new ActivityTestRule<ActTestActivity>(ActTestActivity.class){ @Override protected Intent getActivityIntent() { Intent intent=new Intent(); intent.putExtra("url","http://www.weather.com.cn/adat/sk/101310201.html"); return intent; } @Override protected void beforeActivityLaunched() { mHttpClient.setClient(new HttpURLConnectionClient()); } }; @Test public void mTest() throws Exception{ Thread.sleep(5000); }}网络获取不要忘记在AndroidManifest中加网络权限喔。
这个Activity的主要逻辑就是接收Intent,然后获取到传过来的url,接着通过网络获取到url的String,显示到TextView上。
主要测试逻辑:
首先还是要定义ActivityTestRule,确定使用哪个Activity。
与前一个例子不同的是,这里要重写ActivityTestRule的两个方法,getActivityIntent() 和beforeActivityLaunched()。顾名思义,一个是设置Activity获取到的Intent,另一个是设置Activity启动跟之前的准备工作。
笔者此处在getActivityIntent() 中设置了传递的url,在beforeActivityLaunched()设置的网络获取的方式。
有些读者可能会好奇为什么网络获取的方式不默认呢,而要通过setClient()来设置?
因为这样可以更方便我们测试,在正式的项目中,我们可能会需要在代码中加入log等操作,但是正式的代码一般我们是不会去修改的,但是我们可以继承它,重写某些方法,然后把它放到测试需要的地方。
在这里我们就可以继承HttpURLConnectionClient 这个类,然后把继承的子类使用setClient()来作为网络获取的方式。
上述就是小编为大家分享的怎么在Android中利用Activity实现单元测试了,如果刚好有类似的疑惑,不妨参照上述分析进行理解。如果想知道更多相关知识,欢迎关注编程网行业资讯频道。


