这篇文章给大家分享的是有关element-ui上传图片后标注坐标点的示例分析的内容。小编觉得挺实用的,因此分享给大家做个参考,一起跟随小编过来看看吧。
什么是element-ui
element-ui是由饿了么前端团队推出的一套为开发者、设计师和产品经理准备的基于Vue.js 2.0的桌面组件库,而手机端有对应框架是 Mint UI 。整个ui风格简约,很实用,同时也极大的提高了开发者的效率,是一个非常受欢迎的组件库。
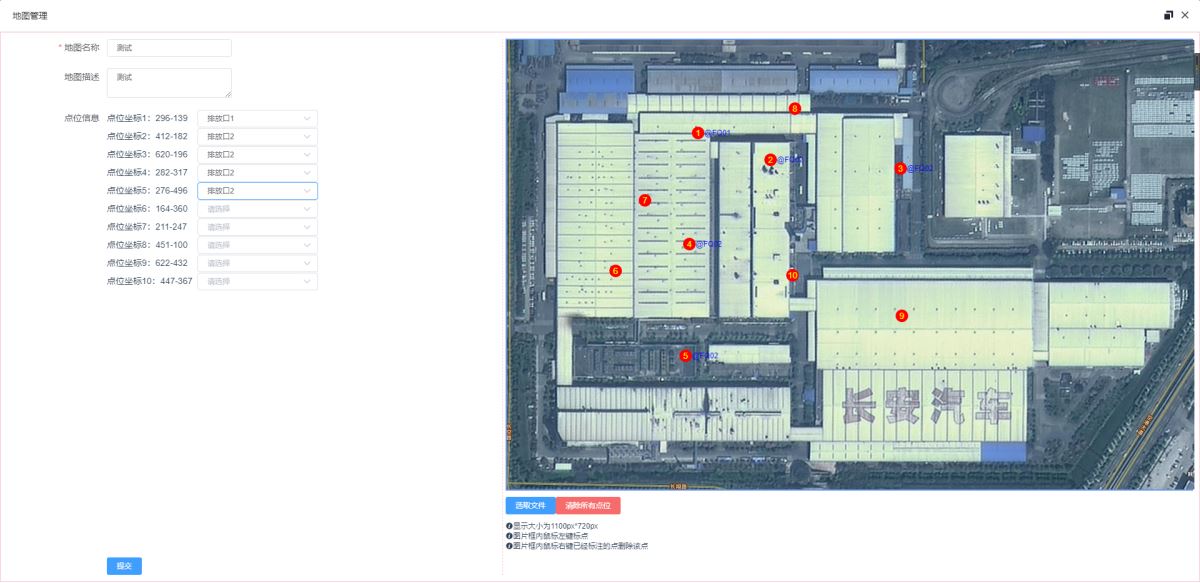
页面大概如下:

组件使用的是layui的layer.open弹框。
左边是表单信息,右边是绘图区域。
原文件mapForm.vue
<template> <div class="mapForm"> <div class="left"> <el-form ref="form" :model="form" :rules="rules" label-width="160px"> <el-form-item label="地图名称" prop="mapName"> <el-input v-model="form.mapName" size="mini" clearable class="formInputClass"></el-input> </el-form-item> <el-form-item label="地图描述" prop="remarks"> <el-input type="textarea" v-model="form.remarks" size="mini" clearable class="formInputClass"></el-input> </el-form-item> <el-form-item label="点位信息" prop="" v-if="mapList.length > 0"> <div class="mapContent"> <div v-for="(map,key) in mapList" :key="key"> <div class="pointAbscissaOrdinate"><span>点位坐标{{key+1}}:{{map.abscissa}}-{{map.ordinate}}</span></div> <el-select v-model="mapList[key]['point']" placeholder="请选择" class="selectClass" @change="changePoint"> <el-option v-for="(item, key) in pointList" :key="key" :label="item.name" :value="item.point"> </el-option> </el-select> </div> </div> </el-form-item> <div class="btn"> <el-button @click="checkParams" type="primary">提交</el-button> </div> </el-form> </div> <div class="right" id=""> <div class="imgDiv" id="imgDiv" v-loading="loadStage"> <img :src="fileSrc" width="1100" height="720" id="imgPainter" /> <div class="marker" v-for="(item, key) in mapList" :key="key" : @contextmenu.prevent="clearMarker(key)"> {{key+1}} <div class="ponint">{{item.point}}</div> </div> </div> <div class="uploadBtn"> <el-upload class="upload-demo" ref="upload" action="" :on-change="handleChange" :show-file-list="false" :on-remove="handleRemove" :auto-upload="false" > <el-button slot="trigger" size="mini" type="primary">选取文件</el-button> </el-upload> <el-button @click="clearPic" type="danger">清除所有点位</el-button> </div> <div class="info"><i class="el-icon-info"></i>显示大小为1100px*720px</div> <div class="info"><i class="el-icon-info"></i>图片框内鼠标左键标点</div> <div class="info"><i class="el-icon-info"></i>图片框内鼠标右键已经标注的点删除该点</div> </div> </div></template><script>export default { name: 'mapFormComponent', data() { return { form: { mapName: "", }, rules: { mapName: [ { required: true, message: "请输入地图名称", trigger: "blur" }, ], }, fileList: [], fileSrc: '', pointList: [ { name: "排放口1", point: "@FQ01" }, { name: "排放口2", point: "@FQ02" }, ], mapList: [], //斑马线的数组 canBiaoZhu: true, //是否可以进行标注 pointColor: 'red', //点的颜色 pointSize: 20, //点的大小 pointSelectList: {}, notifyId: {}, loadStage: false, }; }, created() { }, mounted() { // 绘点区域事件绑定 let _this = this; if (document.getElementById('imgPainter')) { document.getElementById('imgPainter').onmousedown = (e) => { e = e || window.event if (e.button !== 2) { //判断是否右击 if (this.canBiaoZhu && this.fileSrc != '') { //判断是否可以进行标注 需上传图片 var x = e.offsetX || e.layerX var y = e.offsetY || e.layerY this.mapList.push({ id: this.mapList.length + 1, name: '', abscissa: x, ordinate: y, }) // 设置变量 // this.pointSelectList.$set(0); let key = `point`; _this.$set(this.mapList[this.mapList.length - 1], key, "") } else { //提示上传图片 // 只显示一次 if (_this.notifyId.id) _this.notifyId.close(); this.notifyId = _this.$notify.error({ title: '提示信息', message: '请先上传图片后再标点', showClose: true, }); } } else { return false } } } // 右键阻止 var oDiv1 = document.getElementById('imgDiv'); oDiv1.oncontextmenu = function (ev) { var e = e || window.event; //阻止冒泡 e.cancelBubble = true; //阻止触发默认事件 e.returnValue = false; } }, methods: { changePoint() { this.$forceUpdate(); }, clearMarker(index) { this.mapList.splice(index, 1); }, handleChange(file, fileList) { this.loadStage = true; let fileName = file.name; let regex = /(.jpg|.jpeg|.gif|.png|.bmp)$/; if (regex.test(fileName.toLowerCase())) { this.fileSrc = URL.createObjectURL(file.raw) // 获取URL console.log(this.fileSrc); } else { this.$message.error('请选择图片文件'); } this.loadStage = false; }, clearPic() { this.mapList = []; }, checkParams() { this.$refs["form"].validate((valid) => { if (valid) { let params = this.form; this.submit(params); } }); }, async submit(params) { let resp = await this.$api.companyApiList .addEditCompany(params); if (resp.data.code != "error") { // 判断是否新增修改 this.$notify.success({ title: "提示", message: resp.data.msg, showClose: true, }); let type = params.id && params.id != '' ? 'edit' : 'add'; this.$emit("update", type); // 清空表单数据 this.$refs.form.resetFields(); } }, },};</script><style scoped lang="less">.mapForm { display: flex; padding: 10px; border: 1px solid pink; .left { flex: 2; border-right: 1px dashed pink; margin-right: 4px; .mapContent { height: 700px; overflow-y: auto; .selectClass { margin: 0px 5px; } .pointAbscissaOrdinate { display: inline-block; width: 140px; } } } .right { flex: 8; // border: 1px solid pink; max-width: 1100px; .imgDiv { position: relative; height: 720px; border: 2px solid cornflowerblue; .marker { position: absolute; border-radius: 50%; z-index: 999; width: 20px; height: 20px; background-color: red; text-align: center; line-height: 20px; color: yellow; .ponint { display: block; position: absolute; left: 20px; top: 0px; font-size: 12px; color: blue; } } .marker:hover .ponint { display: block; } } .info { font-size: 12px; } .uploadBtn { margin: 10px 0px; } } .btn { padding-left: 160px; }}.formInputClass { width: 200px;}</style>标点的效果如下:

感谢各位的阅读!关于“element-ui上传图片后标注坐标点的示例分析”这篇文章就分享到这里了,希望以上内容可以对大家有一定的帮助,让大家可以学到更多知识,如果觉得文章不错,可以把它分享出去让更多的人看到吧!


