本篇内容介绍了“CNN如何解决Flowers图像分类任务”的有关知识,在实际案例的操作过程中,不少人都会遇到这样的困境,接下来就让小编带领大家学习一下如何处理这些情况吧!希望大家仔细阅读,能够学有所成!
加载并展示数据
(1)该数据需要从网上下载,需要耐心等待片刻,下载下来自动会存放在“你的主目录.keras\datasets\flower_photos”。
(2)数据中总共有 5 种类,分别是 daisy、 dandelion、roses、sunflowers、tulips,总共包含了 3670 张图片。
(3) 随机展示了一张花朵的图片。
import matplotlib.pyplot as pltimport numpy as npimport PILimport tensorflow as tfimport pathlibfrom tensorflow import kerasfrom tensorflow.keras import layersfrom tensorflow.keras.models import Sequentialimport randomdataset_url = "https://storage.googleapis.com/download.tensorflow.org/example_images/flower_photos.tgz"data_dir = tf.keras.utils.get_file('flower_photos', origin=dataset_url, untar=True)data_dir = pathlib.Path(data_dir)image_count = len(list(data_dir.glob('*/*.jpg')))print("总共包含%d张图片,下面随便展示一张玫瑰的图片样例:"%image_count)roses = list(data_dir.glob('roses/*'))PIL.Image.open(str(random.choice(roses)))构件处理图像的 pipeline
(1)使用 tf.keras.utils.image_dataset_from_directory 可以将我们的花朵图片数据,从磁盘加载到内存中,并形成 tensorflow 高效的 tf.data.Dataset 类型。
(2)我们将数据集 shuffle 之后,进行二八比例的随机抽取分配,80% 的数据作为我们的训练集,共 2936 张图片, 20% 的数据集作为我们的测试集,共 734 张图片。
(3)我们使用 Dataset.cache 和 Dataset.prefetch 来提升数据的处理速度,使用 cache 在将数据从磁盘加载到 cache 之后,就可以将数据一直放 cache 中便于我们的后续访问,这可以保证在训练过程中数据的处理不会成为计算的瓶颈。另外使用 prefetch 可以在 GPU 训练模型的时候,CPU 将之后需要的数据提前进行处理放入 cache 中,也是为了提高数据的处理性能,加快整个训练过程,不至于训练模型时浪费时间等待数据。
(4)我们随便选取了 6 张图像进行展示,可以看到它们的图片以及对应的标签。
batch_size = 32img_height = 180img_width = 180train_ds = tf.keras.utils.image_dataset_from_directory( data_dir, validation_split=0.2, subset="training", seed=1, image_size=(img_height, img_width), batch_size=batch_size)val_ds = tf.keras.utils.image_dataset_from_directory( data_dir, validation_split=0.2, subset="validation", seed=1, image_size=(img_height, img_width),batch_size=batch_size)class_names = train_ds.class_namesnum_classes = len(class_names)AUTOTUNE = tf.data.AUTOTUNEtrain_ds = train_ds.cache().shuffle(1000).prefetch(buffer_size=AUTOTUNE)val_ds = val_ds.cache().prefetch(buffer_size=AUTOTUNE)plt.figure(figsize=(5, 5))for images, labels in train_ds.take(1): for i in range(6): ax = plt.subplot(2, 3, i + 1) plt.imshow(images[i].numpy().astype("uint8")) plt.title(class_names[labels[i]]) plt.axis("off")结果打印:
Found 3670 files belonging to 5 classes.
Using 2936 files for training.
Found 3670 files belonging to 5 classes.
Using 734 files for validation.
搭建深度学习分类模型
(1)因为最初的图片都是 RGB 三通道图片,像素点的值在 [0,255] 之间,为了加速模型的收敛,我们要将所有的数据进行归一化操作。所以在模型的第一层加入了 layers.Rescaling 对图片进行处理。
(2)使用了三个卷积块,每个卷积块中包含了卷积层和池化层,并且每一个卷积层中都添加了 relu 激活函数,卷积层不断提取图片的特征,池化层可以有效的所见特征矩阵的尺寸,同时也可以减少最后连接层的中的参数数量,权重参数少的同时也起到了加快计算速度和防止过拟合的作用。
(3)最后加入了两层全连接层,输出对图片的分类预测 logit 。
(4)使用 Adam 作为我们的模型优化器,使用 SparseCategoricalCrossentropy 计算我们的损失值,在训练过程中观察 accuracy 指标。
model = Sequential([ layers.Rescaling(1./255, input_shape=(img_height, img_width, 3)), layers.Conv2D(16, 3, padding='same', activation='relu'), layers.MaxPooling2D(), layers.Conv2D(32, 3, padding='same', activation='relu'), layers.MaxPooling2D(), layers.Conv2D(64, 3, padding='same', activation='relu'), layers.MaxPooling2D(), layers.Flatten(), layers.Dense(128, activation='relu'), layers.Dense(num_classes)])model.compile(optimizer='adam', loss=tf.keras.losses.SparseCategoricalCrossentropy(from_logits=True), metrics=['accuracy'])训练模型并观察结果
(1)我们使用训练集进行模型的训练,使用验证集进行模型的验证,总共训练 5 个 epoch 。
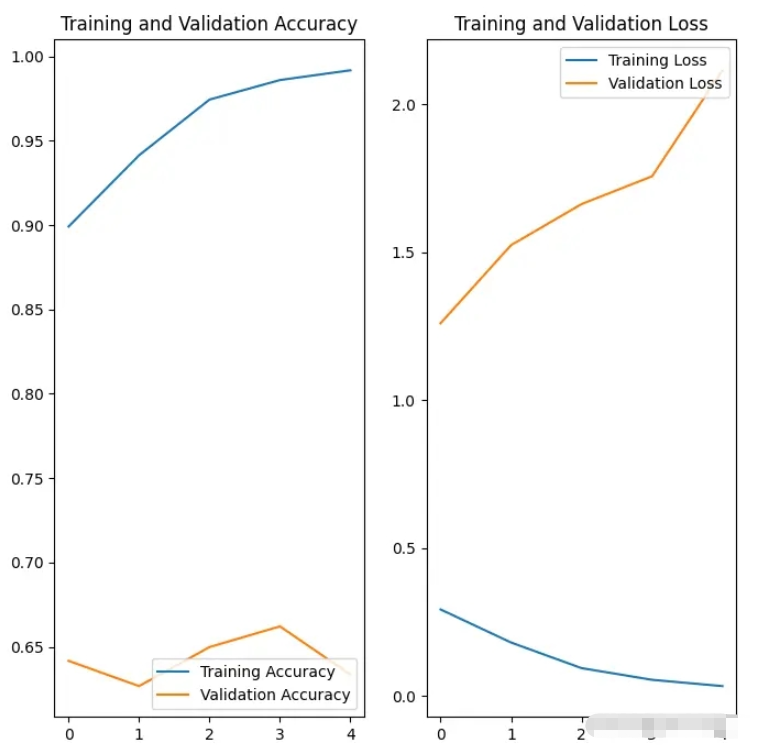
(2)我们通过对训练过程中产生的准确率和损失值,与验证过程中产生的准确率和损失值进行绘图对比,训练时的准确率高出验证时的准确率很多,训练时的损失值远远低于验证时的损失值,这说明模型存在过拟合风险。正常的情况这两个指标应该是大体呈现同一个发展趋势。
epochs = 5history = model.fit(train_ds, validation_data=val_ds, epochs=epochs)acc = history.history['accuracy']val_acc = history.history['val_accuracy']loss = history.history['loss']val_loss = history.history['val_loss']epochs_range = range(epochs)plt.figure(figsize=(8, 8))plt.subplot(1, 2, 1)plt.plot(epochs_range, acc, label='Training Accuracy')plt.plot(epochs_range, val_acc, label='Validation Accuracy')plt.legend(loc='lower right')plt.title('Training and Validation Accuracy')plt.subplot(1, 2, 2)plt.plot(epochs_range, loss, label='Training Loss')plt.plot(epochs_range, val_loss, label='Validation Loss')plt.legend(loc='upper right')plt.title('Training and Validation Loss')plt.show()结果打印:
Epoch 1/5
92/92 [==============================] - 45s 494ms/step - loss: 0.2932 - accuracy: 0.8992 - val_loss: 1.2603 - val_accuracy: 0.6417
Epoch 2/5
92/92 [==============================] - 40s 436ms/step - loss: 0.1814 - accuracy: 0.9414 - val_loss: 1.5241 - val_accuracy: 0.6267
Epoch 3/5
92/92 [==============================] - 36s 394ms/step - loss: 0.0949 - accuracy: 0.9745 - val_loss: 1.6629 - val_accuracy: 0.6499
Epoch 4/5
92/92 [==============================] - 48s 518ms/step - loss: 0.0554 - accuracy: 0.9860 - val_loss: 1.7566 - val_accuracy: 0.6621
Epoch 5/5
92/92 [==============================] - 39s 419ms/step - loss: 0.0341 - accuracy: 0.9918 - val_loss: 2.1150 - val_accuracy: 0.6335

加入了抑制过拟合措施并重新进行模型的训练和测试
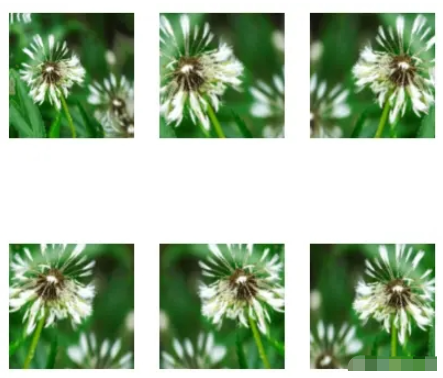
(1)当训练样本数量较少时,通常会发生过拟合现象。我们可以操作数据增强技术,通过随机翻转、旋转等方式来增加样本的丰富程度。常见的数据增强处理方式有:tf.keras.layers.RandomFlip、tf.keras.layers.RandomRotation和 tf.keras.layers.RandomZoom。这些方法可以像其他层一样包含在模型中,并在 GPU 上运行。
(2)这里挑选了一张图片,对其进行 6 次执行数据增强,可以看到得到了经过一定程度缩放、旋转、反转的数据集。
data_augmentation = keras.Sequential([ layers.RandomFlip("horizontal", input_shape=(img_height, img_width, 3)), layers.RandomRotation(0.1), layers.RandomZoom(0.5)])plt.figure(figsize=(5, 5))for images, _ in train_ds.take(1): for i in range(6): augmented_images = data_augmentation(images) ax = plt.subplot(2, 3, i + 1) plt.imshow(augmented_images[0].numpy().astype("uint8")) plt.axis("off")
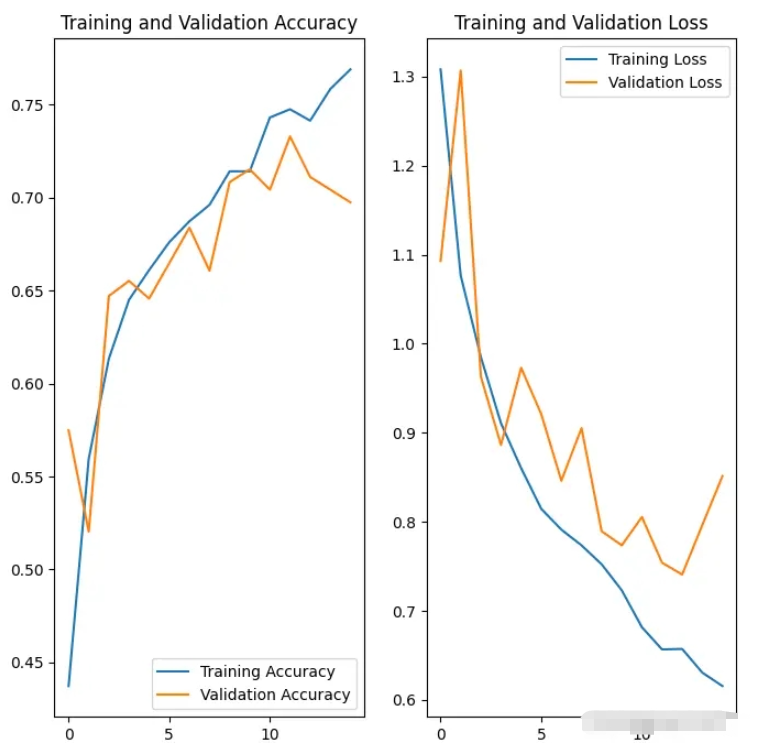
(3)在模型架构的开始加入数据增强层,同时在全连接层的地方加入 Dropout ,进行神经元的随机失活,这两个方法的加入可以有效抑制模型过拟合的风险。其他的模型结构、优化器、损失函数、观测值和之前相同。通过绘制数据图我们发现,使用这些措施很明显减少了过拟合的风险。
model = Sequential([ data_augmentation, layers.Rescaling(1./255), layers.Conv2D(16, 3, padding='same', activation='relu'), layers.MaxPooling2D(), layers.Conv2D(32, 3, padding='same', activation='relu'), layers.MaxPooling2D(), layers.Conv2D(64, 3, padding='same', activation='relu'), layers.MaxPooling2D(), layers.Dropout(0.2), layers.Flatten(), layers.Dense(128, activation='relu'), layers.Dense(num_classes, name="outputs")])model.compile(optimizer='adam', loss=tf.keras.losses.SparseCategoricalCrossentropy(from_logits=True), metrics=['accuracy'])epochs = 15history = model.fit( train_ds, validation_data=val_ds, epochs=epochs)acc = history.history['accuracy']val_acc = history.history['val_accuracy']loss = history.history['loss']val_loss = history.history['val_loss']epochs_range = range(epochs)plt.figure(figsize=(8, 8))plt.subplot(1, 2, 1)plt.plot(epochs_range, acc, label='Training Accuracy')plt.plot(epochs_range, val_acc, label='Validation Accuracy')plt.legend(loc='lower right')plt.title('Training and Validation Accuracy')plt.subplot(1, 2, 2)plt.plot(epochs_range, loss, label='Training Loss')plt.plot(epochs_range, val_loss, label='Validation Loss')plt.legend(loc='upper right')plt.title('Training and Validation Loss')plt.show()结果打印:
92/92 [==============================] - 57s 584ms/step - loss: 1.3080 - accuracy: 0.4373 - val_loss: 1.0929 - val_accuracy: 0.5749
Epoch 2/15
92/92 [==============================] - 41s 445ms/step - loss: 1.0763 - accuracy: 0.5596 - val_loss: 1.3068 - val_accuracy: 0.5204
...
Epoch 14/15
92/92 [==============================] - 59s 643ms/step - loss: 0.6306 - accuracy: 0.7585 - val_loss: 0.7963 - val_accuracy: 0.7044
Epoch 15/15
92/92 [==============================] - 42s 452ms/step - loss: 0.6155 - accuracy: 0.7691 - val_loss: 0.8513 - val_accuracy: 0.6975

(4)最后我们使用一张随机下载的图片,用模型进行类别的预测,发现可以识别出来。
sunflower_url = "https://storage.googleapis.com/download.tensorflow.org/example_images/592px-Red_sunflower.jpg"sunflower_path = tf.keras.utils.get_file('Red_sunflower', origin=sunflower_url)img = tf.keras.utils.load_img( sunflower_path, target_size=(img_height, img_width) )img_array = tf.keras.utils.img_to_array(img)img_array = tf.expand_dims(img_array, 0) predictions = model.predict(img_array)score = tf.nn.softmax(predictions[0])print( "这张图片最有可能属于 {} ,有 {:.2f} 的置信度。".format(class_names[np.argmax(score)], 100 * np.max(score)))结果打印:
这张图片最有可能属于 sunflowers ,有 97.39 的置信度。
“CNN如何解决Flowers图像分类任务”的内容就介绍到这里了,感谢大家的阅读。如果想了解更多行业相关的知识可以关注编程网网站,小编将为大家输出更多高质量的实用文章!


