1.tensorflow-gpu版和tensorflow-cpu版的区别
tensorflow-gpu版需要同时配置安装CUDA、cuDNN,而tensorflow-cpu版不需要配置,直接pip/conda install tensorflow即可安装tensorflow-cpu版本
2.为什么要创建虚拟环境
在安装gpu版本的库时通常会创建单独的虚拟环境,例如安装tensorflow-gpu,则需要利用conda create -n tensorflow python=3.7,创建一个tensorflow的虚拟环境 ,这样做的主要目的是保证tensorflow-gpu这个库不受其它库的影响,比如同时安装tensorflow-gpu与pytorch-gpu,或者同时安装不同版本的tensorflow-gpu,由于不同库或不同版本的gpu库需要配置的CUDA、cuDNN不同,导致即使都安装在base环境里,由于CUDA、cuDNN不适配,也仅能用一个gpu库,因此用到什么gpu库就单独的创建这个库的虚拟环境,这样你就不需要动之前环境中的CUDA、cuDNN,只需要在新的环境中重新配置这个新库的专属CUDA、cuDNN就OK了,只需要切换虚拟环境,这两个都能用。
3.那怎么同时用两个库呢,例如:tensorflow和opencv库
需要审视这两个库哪个对项目起主要支撑作用,是否需要更高的计算能力,比如需要tensorflow有更高的计算能力,那么就创建一个tensorflow的虚拟环境,安装tensorflow-gpu,后在这个环境中安装cpu版的opencv,即可保证两个库都能使用。
另外一种方法是,对应tensorflow-gpu库的CUDA、cuDNN的版本,找到与之匹配的opencv-gpu版本,这样即可在一个环境中用两个gpu库
4.tensorflow-gpu版安装过程
step1.安装anoconda(不要安装太高版本的)
在安装完毕后,使用Win+R调出cmd,输入conda -V,可以看到Anaconda的版本号,即为Anaconda安装成功!
具体过程可点击参考该视频
step2.对Anaconda和Python进行换源
在cmd中输入conda config --set show_channel_urls yes在C盘用户目录下会生成.condarc文件。
然后使用记事本打开,用下面的内容将其替换。
channels: - defaultsshow_channel_urls: truechannel_alias: https://mirror.tuna.tsinghua.edu.cn/anacondadefault_channels: - https://mirror.tuna.tsinghua.edu.cn/anaconda/pkgs/main - https://mirror.tuna.tsinghua.edu.cn/anaconda/pkgs/free - https://mirror.tuna.tsinghua.edu.cn/anaconda/pkgs/r - https://mirror.tuna.tsinghua.edu.cn/anaconda/pkgs/pro - https://mirror.tuna.tsinghua.edu.cn/anaconda/pkgs/msys2custom_channels: conda-forge: https://mirror.tuna.tsinghua.edu.cn/anaconda/cloud msys2: https://mirror.tuna.tsinghua.edu.cn/anaconda/cloud bioconda: https://mirror.tuna.tsinghua.edu.cn/anaconda/cloud menpo: https://mirror.tuna.tsinghua.edu.cn/anaconda/cloud pytorch: https://mirror.tuna.tsinghua.edu.cn/anaconda/cloud simpleitk: https://mirror.tuna.tsinghua.edu.cn/anaconda/cloud最后保存,然后在CMD中输入conda clean -i,此时Anaconda已经换源成功!
接着是Python换源,在CMD中输入
pip config set global.index-url https://pypi.tuna.tsinghua.edu.cn/simple即可换源成功!
参考该篇博客
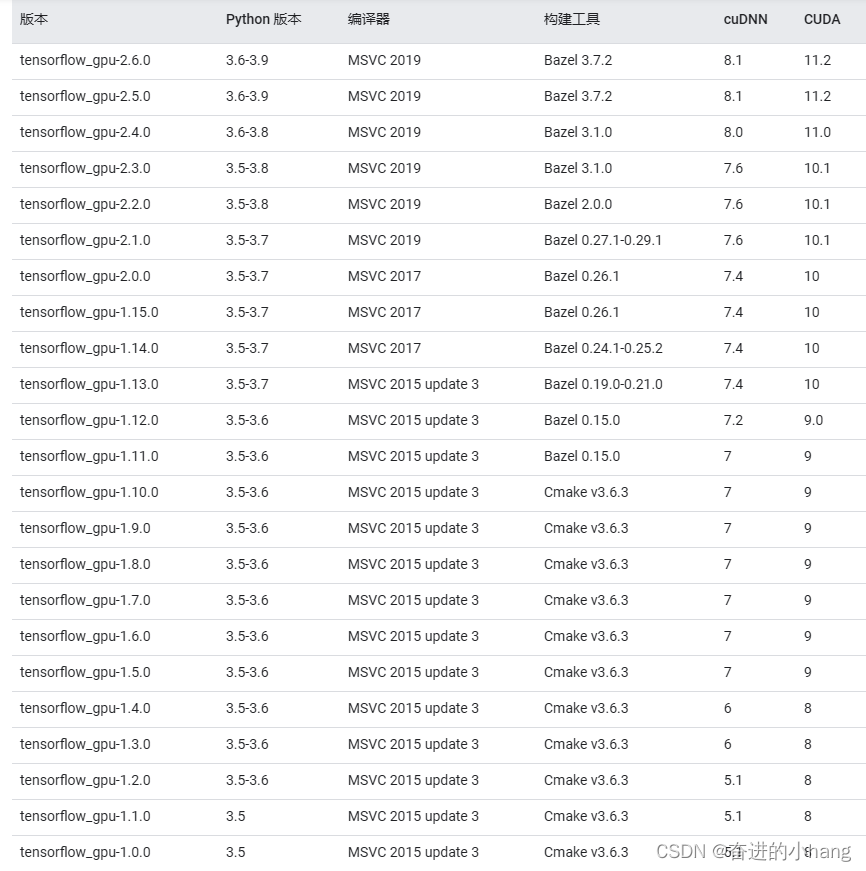
step3.明确CUDA、cuDNN、Tensorflow版本的搭配
在安装Tensorflow-gpu之前,需要安装CUDA和cuDNN等。对于Tensorflow的gpu版本最重要的是CUDA、cuDNN、Tensorflow版本的搭配。
下面给出GPU版本的版本搭配:

具体参照该篇博客
step4.创建tensorflow虚拟环境
使用Anaconda来创建环境,这里环境名称命名为tensorflow,在CMD中输入conda create -n tensorflow python=3.7,输入y进行确认
step5.安装tensorflow-gpu(以2.1.0版本为例)
(1)先在CMD中输入activate tensorflow以激活环境
(2)输入conda install cudatoolkit=10.1,安装cudatoolkit(CUDA)(在我们的具体使用中,其实真正需要的并不是整个CUDA,而是cudatoolkit,所以我们在这里直接安装cudatoolkit,不需要再下载3个多G的CUDA来本地安装。)
(3)在激活的环境里输入conda install cudnn=7.6,安装 cuDNN
(4)在激活环境中输入pip install tensorflow-gpu==2.1.0,安装2.1.0版本 tensorflow-gpu
step6.验证
至此,Tensorflow的GPU版本已经安装成功,现在需要测试在激活环境中输入python以进入python环境。然后输入import tensorflow as tf可见如下:

再输入tf.test.is_gpu_available(),若最后为True表示GPU可用,证明已经成功安装Tensorflow的GPU版本

但是该过程可能会出现:TypeError: Descriptors cannot not be created directly. If this call came from a _pb2.py file……这个问题,如果出现采用Step7.
step7.解决TypeError
(1)打开CMD输入activate tensorflow进入激活环境
(2)在激活环境中输入pip uninstall protobuf
(3)继续输入pip install protobuf==3.20.1
即可完美解决问题,重新测试,即可成功!
来源地址:https://blog.csdn.net/sunshine_boy1/article/details/129923839


