本篇内容主要讲解“python怎么编写接口测试文档”,感兴趣的朋友不妨来看看。本文介绍的方法操作简单快捷,实用性强。下面就让小编来带大家学习“python怎么编写接口测试文档”吧!
目录
前言
一、postman接口用例转换为python测试用例
二、转换为pytest测试用例
三、封装POST和GET方法
common.py—公共类封装
具体接口测试用例
前言
很多人会使用postman工具,或者熟悉python,但不一定会使用python来编写测试用例脚本,postman里面可以完整的将python代码复制出来。
(以下所有内容以豆瓣网站搜索功能为例子)
一、postman接口用例转换为python测试用例
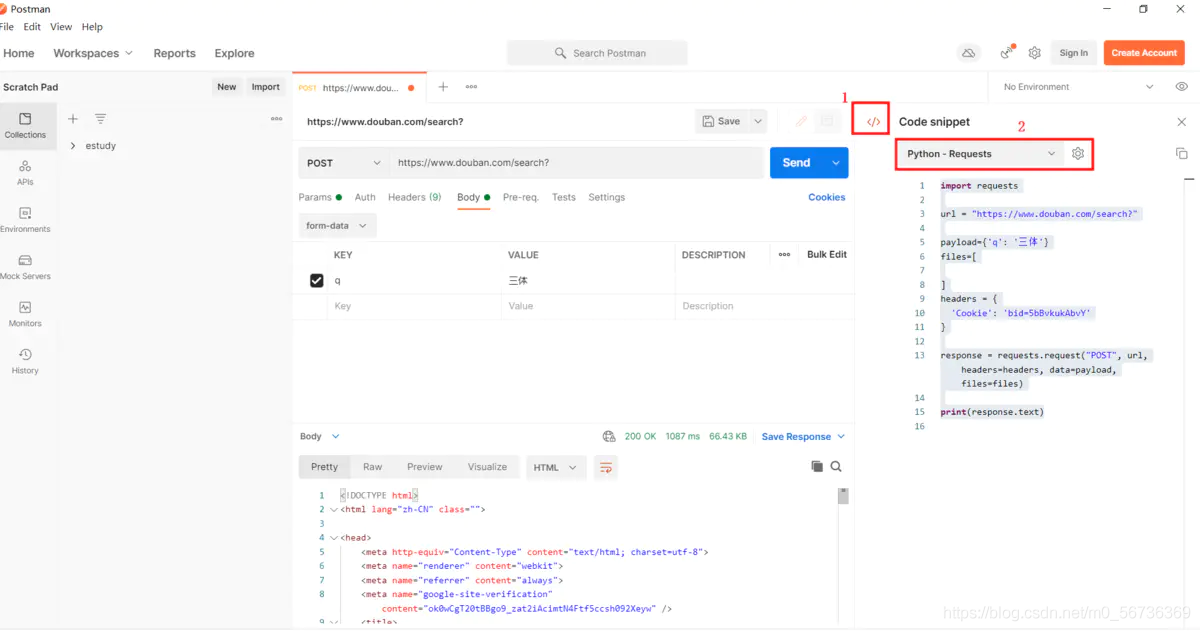
打开postman,点击右侧的</>图标,页面右边会显示脚本,顶部修改导出的语言,这边我使用的是Python-Reqyests

复制脚本,在PyCharm中打开即可,在导入使用之前如果没有reuqests库,可能会报错,我们需要安装reuqests库。
cmd命令窗口输入:pip install requests
导出后的脚本格式如下:
import requestsurl = "<https://www.douban.com/search?">payload={'q': '三体'}files=[]headers = { 'Cookie': 'bid=5bBvkukAbvY'}response = requests.request("POST", url, headers=headers, data=payload, files=files)print(response.text)二、转换为pytest测试用例
下面就是转成pytest的测试用例
import requestsclass TestDouban: def test_douban(self): url = "<https://www.douban.com/search?"> payload = {'q': '三体'} files = [] headers = { 'Cookie': 'bid=5bBvkukAbvY' } response = requests.request("POST", url, headers=headers, data=payload, files=files) print(response.text)三、封装POST和GET方法
在一个项目中,根路由的路径是一样的,只是不同功能对应的具体的接口不一致,且POST和GET是目前测试用例中比较通用的方法,所以可以将根路由、POST和GET方法封装成一个通用的类,后面直接调用即可。
1.common.py—公共类封装
import requestsclass Common: def __init__(self): # 豆瓣根路由 self.url_root = "<https://www.douban.com>" # get请求,uri是接口具体地址,params是get请求的参数,如果没有,默认为空 def get(self, uri, params=''): # 拼凑访问地址 url = self.url_root + uri + params # 通过get请求访问对应地址 response = requests.get(url) # 返回request的response结果,类型为requests的Response类型 return response # post请求,uri是接口具体地址,params是post请求的参数,如果没有,默认为空 def post(self, uri, params=''): # 拼凑访问地址 url = self.url_root + uri # 有参数,则访问对应的url,并赋值给默认参数data if len(params) > 0: response = requests.post(url, data=params) # 无参数,只需要访问对应的url即可 else: response = requests.post(url) # 返回request的response结果,类型为requests的Response类型 return response2.具体接口测试用例
import requestsfrom common.common import Commonclass TestDouban: def setup(self): self.com = Common() def test_douban(self): uri = "/search?" payload = {'q': '三体'} response = self.com.post(uri, payload)# 由于file不需要,就将file删除了,至于hearder是否要添加可根据需求来定执行结果如下:

到此,相信大家对“python怎么编写接口测试文档”有了更深的了解,不妨来实际操作一番吧!这里是编程网网站,更多相关内容可以进入相关频道进行查询,关注我们,继续学习!


