本文为 【Java多数据源实现教程】 相关知识,由于自己最近在做导师的项目的时候需要使用这种技术,于是自学了相关技术原理与实现,并将其整理如下,具体包含:多数据源的典型使用场景(包含业务复杂场景、读写分离场景),多数据源实现原理及实现方法(包含通过AbstractRoutingDataSource实现动态数据源、多数据源切换方式、Spring集成多个MyBatis框架实现多数据源),多数据源事务控制(包含只使用主库TransactionManger、一个方法开启2个事务),dynamic-datasource多数源组件等~
📌博主主页:小新要变强 的主页
👉Java全栈学习路线可参考:【Java全栈学习路线】最全的Java学习路线及知识清单,Java自学方向指引,内含最全Java全栈学习技术清单~
👉算法刷题路线可参考:算法刷题路线总结与相关资料分享,内含最详尽的算法刷题路线指南及相关资料分享~
👉Java微服务开源项目可参考:企业级Java微服务开源项目(开源框架,用于学习、毕设、公司项目、私活等,减少开发工作,让您只关注业务!)
文章

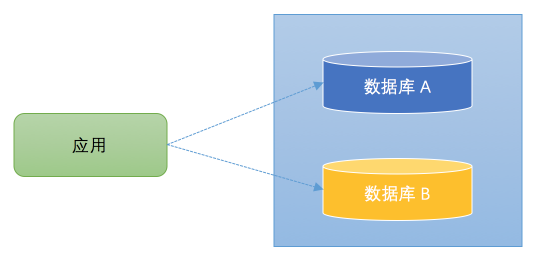
在实际开发中,经常可能遇到在一个应用中可能需要访问多个数据库的情况。以下是两种典型场景:
1️⃣业务复杂(数据量大)
数据分布在不同的数据库中,数据库拆了, 应用没拆。 一个公司多个子项目,各用各的数据库,涉及数据共享…

2️⃣读写分离
- 为了解决数据库的读性能瓶颈(读比写性能更高, 写锁会影响读阻塞,从而影响读的性能)。
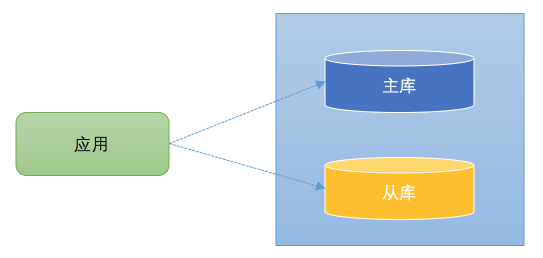
- 很多数据库拥主从架构。也就是,一台主数据库服务器,是对外提供增删改业务的生产服务器;另一(多)台从数据库服务器,主要进行读的操作。ꞏ
- 可以通过中间件(ShardingSphere、mycat、mysql-proxy 、TDDL …),但是有一些规模较小的公司,没有专门的中间件团队搭建读写分离基础设施,因此需要业务开发人员自行实现读写分离。

这里的架构与上图类似。不同的是,在读写分离中,主库和从库的数据库是一致的(不考虑主从延迟)。数据更新操作(insert、update、delete)都是在主库上进行,主库将数据变更信息同步给从库。在查询时,可以在从库上进行,从而分担主库的压力。
原理:
对于大多数的java应用,都使用了spring框架,spring-jdbc模块提供AbstractRoutingDataSource,其内部可以包含了多个DataSource,然后在运行时来动态的访问哪个数据库。这种方式访问数据库的架构图如下所示:

应用直接操作的是AbstractRoutingDataSource的实现类,告诉AbstractRoutingDataSource访问哪个数据库,然后由AbstractRoutingDataSource从事先配置好的数据源(ds1、ds2)选择一个,来访问对应的数据库。

- (1)当执行数据库持久化操作,只要集成了Spring就一定会通过DataSourceUtils获取Connection
- (2)通过Spring注入的DataSource获取Connection即可执行数据库操作。所以思路就是:只需配置一个实现了DataSource的Bean, 然后根据业务动态提供Connection即可
- (3)其实Spring已经提供一个DataSource实现类用于动态切换数据源——AbstractRoutingDataSource
- (4)分析AbstractRoutingDataSource即可实现动态数据源切换。
1️⃣通过AbstractRoutingDataSource实现动态数据源
通过这个类可以实现动态数据源切换。如下是这个类的成员变量:
private Map targetDataSources;private Object defaultTargetDataSource;private Map resolvedDataSources; - targetDataSources保存了key和数据库连接的映射关系
- defaultTargetDataSource标识默认的连接
- resolvedDataSources这个数据结构是通过targetDataSources构建而来,存储结构也是数据库标识和数据源的映射关系
而AbstractRoutingDataSource实现了InitializingBean接口,并实现了afterPropertiesSet方法。afterPropertiesSet方法是初始化bean的时候执行,通常用作数据初始化。(resolvedDataSources就是在这里赋值)
@Overridepublic void afterPropertiesSet() {...this.resolvedDataSources = new HashMap entry : this.targetDataSources.entrySet()) {Object lookupKey = resolveSpecifiedLookupKey(entry.getKey());DataSource dataSource = resolveSpecifiedDataSource(entry.getValue());this.resolvedDataSources.put(lookupKey, dataSource);}...} - 所以,我们只需创建
AbstractRoutingDataSource实现类DynamicDataSource然后初始化targetDataSources和key为数据源标识(可以是字符串、枚举、都行,因为标识是Object)、defaultTargetDataSource即可 - 后续当调用
AbstractRoutingDataSource.getConnection会接着调用提供的模板方法:determineTargetDataSource - 通过
determineTargetDataSource该方法返回的数据库标识从resolvedDataSources中拿到对应的数据源 - 所以,我们只需
DynamicDataSource中实现determineTargetDataSource为其提供一个数据库标识
总结,在整个代码中我们只需做4件大事:
- (1)定义
AbstractRoutingDataSource实现类DynamicDataSource - (2)初始化时为
targetDataSources设置不同数据源的DataSource和标识、及defaultTargetDataSource - (3)在
determineTargetDataSource中提供对应的数据源标识即可 - (4)切换数据源标识即可
什么到这还不会? 附上代码:
🍀(1)配置多数据源和 AbstractRoutingDataSource的自定义实现类:DynamicDataSource
配置多数据:
application.yml:
spring: datasource: type: com.alibaba.druid.pool.DruidDataSource datasource1: url: jdbc:mysql://127.0.0.1:3306/datasource1?serverTimezone=UTC&useUnicode=true&characterEncoding=UTF8&useSSL=false username: root password: 123456 initial-size: 1 min-idle: 1 max-active: 20 test-on-borrow: true driver-class-name: com.mysql.cj.jdbc.Driver datasource2: url: jdbc:mysql://127.0.0.1:3306/datasource2?serverTimezone=UTC&useUnicode=true&characterEncoding=UTF8&useSSL=false username: root password: 123456 initial-size: 1 min-idle: 1 max-active: 20 test-on-borrow: true driver-class-name: com.mysql.cj.jdbc.DriverDynamicDataSourceConfig.java:
@Configurationpublic class DynamicDataSourceConfig { @Bean @ConfigurationProperties("spring.datasource.datasource1") public DataSource firstDataSource(){ return DruidDataSourceBuilder.create().build(); } @Bean @ConfigurationProperties("spring.datasource.datasource2") public DataSource secondDataSource(){ return DruidDataSourceBuilder.create().build(); } @Bean @Primary public DynamicDataSource dataSource(DataSource firstDataSource, DataSource secondDataSource) { Map targetDataSources = new HashMap<>(5); targetDataSources.put(DataSourceNames.FIRST, firstDataSource); targetDataSources.put(DataSourceNames.SECOND, secondDataSource); return new DynamicDataSource(firstDataSource, targetDataSources); }} DynamicDataSource.java:
public class DynamicDataSource extends AbstractRoutingDataSource { private static final ThreadLocal CONTEXT_HOLDER = new ThreadLocal<>(); public DynamicDataSource(DataSource defaultTargetDataSource, MaptargetDataSources) { super.setDefaultTargetDataSource(defaultTargetDataSource); super.setTargetDataSources(targetDataSources); super.afterPropertiesSet(); } @Override protected Object determineCurrentLookupKey() { return getDataSource(); } public static void setDataSource(String dataSource) { CONTEXT_HOLDER.set(dataSource); } public static String getDataSource() { return CONTEXT_HOLDER.get(); } public static void clearDataSource() { CONTEXT_HOLDER.remove(); }} 2️⃣多数据源切换方式
多数据源切换方式需要根据我们的具体需求进行选择:
🍀(1)AOP+自定义注解
用于不同业务的数据源: 一般利用AOP,结合自定义注解动态切换数据源
- (1)自定义注解
@Target({ElementType.METHOD,ElementType.TYPE})@Retention(RetentionPolicy.RUNTIME)public @interface WR { String value() default "W";}- (2)切面类
@Component@Aspectpublic class DynamicDataSourceAspect { // 前置通知 @Before("within(com.tuling.dynamic.datasource.service.impl.*) && @annotation(wr)") public void before(JoinPoint joinPoint, WR wr){ System.out.println(wr.value()); }}- (3)使用注解
@Servicepublic class FrendImplService implements FrendService { @Autowired FrendMapper frendMapper; @Override @WR("R") // 库2 public List list() { return frendMapper.list(); } @Override @WR("W") // 库1 public void save(Frend frend) { frendMapper.save(frend); }} 🍀(2)MyBatis插件
用于读写分离的数据源:如果是MyBatis可以结合插件实现读写分离动态切换数据源
@Intercepts( {@Signature(type = Executor.class, method = "update", args = {MappedStatement.class, Object.class}), @Signature(type = Executor.class, method = "query", args = {MappedStatement.class, Object.class, RowBounds.class,ResultHandler.class})})public class DynamicDataSourcePlugin implements Interceptor { @Override public Object intercept(Invocation invocation) throws Throwable { Object[] objects = invocation.getArgs(); MappedStatement ms = (MappedStatement) objects[0]; // 读方法 if (ms.getSqlCommandType().equals(SqlCommandType.SELECT)) { DynamicDataSource.name.set("R"); } else { // 写方法 DynamicDataSource.name.set("W"); } // 修改当前线程要选择的数据源的key return invocation.proceed(); } @Override public Object plugin(Object target) { if (target instanceof Executor) { return Plugin.wrap(target, this); } else { return target; } } @Override public void setProperties(Properties properties) { }}3️⃣Spring集成多个MyBatis框架实现多数据源

WDataSourceConfig.java:
@MapperScan(basePackages = "com.tuling.dynamic.datasource.mapper.w", sqlSessionFactoryRef = "wSqlSessionFactory")public class WDataSourceConfig { @Bean @Primary public SqlSessionFactory wSqlSessionFactory(@Qualifier("dataSource1") DataSource dataSource1) throws Exception { final SqlSessionFactoryBean sessionFactory = new SqlSessionFactoryBean(); sessionFactory.setDataSource(dataSource1); sessionFactory.setMapperLocations(new PathMatchingResourcePatternResolver().getResources("classpath:mapper/w org.apache.ibatis.session.Configuration configuration = new org.apache.ibatis.session.Configuration(); configuration.setLogImpl(StdOutImpl.class); sessionFactory.setConfiguration(configuration); return sessionFactory.getObject(); }}RDataSourceConfig.java:
@MapperScan(basePackages = "com.tuling.dynamic.datasource.mapper.r", sqlSessionFactoryRef = "rSqlSessionFactory")public class RMyBatisConfig { @Bean public SqlSessionFactory rSqlSessionFactory(@Qualifier("dataSource2") DataSource dataSource2) throws Exception { final SqlSessionFactoryBean sessionFactory = new SqlSessionFactoryBean(); sessionFactory.setDataSource(dataSource2); sessionFactory.setMapperLocations(new PathMatchingResourcePatternResolver().getResources("classpath:mapper/r org.apache.ibatis.session.Configuration configuration = new org.apache.ibatis.session.Configuration(); configuration.setLogImpl(StdOutImpl.class); sessionFactory.setConfiguration(configuration); return sessionFactory.getObject(); }}在多数据源下,由于涉及到数据库的多个读写。一旦发生异常就可能会导致数据不一致的情况, 在这种情况希望使用事务进行回退。
Spring的声明式事务在一次请求线程中只能使用一个数据源进行控制。
但是是对于多源数据库:
- (1)单一事务管理器(
TransactionManager)无法切换数据源,需要配置多个TransactionManager。 - (2)
@Transactionnal是无法管理多个数据源的。 如果想真正实现多源数据库事务控制,肯定是需要分布式事务。这里讲解多源数据库事务控制的一种变通方式。
@Beanpublic DataSourceTransactionManager transactionManager1(DynamicDataSource dataSource){ DataSourceTransactionManager dataSourceTransactionManager = new DataSourceTransactionManager(); dataSourceTransactionManager.setDataSource(dataSource); return dataSourceTransactionManager;}@Beanpublic DataSourceTransactionManager transactionManager2(DynamicDataSource dataSource){ DataSourceTransactionManager dataSourceTransactionManager = new DataSourceTransactionManager(); dataSourceTransactionManager.setDataSource(dataSource); return dataSourceTransactionManager;}1️⃣只使用主库TransactionManger
使用主库事务管理器,也就是说事务中产生异常时,只能回滚主库数据。但是因为数据操作顺序是先主后从,所以分一下三种情况:
- (1)主库插入时异常,主库未插成功,这时候从库还没来及插入,主从数据是还是一致的
- (2)主库插入成功,从库插入时异常,这时候在主库事务管理器监测到事务中存在异常,将之前插入的主库数据插入,主从数据还是一致的
- (3)主库插入成功,从库插入成功,事务结束,主从数据一致
@Override@WR("W")public void save(Frend frend) { frendMapper.save(frend); //int a=1/0; 1.主库插入时异常,主库未插成功,这时候从库还没来及插入,主从数据是还是一致的}@Override@WR("R")@Transactional(transactionManager = "transactionManager2",propagation= Propagation.REQUIRES_NEW)public void saveRead(Frend frend) { frend.setName("xushu"); frendMapper.save(frend); // int a=1/0; 2.主库插入成功,从库插入时异常,这时候在主库事务管理器监测到事务中存在异常,将之前插入的主库数据插入,主从数据还是一致的}@Override@Transactional(transactionManager = "transactionManager1")public void saveAll(Frend frend) {// 3. 无异常情况:主库插入成功,从库插入成功,事务结束,主从数据一致。FrendService self= (FrendService)AopContext.currentProxy();self.save(frend);self.saveRead(frend);//int a=1/0; 从库插入之后出现异常, 只能回滚主库数据 ,从库数据是无法回滚的 , 数据将不一致}当然这只是理想情况,例外情况:
- (4)从库插入之后出现异常, 只能回滚主库数据 ,从库数据是无法回滚的 , 数据将不一致
- (5)从库数据插入成功后,主库提交,这时候主库崩溃了,导致数据没插入,这时候从库数据也是无法回滚的。这种方式可以简单实现多源数据库的事务管理,但是无法处理上述情况。
2️⃣一个方法开启2个事务
spring编程式事务 :
// 读‐‐ 写库@Overridepublic void saveAll(Frend frend) { wtransactionTemplate.execute(wstatus ‐> { rtransactionTemplate.execute(rstatus ‐> { try{ saveW(frend); saveR(frend); int a=1/0; return true; }catch (Exception e){ wstatus.setRollbackOnly(); rstatus.setRollbackOnly(); return false; } }); return true; });}spring声明式事务:
@Transactional(transactionManager = "wTransactionManager")public void saveAll(Frend frend) throws Exception { FrendService frendService = (FrendService) AopContext.currentProxy(); frendService.saveAllR(frend);}@Transactional(transactionManager = "rTransactionManager",propagation = Propagation.REQUIRES_NEW )public void saveAllR(Frend frend) { saveW(frend); saveR(frend); int a = 1 / 0;}两三个数据源、事务场景比较少,基于 SpringBoot 的多数据源组件,功能强悍,支持 Seata 分布式事务。
- 支持数据源分组,适用于多种场景纯粹多库 读写分离 一主多从 混合模式。
- 支持数据库敏感配置信息加密 ENC()。
- 支持每个数据库独立初始化表结构schema和数据库database。
- 支持无数据源启动,支持懒加载数据源(需要的时候再创建连接)。
- 支持自定义注解,需继承DS(3.2.0+)。
- 提供并简化对Druid,HikariCp,BeeCp,Dbcp2的快速集成。
- 提供对MybatisPlus,Quartz,ShardingJdbc,P6sy,Jndi等组件的集成方案。
- 提供自定义数据源来源方案(如全从数据库加载)。
- 提供项目启动后动态增加移除数据源方案。
- 提供Mybatis环境下的纯读写分离方案。
- 提供使用spel动态参数解析数据源方案。内置spel,session,header,支持自定义。
- 支持多层数据源嵌套切换 。(ServiceA >>> ServiceB >>> ServiceC)。
- 提供基于seata的分布式事务方案。
- 提供本地多数据源事务方案。 附:不能和原生spring事务混用。
🍀(1)约定
- (1)本框架只做切换数据源 这件核心的事情,并不限制你的具体操作,切换了数据源可以做任何CRUD。
- (2)配置文件所有以下划线 _ 分割的数据源 首部 即为组的名称,相同组名称的数据源会放在一个组下。
- (3)切换数据源可以是组名,也可以是具体数据源名称。组名则切换时采用负载均衡算法切换,默认是轮询的。
- (4)默认的数据源名称为 master ,你可以通过
spring.datasource.dynamic.primary修改。 - (5)方法上的注解优先于类上注解。
- (6)DS支持继承抽象类上的DS,暂不支持继承接口上的DS。
🍀(2)使用方法
(1)引入dynamicdatasourcespringbootstarter。
com.baomidou dynamic‐datasource‐spring‐boot‐starter ${version} (2)配置数据源。
spring: datasource: dynamic: #设置默认的数据源或者数据源组,默认值即为master primary: master #严格匹配数据源,默认false. true未匹配到指定数据源时抛异常,false使用默认数据源 strict: false datasource: master: url: jdbc:mysql://xx.xx.xx.xx:3306/dynamic username: root password: 123456 driver-class-name: com.mysql.jdbc.Driver # 3.2.0开始支持SPI可省略此配置 slave_1: url: jdbc:mysql://xx.xx.xx.xx:3307/dynamic username: root password: 123456 driver-class-name: com.mysql.jdbc.Driver slave_2: url: ENC(xxxxx) # 内置加密,使用请查看详细文档 username: ENC(xxxxx) password: ENC(xxxxx) driver‐class‐name: com.mysql.jdbc.Driver #......省略 #以上会配置一个默认库master,一个组slave下有两个子库slave_1,slave_2# 多主多从 纯粹多库(记得设置primary) 混合配置spring: spring: spring: datasource: datasource: datasource: dynamic: dynamic: dynamic: datasource: datasource: datasource: master_1: mysql: master: master_2: oracle: slave_1: slave_1: sqlserver: slave_2: slave_2: postgresql: oracle_1: slave_3: h2: oracle_2:(3)使用@DS切换数据源。
@DS可以注解在方法上或类上,同时存在就近原则方法上注解优先于类上注解。
| 注解 | 结果 |
|---|---|
| 没有@DS | 默认数据源 |
| @DS(“dsName”) | dsName可以为组名也可以为具体某个库的名称 |
@Service@DS("slave")public class UserServiceImpl implements UserService { @Autowired private JdbcTemplate jdbcTemplate; public List selectAll() { return jdbcTemplate.queryForList("select * from user"); } @Override @DS("slave_1") public List selectByCondition() { return jdbcTemplate.queryForList("select * from user where age >10"); }}本地事务:
使用@DSTransactional即可, 不能和Spring@Transactional混用!
//在最外层的方法添加 @DSTransactional,底下调用的各个类该切数据源就正常使用DS切换数据源即可。 就是这么简单。~//如AService调用BService和CService的方法,A,B,C分别对应不同数据源。public class AService { @DS("a")//如果a是默认数据源则不需要DS注解。 @DSTransactional public void dosomething(){ BService.dosomething(); CService.dosomething(); }}public class BService { @DS("b") public void dosomething(){ //dosomething }}public class CService { @DS("c") public void dosomething(){ //dosomething }}只要@DSTransactional注解下任一环节发生异常,则全局多数据源事务回滚。
如果BC上也有@DSTransactional会有影响吗?答:没有影响的。
动态添加删除数据源:
通过DynamicRoutingDataSource 类即可,它就相当于我们之前自定义的那个DynamicDataSource。
@RestController@RequestMapping("/datasources")@Api(tags = "添加删除数据源")public class DataSourceController { @Autowired private DataSource dataSource; // private final DataSourceCreator dataSourceCreator; //3.3.1及以下版本使用这个通用 @Autowired private DefaultDataSourceCreator dataSourceCreator; @Autowired private BasicDataSourceCreator basicDataSourceCreator; @Autowired private JndiDataSourceCreator jndiDataSourceCreator; @Autowired private DruidDataSourceCreator druidDataSourceCreator; @Autowired private HikariDataSourceCreator hikariDataSourceCreator; @Autowired private BeeCpDataSourceCreator beeCpDataSourceCreator; @Autowired private Dbcp2DataSourceCreator dbcp2DataSourceCreator; @GetMapping @ApiOperation("获取当前所有数据源") public Set now() { DynamicRoutingDataSource ds = (DynamicRoutingDataSource) dataSource; return ds.getCurrentDataSources().keySet(); } //通用数据源会根据maven中配置的连接池根据顺序依次选择。 //默认的顺序为druid>hikaricp>beecp>dbcp>spring basic @PostMapping("/add") @ApiOperation("通用添加数据源(推荐)") public Set add(@Validated @RequestBody DataSourceDTO dto) { DataSourceProperty dataSourceProperty = new DataSourceProperty(); BeanUtils.copyProperties(dto, dataSourceProperty); DynamicRoutingDataSource ds = (DynamicRoutingDataSource) dataSource; DataSource dataSource = dataSourceCreator.createDataSource(dataSourceProperty); ds.addDataSource(dto.getPollName(), dataSource); return ds.getCurrentDataSources().keySet(); } @PostMapping("/addBasic(强烈不推荐,除了用了马上移除)") @ApiOperation(value = "添加基础数据源", notes = "调用Springboot内置方法创建数据源,兼容1,2") public Set addBasic(@Validated @RequestBody DataSourceDTO dto) { DataSourceProperty dataSourceProperty = new DataSourceProperty(); BeanUtils.copyProperties(dto, dataSourceProperty); DynamicRoutingDataSource ds = (DynamicRoutingDataSource) dataSource; DataSource dataSource = basicDataSourceCreator.createDataSource(dataSourceProperty); ds.addDataSource(dto.getPollName(), dataSource); return ds.getCurrentDataSources().keySet(); } @PostMapping("/addJndi") @ApiOperation("添加JNDI数据源") public Set addJndi(String pollName, String jndiName) { DynamicRoutingDataSource ds = (DynamicRoutingDataSource) dataSource; DataSource dataSource = jndiDataSourceCreator.createDataSource(jndiName); ds.addDataSource(pollName, dataSource); return ds.getCurrentDataSources().keySet(); } @PostMapping("/addDruid") @ApiOperation("基础Druid数据源") public Set addDruid(@Validated @RequestBody DataSourceDTO dto) { DataSourceProperty dataSourceProperty = new DataSourceProperty(); BeanUtils.copyProperties(dto, dataSourceProperty); dataSourceProperty.setLazy(true); DynamicRoutingDataSource ds = (DynamicRoutingDataSource) dataSource; DataSource dataSource = druidDataSourceCreator.createDataSource(dataSourceProperty); ds.addDataSource(dto.getPollName(), dataSource); return ds.getCurrentDataSources().keySet(); } @PostMapping("/addHikariCP") @ApiOperation("基础HikariCP数据源") public Set addHikariCP(@Validated @RequestBody DataSourceDTO dto) { DataSourceProperty dataSourceProperty = new DataSourceProperty(); BeanUtils.copyProperties(dto, dataSourceProperty); dataSourceProperty.setLazy(true);//3.4.0版本以下如果有此属性,需手动设置,不然会空指针。 DynamicRoutingDataSource ds = (DynamicRoutingDataSource) dataSource; DataSource dataSource = hikariDataSourceCreator.createDataSource(dataSourceProperty); ds.addDataSource(dto.getPollName(), dataSource); return ds.getCurrentDataSources().keySet(); } @PostMapping("/addBeeCp") @ApiOperation("基础BeeCp数据源") public Set addBeeCp(@Validated @RequestBody DataSourceDTO dto) { DataSourceProperty dataSourceProperty = new DataSourceProperty(); BeanUtils.copyProperties(dto, dataSourceProperty); dataSourceProperty.setLazy(true);//3.4.0版本以下如果有此属性,需手动设置,不然会空指针。 DynamicRoutingDataSource ds = (DynamicRoutingDataSource) dataSource; DataSource dataSource = beeCpDataSourceCreator.createDataSource(dataSourceProperty); ds.addDataSource(dto.getPollName(), dataSource); return ds.getCurrentDataSources().keySet(); } @PostMapping("/addDbcp") @ApiOperation("基础Dbcp数据源") public Set addDbcp(@Validated @RequestBody DataSourceDTO dto) { DataSourceProperty dataSourceProperty = new DataSourceProperty(); BeanUtils.copyProperties(dto, dataSourceProperty); dataSourceProperty.setLazy(true);//3.4.0版本以下如果有此属性,需手动设置,不然会空指针。 DynamicRoutingDataSource ds = (DynamicRoutingDataSource) dataSource; DataSource dataSource = dbcp2DataSourceCreator.createDataSource(dataSourceProperty); ds.addDataSource(dto.getPollName(), dataSource); return ds.getCurrentDataSources().keySet(); } @DeleteMapping @ApiOperation("删除数据源") public String remove(String name) { DynamicRoutingDataSource ds = (DynamicRoutingDataSource) dataSource; ds.removeDataSource(name); return "删除成功"; }} 原理:
- (1)通过
DynamicDataSourceAutoConfiguration自动配置类 - (2)配置了
DynamicRoutingDataSource它就相当于我们之前自定义的那个DynamicDataSource,用来动态提供数据源 - (3)配置
DynamicDataSourceAnnotationAdvisor就相当于之前自定义的一个切面类 - (4)设置
DynamicDataSourceAnnotationInterceptor当前advisor的拦截器,把它理解成之前环绕通知 - (5)当执行方法会调用
DynamicDataSourceAnnotationInterceptor#invoke 来进行增强:
// 获取当前方法的DS注解的value值String dsKey = determineDatasourceKey(invocation);// 设置当当前数据源的标识TheardLocal中DynamicDataSourceContextHolder.push(dsKey);try { // 执行目标方法 return invocation.proceed();} finally { DynamicDataSourceContextHolder.poll();}- (6)在执行数据库操作时候, 就会调用
DataSource.getConnection,此时的DataSource指的就是DynamicRoutingDataSource - (7)然后执行模板方法
@Overridepublic DataSource determineDataSource() { // 拿到之前切换的数据源标识 String dsKey = DynamicDataSourceContextHolder.peek(); // 通过该标识获取对应的数据源 return getDataSource(dsKey);}
👉Java全栈学习路线可参考:【Java全栈学习路线】最全的Java学习路线及知识清单,Java自学方向指引,内含最全Java全栈学习技术清单~
👉算法刷题路线可参考:算法刷题路线总结与相关资料分享,内含最详尽的算法刷题路线指南及相关资料分享~
来源地址:https://blog.csdn.net/qq_42146402/article/details/127907963


