这篇文章给大家介绍使用springboot怎么在后台上传图片,内容非常详细,感兴趣的小伙伴们可以参考借鉴,希望对大家能有所帮助。
先配置启动类
继承WebMvcConfigurer
重写方法
@SpringBootApplication//@MapperScan("com.example.demo.Mapper")public class DemoApplication implements WebMvcConfigurer { public static void main(String[] args) { SpringApplication.run(DemoApplication.class, args); } @Override public void addResourceHandlers(ResourceHandlerRegistry registry){ registry.addResourceHandler("/imctemp-rainy public boolean doUpload(MultipartFile attach, HttpServletRequest request, String uploader){ if(!attach.isEmpty()){ originalFilename = attach.getOriginalFilename(); System.out.println("==>上传的文件名:"+originalFilename); suffix = originalFilename.substring(originalFilename.lastIndexOf(".")); System.out.println("==>上传的文件后缀名:"+suffix); size = attach.getSize(); System.out.println("==>上传文件的大小:"+size); String currentFilename = System.currentTimeMillis()+ UUID.randomUUID().toString() + suffix; System.out.println("==>存储的上传文件名:"+currentFilename); realPath = "D:/image/"+uploader ; System.out.println("==>上传文件保存的真实路径:"+realPath); File targetFile = new File(realPath, currentFilename); if(!targetFile.exists()){ targetFile.mkdirs(); } try{ attach.transferTo(targetFile); }catch (Exception e){ e.printStackTrace(); return false; } realPath = realPath + "/" + currentFilename;// dbPath = request.getContextPath() + "/" + uploader + "/" + new SimpleDateFormat("yyyy-MM-dd").format(new Date()) + "/" + currentFilename; dbPath = "/" + uploader + "/" + currentFilename; return true; }else{ return false; } } public String getUploadFile(){ return dbPath; }}其中关于路径都需要改成自己存放图片的路径

3.Controller层
@RestControllerpublic class UserPhotoController { @RequestMapping(value = "/upload",method = RequestMethod.POST) @ResponseBody public String testUpload(@RequestParam("file") MultipartFile file, HttpServletRequest request) { UploadUtil uploadUtil = new UploadUtil(); String fileName = ""; if (uploadUtil.doUpload(file, request, "uploadImg")) { fileName = uploadUtil.getUploadFile(); } else { fileName = "file"; } return fileName; }}完成。
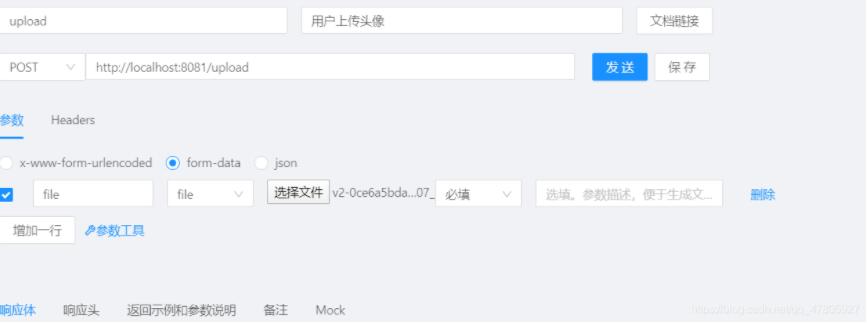
附上RunApi接口测试工具测试过程(测试工具大同小异都是差不多步骤(如postman))

Headers:
注意这里的Headers部分不要写任何东西。
如果之前是有Content-Type头信息, 那么就会上传失败.
参数选择form-data
key:后台规定的接收文件的名称参数(切记不是你传的图片名称)
(比如我是file)
key的格式选择为File
value:自动变成 选择文件
点击发送
可以发现-上传图片成功(存到了你设置的路径中自动创建upload文件夹)
控制台也输出了你上传的图片信息

关于使用springboot怎么在后台上传图片就分享到这里了,希望以上内容可以对大家有一定的帮助,可以学到更多知识。如果觉得文章不错,可以把它分享出去让更多的人看到。


