这篇文章主要介绍了Android3D如何实现滑动菜单,具有一定借鉴价值,感兴趣的朋友可以参考下,希望大家阅读完这篇文章之后大有收获,下面让小编带着大家一起了解一下。
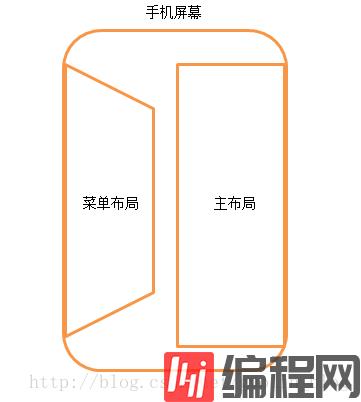
首先来讲一下这次的实现原理吧,其实传统的滑动菜单功能就是把菜单部分放在了下面,主布局放在了上面,然后根据手指滑动的距离来偏移主布局,让菜单部分得以显示出来就行了。不过我们这次既然要做推拉门式的立体效果,就需要将传统的思维稍微转变一下,可以先让菜单部分隐藏掉,但却复制一个菜单的镜像并生成一张图片,然后在手指滑动的时候对这张图片进行三维操作,让它产生推拉门式的效果,等滑动操作结束的时候,才让真正的菜单显示出来,然后将这个图片隐藏。原理示意图如下所示:

那么下面我们就开始动手实现吧,首先新建一个Android项目,起名叫做ThreeDSlidingLayoutDemo。
然后新建一个Image3dView类继承自View,用于生成镜像图片,以及完成三维操作,代码如下所示:
public class Image3dView extends View { private View sourceView; private Bitmap sourceBitmap; private float sourceWidth; private Matrix matrix = new Matrix(); private Camera camera = new Camera(); public Image3dView(Context context, AttributeSet attrs) { super(context, attrs); } public void setSourceView(View view) { sourceView = view; sourceWidth = sourceView.getWidth(); } public void clearSourceBitmap() { if (sourceBitmap != null) { sourceBitmap = null; } } @Override protected void onDraw(Canvas canvas) { super.onDraw(canvas); if (sourceBitmap == null) { getSourceBitmap(); } // 计算图片需要旋转的角度 float degree = 90 - (90 / sourceWidth) * getWidth(); camera.save(); camera.rotateY(degree); camera.getMatrix(matrix); camera.restore(); // 将旋转的中心点移动到屏幕左边缘的中间位置 matrix.preTranslate(0, -getHeight() / 2); matrix.postTranslate(0, getHeight() / 2); canvas.drawBitmap(sourceBitmap, matrix, null); } private void getSourceBitmap() { if (sourceView != null) { sourceView.setDrawingCacheEnabled(true); sourceView.layout(0, 0, sourceView.getWidth(), sourceView.getHeight()); sourceView.buildDrawingCache(); sourceBitmap = sourceView.getDrawingCache(); } } }可以看到,Image3dView中提供了一个setSourceView()方法,用于传递源视图进来,我们稍后复制镜像就是对它进行复制。然后在onDraw()方法里对sourceBitmap进行判断,如果为空,则去调用getSourceBitmap()方法来生成一张镜像图片,getSourceBitmap()方法的细节大家自己去看。在获得了镜像图片之后,接下来就是要计算图片的旋转角度了,这里根据Image3dView当前的宽度和源视图的总宽度进行对比,按比例算出旋转的角度。然后调用Camera的rotateY()方法,让图片团练Y轴进行旋转,并将旋转的中心点移动到屏幕左边缘的中间位置,这几行代码我们在上篇文章中已经见过了,算是挺熟悉了吧!最后调用Canvas的drawBitmap()方法把图片绘制出来。
完成了Image3dView之后,接着我们要开始编写滑动菜单部分的代码,其实这次的代码和之前的滑动菜单代码大同小异,看过我前面文章的朋友,这次理解起来一定会轻而易举。新建ThreeDSlidingLayout类,代码如下所示:
public class ThreeDSlidingLayout extends RelativeLayout implements OnTouchListener { public static final int SNAP_VELOCITY = 200; public static final int DO_NOTHING = 0; public static final int SHOW_MENU = 1; public static final int HIDE_MENU = 2; private int slideState; private int screenWidth; private int leftEdge = 0; private int rightEdge = 0; private int touchSlop; private float xDown; private float yDown; private float xMove; private float yMove; private float xUp; private boolean isLeftLayoutVisible; private boolean isSliding; private boolean loadOnce; private View leftLayout; private View rightLayout; private Image3dView image3dView; private View mBindView; private MarginLayoutParams leftLayoutParams; private MarginLayoutParams rightLayoutParams; private ViewGroup.LayoutParams image3dViewParams; private VelocityTracker mVelocityTracker; public ThreeDSlidingLayout(Context context, AttributeSet attrs) { super(context, attrs); WindowManager wm = (WindowManager) context.getSystemService(Context.WINDOW_SERVICE); screenWidth = wm.getDefaultDisplay().getWidth(); touchSlop = ViewConfiguration.get(context).getScaledTouchSlop(); } public void setScrollEvent(View bindView) { mBindView = bindView; mBindView.setOnTouchListener(this); } public void scrollToLeftLayout() { image3dView.clearSourceBitmap(); new ScrollTask().execute(-10); } public void scrollToRightLayout() { image3dView.clearSourceBitmap(); new ScrollTask().execute(10); } public boolean isLeftLayoutVisible() { return isLeftLayoutVisible; } @Override protected void onLayout(boolean changed, int l, int t, int r, int b) { super.onLayout(changed, l, t, r, b); if (changed && !loadOnce) { // 获取左侧布局对象 leftLayout = findViewById(R.id.menu); leftLayoutParams = (MarginLayoutParams) leftLayout.getLayoutParams(); rightEdge = -leftLayoutParams.width; // 获取右侧布局对象 rightLayout = findViewById(R.id.content); rightLayoutParams = (MarginLayoutParams) rightLayout.getLayoutParams(); rightLayoutParams.width = screenWidth; rightLayout.setLayoutParams(rightLayoutParams); // 获取3D视图对象 image3dView = (Image3dView) findViewById(R.id.image_3d_view); // 将左侧布局传入3D视图中作为生成源 image3dView.setSourceView(leftLayout); loadOnce = true; } } @Override public boolean onTouch(View v, MotionEvent event) { createVelocityTracker(event); switch (event.getAction()) { case MotionEvent.ACTION_DOWN: // 手指按下时,记录按下时的横坐标 xDown = event.getRawX(); yDown = event.getRawY(); slideState = DO_NOTHING; break; case MotionEvent.ACTION_MOVE: // 手指移动时,对比按下时的横坐标,计算出移动的距离,来调整右侧布局的leftMargin值,从而显示和隐藏左侧布局 xMove = event.getRawX(); yMove = event.getRawY(); int moveDistanceX = (int) (xMove - xDown); int moveDistanceY = (int) (yMove - yDown); checkSlideState(moveDistanceX, moveDistanceY); switch (slideState) { case SHOW_MENU: rightLayoutParams.rightMargin = -moveDistanceX; onSlide(); break; case HIDE_MENU: rightLayoutParams.rightMargin = rightEdge - moveDistanceX; onSlide(); break; default: break; } break; case MotionEvent.ACTION_UP: xUp = event.getRawX(); int upDistanceX = (int) (xUp - xDown); if (isSliding) { // 手指抬起时,进行判断当前手势的意图 switch (slideState) { case SHOW_MENU: if (shouldScrollToLeftLayout()) { scrollToLeftLayout(); } else { scrollToRightLayout(); } break; case HIDE_MENU: if (shouldScrollToRightLayout()) { scrollToRightLayout(); } else { scrollToLeftLayout(); } break; default: break; } } else if (upDistanceX < touchSlop && isLeftLayoutVisible) { scrollToRightLayout(); } recycleVelocityTracker(); break; } if (v.isEnabled()) { if (isSliding) { unFocusBindView(); return true; } if (isLeftLayoutVisible) { return true; } return false; } return true; } private void onSlide() { checkSlideBorder(); rightLayout.setLayoutParams(rightLayoutParams); image3dView.clearSourceBitmap(); image3dViewParams = image3dView.getLayoutParams(); image3dViewParams.width = -rightLayoutParams.rightMargin; // 滑动的同时改变3D视图的大小 image3dView.setLayoutParams(image3dViewParams); // 保证在滑动过程中3D视图可见,左侧布局不可见 showImage3dView(); } private void checkSlideState(int moveDistanceX, int moveDistanceY) { if (isLeftLayoutVisible) { if (!isSliding && Math.abs(moveDistanceX) >= touchSlop && moveDistanceX < 0) { isSliding = true; slideState = HIDE_MENU; } } else if (!isSliding && Math.abs(moveDistanceX) >= touchSlop && moveDistanceX > 0 && Math.abs(moveDistanceY) < touchSlop) { isSliding = true; slideState = SHOW_MENU; } } private void checkSlideBorder() { if (rightLayoutParams.rightMargin > leftEdge) { rightLayoutParams.rightMargin = leftEdge; } else if (rightLayoutParams.rightMargin < rightEdge) { rightLayoutParams.rightMargin = rightEdge; } } private boolean shouldScrollToLeftLayout() { return xUp - xDown > leftLayoutParams.width / 2 || getScrollVelocity() > SNAP_VELOCITY; } private boolean shouldScrollToRightLayout() { return xDown - xUp > leftLayoutParams.width / 2 || getScrollVelocity() > SNAP_VELOCITY; } private void createVelocityTracker(MotionEvent event) { if (mVelocityTracker == null) { mVelocityTracker = VelocityTracker.obtain(); } mVelocityTracker.addMovement(event); } private int getScrollVelocity() { mVelocityTracker.computeCurrentVelocity(1000); int velocity = (int) mVelocityTracker.getXVelocity(); return Math.abs(velocity); } private void recycleVelocityTracker() { mVelocityTracker.recycle(); mVelocityTracker = null; } private void unFocusBindView() { if (mBindView != null) { mBindView.setPressed(false); mBindView.setFocusable(false); mBindView.setFocusableInTouchMode(false); } } private void showImage3dView() { if (image3dView.getVisibility() != View.VISIBLE) { image3dView.setVisibility(View.VISIBLE); } if (leftLayout.getVisibility() != View.INVISIBLE) { leftLayout.setVisibility(View.INVISIBLE); } } class ScrollTask extends AsyncTask<Integer, Integer, Integer> { @Override protected Integer doInBackground(Integer... speed) { int rightMargin = rightLayoutParams.rightMargin; // 根据传入的速度来滚动界面,当滚动到达左边界或右边界时,跳出循环。 while (true) { rightMargin = rightMargin + speed[0]; if (rightMargin < rightEdge) { rightMargin = rightEdge; break; } if (rightMargin > leftEdge) { rightMargin = leftEdge; break; } publishProgress(rightMargin); // 为了要有滚动效果产生,每次循环使线程睡眠5毫秒,这样肉眼才能够看到滚动动画。 sleep(5); } if (speed[0] > 0) { isLeftLayoutVisible = false; } else { isLeftLayoutVisible = true; } isSliding = false; return rightMargin; } @Override protected void onProgressUpdate(Integer... rightMargin) { rightLayoutParams.rightMargin = rightMargin[0]; rightLayout.setLayoutParams(rightLayoutParams); image3dViewParams = image3dView.getLayoutParams(); image3dViewParams.width = -rightLayoutParams.rightMargin; image3dView.setLayoutParams(image3dViewParams); showImage3dView(); unFocusBindView(); } @Override protected void onPostExecute(Integer rightMargin) { rightLayoutParams.rightMargin = rightMargin; rightLayout.setLayoutParams(rightLayoutParams); image3dViewParams = image3dView.getLayoutParams(); image3dViewParams.width = -rightLayoutParams.rightMargin; image3dView.setLayoutParams(image3dViewParams); if (isLeftLayoutVisible) { // 保证在滑动结束后左侧布局可见,3D视图不可见。 image3dView.setVisibility(View.INVISIBLE); leftLayout.setVisibility(View.VISIBLE); } } } private void sleep(long millis) { try { Thread.sleep(millis); } catch (InterruptedException e) { e.printStackTrace(); } } }代码比较长,我还是带着大家来理一下思路。首先在onLayout方法中,我们分别初始化了左侧布局对象、右侧布局对象和Image3dView对象,这三个对象稍后都要配置到Activity布局里面的。在onLayout()方法的最后,调用了Image3dView的setSourceView()方法,并将左侧布局对象传了进去,说明我们后面就要对它进行镜像复制。
当手指在界面上拖动来显示左侧布局的时候,就会进入到onTouch()方法中,这里会调用checkSlideState()方法来检查滑动的状态,以判断用户是想要显示左侧布局还是隐藏左侧布局,然后根据手指滑动的距离对右侧布局进行偏移,就可以实现基本的滑动效果了。接下来是重点内容,这里会根据右侧布局的偏移量来改变Image3dView的宽度,当Image3dView大小发生改变时,当然会调用onDraw()方法来进行重绘,此时我们编写的三维旋转逻辑就可以得到执行了,于是就会产生立体的推拉门式效果。注意,在整个的滑动过程中,真正的左侧布局一直都是不可见的,我们所看到的只是它的一张镜像图片。
当手指离开屏幕后,会根据当前的移动距离来决定是显示左侧布局还是隐藏左侧布局,并会调用scrollToLeftLayout()方法或scrollToRightLayout()方法来完成后续的滚动操作。当整个滚动操作完成之后,才会将真正的左侧布局显示出来,再把镜像图片隐藏掉,这样用户就可以点击左侧布局上按钮之类的东西了。
接着我们需要在Activity的布局文件当中去引用这个三维滑动菜单框架,打开或新建activity_main.xml作为程序的主布局文件,代码如下所示:
<com.example.slidinglayout3d.ThreeDSlidingLayout xmlns:android="http://schemas.android.com/apk/res/android" xmlns:tools="http://schemas.android.com/tools" android:id="@+id/slidingLayout" android:layout_width="fill_parent" android:layout_height="fill_parent" > <RelativeLayout android:id="@+id/menu" android:layout_width="270dip" android:layout_height="fill_parent" android:layout_alignParentLeft="true" android:background="#00ccff" android:visibility="invisible" > <LinearLayout android:layout_width="match_parent" android:layout_height="wrap_content" android:layout_centerInParent="true" android:orientation="vertical" > <TextView android:layout_width="wrap_content" android:layout_height="wrap_content" android:layout_gravity="center_horizontal" android:text="This is menu" android:textColor="#000000" android:textSize="28sp" /> <Button android:layout_width="wrap_content" android:layout_height="wrap_content" android:layout_gravity="center_horizontal" android:text="Test Button" /> </LinearLayout> </RelativeLayout> <LinearLayout android:id="@+id/content" android:layout_width="320dip" android:layout_height="fill_parent" android:layout_alignParentRight="true" android:background="#e9e9e9" android:orientation="vertical" android:visibility="visible" > <Button android:id="@+id/menuButton" android:layout_width="wrap_content" android:layout_height="wrap_content" android:text="Menu" /> <ListView android:id="@+id/contentList" android:layout_width="fill_parent" android:layout_height="fill_parent" android:cacheColorHint="#00000000" > </ListView> </LinearLayout> <com.example.slidinglayout3d.Image3dView android:id="@+id/image_3d_view" android:layout_width="wrap_content" android:layout_height="wrap_content" android:layout_alignParentLeft="true" android:visibility="invisible" /> </com.example.slidinglayout3d.ThreeDSlidingLayout>可以看到,在最外层的ThreeDSlidingLayout布局里面,我们放入了三个直接子布局,第一个RelativeLayout也就是左侧布局了,里面简单地放了一个TextView和一个按钮。第二个LinearLayout是右侧布局,里面放入了一个按钮和一个ListView,都是用于显示左侧布局而准备的。第三个是Image3dView,当然是用于在滑动过程中显示左侧布局的镜像图片了。
最后,打开或新建MainActivity作为程序的主Activity,在里面加入如下代码:
public class MainActivity extends Activity { private ThreeDSlidingLayout slidingLayout; private Button menuButton; private ListView contentListView; private ArrayAdapter<String> contentListAdapter; private String[] contentItems = { "Content Item 1", "Content Item 2", "Content Item 3", "Content Item 4", "Content Item 5", "Content Item 6", "Content Item 7", "Content Item 8", "Content Item 9", "Content Item 10", "Content Item 11", "Content Item 12", "Content Item 13", "Content Item 14", "Content Item 15", "Content Item 16" }; @Override protected void onCreate(Bundle savedInstanceState) { super.onCreate(savedInstanceState); setContentView(R.layout.activity_main); slidingLayout = (ThreeDSlidingLayout) findViewById(R.id.slidingLayout); menuButton = (Button) findViewById(R.id.menuButton); contentListView = (ListView) findViewById(R.id.contentList); contentListAdapter = new ArrayAdapter<String>(this, android.R.layout.simple_list_item_1, contentItems); contentListView.setAdapter(contentListAdapter); // 将监听滑动事件绑定在contentListView上 slidingLayout.setScrollEvent(contentListView); menuButton.setOnClickListener(new OnClickListener() { @Override public void onClick(View v) { if (slidingLayout.isLeftLayoutVisible()) { slidingLayout.scrollToRightLayout(); } else { slidingLayout.scrollToLeftLayout(); } } }); contentListView.setOnItemClickListener(new OnItemClickListener() { @Override public void onItemClick(AdapterView<?> parent, View view, int position, long id) { String text = contentItems[position]; Toast.makeText(MainActivity.this, text, Toast.LENGTH_SHORT).show(); } }); } }这些代码应该都非常简单和眼熟了吧,和以前滑动菜单中的代码完全一样,调用ThreeDSlidingLayout的setScrollEvent方法,将ListView作为绑定布局传入,这样就可以通过拖动ListView来显示或隐藏左侧布局。并且在按钮的点击事件里也加入了显示和隐藏左侧布局的逻辑。
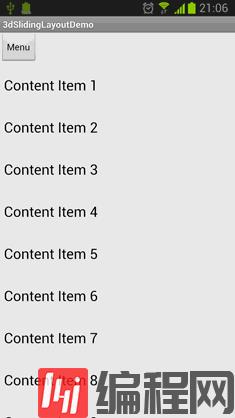
好了,这样所有的编码工作就已经完成了,让我们来运行一下吧,效果如下图所示:

感谢你能够认真阅读完这篇文章,希望小编分享的“Android3D如何实现滑动菜单”这篇文章对大家有帮助,同时也希望大家多多支持编程网,关注编程网行业资讯频道,更多相关知识等着你来学习!


