这篇文章主要介绍“Java SpringBoot整合JSP和MyBatis的方法是什么”,在日常操作中,相信很多人在Java SpringBoot整合JSP和MyBatis的方法是什么问题上存在疑惑,小编查阅了各式资料,整理出简单好用的操作方法,希望对大家解答”Java SpringBoot整合JSP和MyBatis的方法是什么”的疑惑有所帮助!接下来,请跟着小编一起来学习吧!
Spring Boot starter入门
传统的 Spring 项目想要运行,不仅需要导入各种依赖,还要对各种 XML 配置文件进行配置,十分繁琐,但 Spring Boot 项目在创建完成后,即使不编写任何代码,不进行任何配置也能够直接运行,这都要归功于 Spring Boot 的 starter 机制
Spring Boot 将日常企业应用研发中的各种场景都抽取出来,做成一个个的 starter(启动器),starter 中整合了该场景下各种可能用到的依赖,用户只需要在 Maven 中引入 starter 依赖,SpringBoot 就能自动扫描到要加载的信息并启动相应的默认配置。starter 提供了大量的自动配置,让用户摆脱了处理各种依赖和配置的困扰。所有这些 starter 都遵循着约定成俗的默认配置,并允许用户调整这些配置,即遵循“约定大于配置”的原则
并不是所有的 starter 都是由 Spring Boot 官方提供的,也有部分 starter 是第三方技术厂商提供的,例如 druid-spring-boot-starter 和 mybatis-spring-boot-starter 等等。当然也存在个别第三方技术,Spring Boot 官方没提供 starter,第三方技术厂商也没有提供 starter
以 spring-boot-starter-web 为例,它能够为提供 Web 开发场景所需要的几乎所有依赖,因此在使用 Spring Boot 开发 Web 项目时,只需要引入该 Starter 即可,而不需要额外导入 Web 服务器和其他的 Web 依赖
<!--SpringBoot父项目依赖管理--> <parent> <groupId>org.springframework.boot</groupId> <artifactId>spring-boot-starter-parent</artifactId> <version>2.5.13</version> <relativePath/> </parent> <dependencies> <!--导入 spring-boot-starter-web--> <dependency> <groupId>org.springframework.boot</groupId> <artifactId>spring-boot-starter-web</artifactId> </dependency> ... </dependencies></project>您可能会发现一个问题,即在以上 pom.xml 的配置中,引入依赖 spring-boot-starter-web 时,并没有指明其版本(version),但在依赖树中,我们却看到所有的依赖都具有版本信息,那么这些版本信息是在哪里控制的呢?
其实,这些版本信息是由 spring-boot-starter-parent(版本仲裁中心) 统一控制的。
spring-boot-starter-parent
spring-boot-starter-parent 是所有 Spring Boot 项目的父级依赖,它被称为 Spring Boot 的版本仲裁中心,可以对项目内的部分常用依赖进行统一管理。
<!--SpringBoot父项目依赖管理--><parent> <groupId>org.springframework.boot</groupId> <artifactId>spring-boot-starter-parent</artifactId> <version>2.4.5</version> </parent>Spring Boot 项目可以通过继承 spring-boot-starter-parent 来获得一些合理的默认配置,它主要提供了以下特性:
默认 JDK 版本(Java 8)
默认字符集(UTF-8)
依赖管理功能
资源过滤
默认插件配置
识别 application.properties 和 application.yml 类型的配置文件
SpringBoot基本设置
1.1 SpringBoot设置端口号
server: port: 8989 #配置端口1.2 SpringBoot设置项目名
server: servlet: context-path: /springboot #配置项目的虚拟路径(根路径) 项目名使用/开头1.3 SpringBoot配置文件的拆分
spring: profiles: active: dev #开发环境
1.4 SpringBoot开启日志
# 显示sqllogging: level: cn.kgc.springboot.mapper: debug #开启日志1.5 SpringBoot实现热部署
在web项目的开放过程中,通常我们每次修改完代码都需要重新启动项目,实现重新部署。但是随着项目越来越庞大,每次启动都是一个费时的事情。所以,热部署是一个非常构建的技术,有了热部署,可以极大提高我们的开发效率
spring-boot-devtools实现热部署
引入依赖
<dependency> <groupId>org.springframework.boot</groupId> <artifactId>spring-boot-devtools</artifactId></dependency>配置maven插件
<build> <plugins> <plugin> <groupId>org.springframework.boot</groupId> <artifactId>spring-boot-maven-plugin</artifactId> <configuration> <fork>true</fork> <!-- 如果devtools不生效 请设置该属性 --> </configuration> </plugin> </plugins></build>配置application.yml文件
devtools: restart: enabled: true #开启热部署修改idea设置
File-Settings-Compiler 勾选 Build Project automatically
5.设置Registry
ctrl + shift + alt + / ,选择Registry,勾选Compiler autoMake allow when app running
1.6 SpringBoot开启分页查询
引入依赖:
<dependency> <groupId>com.github.pagehelper</groupId> <artifactId>pagehelper-spring-boot-starter</artifactId> <version>1.2.12</version></dependency>---------------------------------------------- <dependency> <groupId>com.github.pagehelper</groupId> <artifactId>pagehelper-spring-boot-starter</artifactId> <version>1.2.10</version></dependency>配置application.yml文件(可以不配置使用默认)
# pageHelper分页配置pagehelper: helper-dialect: mysql #数据库类型 reasonable: true #分页合理化 page<1 查询第一页 page >pageNumber 查询最后一页 support-methods-arguments: true # 支持mapper接口传递参数开启分页 params: count=countSql #用于从对象中根据属性名取值编写控制器,业务层,持久化层进行测试
@Overridepublic PageInfo<User> getPage(int pageNum, int pageSize) { PageHelper.startPage(pageNum, pageSize); List<User> userList = userMapper.selectList(); PageInfo<User> pageInfo = new PageInfo<>(userList); return pageInfo;}springBoot对象管理
管理对象
spring中管理对象的方式:
使用xml配置文件,在文件中使用bean标签设置对象的管理
<bean id="" class="xxx.xxx.xxx"></bean>使用注解 @Component @Controller @Service @Repository
springboot管理对象的方式:
使用配置方式创建对象
springboot支持使用 @Configuration 注解添加在配置类上,该类作为一个配置类,相当于spring的配置文件,该注解只能使用在类上。在配置类中方法上使用 @Bean 注解,相当于spring配置文件中的bean标签
@Configurationpublic class MyConfiguration{ @Bean public User getUser(){ return new User(); } @Bean public Student getStudent(){ return new Student(); }}使用原始的 spring 注解 @Component @Controller @Service @Repository
属性注入
spring 原始的注入方式
set方式
constructor
自动注入
name: tomage: 30price: 23.5sex: truebirth: 2021/11/28 12:12:12array: 12,13,15,17list: 李四,lisi,tommap: "{'aa':30,'bb':'lisi'}" # 注入map使用json格式 取值的个数#{${map}}对象的注入
object: name: lisi age: 20 birth: 2021/11/24@Controller@RequestMapping("/inject2")@ConfigurationProperties("object")public class InjectController2 { private String name; private Integer age; private Date birth; public void setName(String name) { this.name = name; } public void setAge(Integer age) { this.age = age; } public void setBirth(Date birth) { this.birth = birth; } @RequestMapping("/inject") @ResponseBody public String inject(){ System.out.println(name); System.out.println(age); System.out.println(birth); return "ok"; }}注意:添加一下依赖,可以再写yaml文件时提示,消除红色的警告提示。
<dependency> <groupId>org.springframework.boot</groupId> <artifactId>spring-boot-configuration-processor</artifactId> <optional>true</optional></dependency>springBoot整合JSP
引入依赖
<!-- 标准标签库--><dependency> <groupId>jstl</groupId> <artifactId>jstl</artifactId> <version>1.2</version></dependency><!-- 让springboot内置的tomcat具有解析jsp的能力--><dependency> <groupId>org.apache.tomcat.embed</groupId> <artifactId>tomcat-embed-jasper</artifactId></dependency>配置视图解析器
spring: mvc: view: prefix: / suffix: .jsp设置不重启项目 刷新jsp页面
server: servlet: jsp: init-parameters: development: true # 修改jsp页面无需重新启动项目集成后无法访问jsp页面解决方案
添加插件
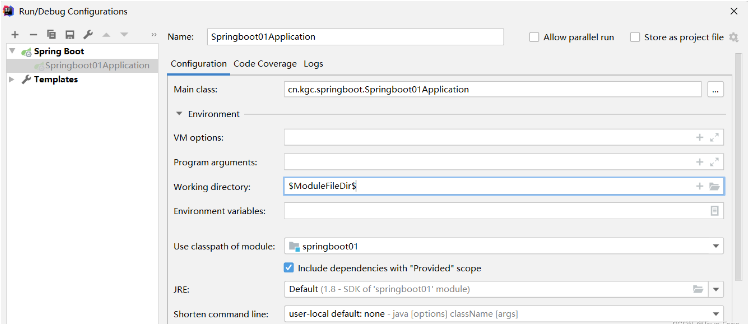
<build> <resources> <!--注册webapp目录为资源目录--> <resource> <directory>src/main/webapp</directory> <targetPath>META-INF/resources</targetPath> <includes> <include>**/*.*</include> </includes> </resource> </resources> <plugins> <plugin> <groupId>org.springframework.boot</groupId> <artifactId>spring-boot-maven-plugin</artifactId> </plugin> </plugins></build>设置工作目录

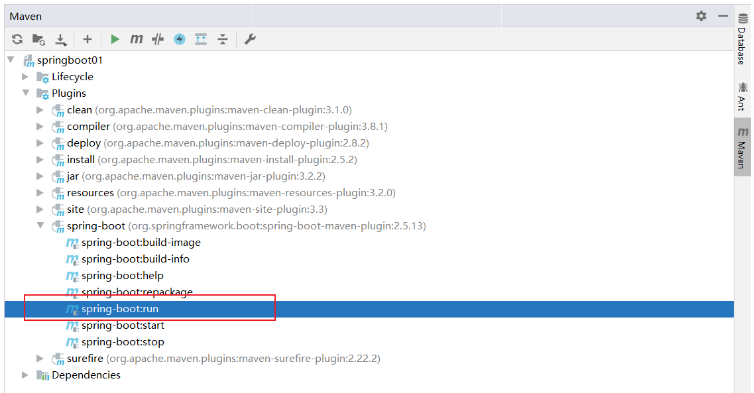
插件启动

SpringBoot整合MyBatis
引入依赖
<dependency> <groupId>mysql</groupId> <artifactId>mysql-connector-java</artifactId> <version>5.1.47</version></dependency><dependency> <groupId>org.mybatis.spring.boot</groupId> <artifactId>mybatis-spring-boot-starter</artifactId> <version>2.1.3</version></dependency><dependency> <groupId>com.alibaba</groupId> <artifactId>druid</artifactId> <version>1.1.12</version></dependency>编写配置文件
spring: datasource: type: com.alibaba.druid.pool.DruidDataSource driver-class-name: com.mysql.jdbc.Driver username: root password: root url: jdbc:mysql://localhost:3306/mybatis?serverTimezone=UTC&characterEncoding=utf-8mybatis配置
mybatis: mapper-locations: classpath:mapper/*.xml #设置mapper文件的位置 type-aliases-package: cn.kgc.springboot.entity # 起别名 configuration: map-underscore-to-camel-case: true #开启驼峰命名设置dao接口的扫描
在入口类上使用注解,完成扫描
@SpringBootApplication@MapperScan("cn.kgc.springboot.dao") //扫描dao接口所在的包 同时生成代理对象 注入spring容器public class Springday02Application { public static void main(String[] args) { SpringApplication.run(Springday02Application.class, args); }}到此,关于“Java SpringBoot整合JSP和MyBatis的方法是什么”的学习就结束了,希望能够解决大家的疑惑。理论与实践的搭配能更好的帮助大家学习,快去试试吧!若想继续学习更多相关知识,请继续关注编程网网站,小编会继续努力为大家带来更多实用的文章!


