小编给大家分享一下Python可视化工具Plotly怎么用,相信大部分人都还不怎么了解,因此分享这篇文章给大家参考一下,希望大家阅读完这篇文章后大有收获,下面让我们一起去了解一下吧!
一.简介
发展由来:
随着信息技术的发展和硬件设备成本的降低,当今的互联网存在海量的数据,要想快速从这些数据中获取更多有效的信息,数据可视化是重要的一环。对于Python语言来说,比较传统的数据可视化模块是Matplotlib,但它存在不够美观、静态性、不易分享等缺点,限制了Python在数据可视化方面的发展。
为了解决这个问题,新型的动态可视化开源模块Plotly应运而生。由于Plotly具有动态、美观、易用、种类丰富等特性,所以一经问世就受到开发人员的喜爱。
简要说明
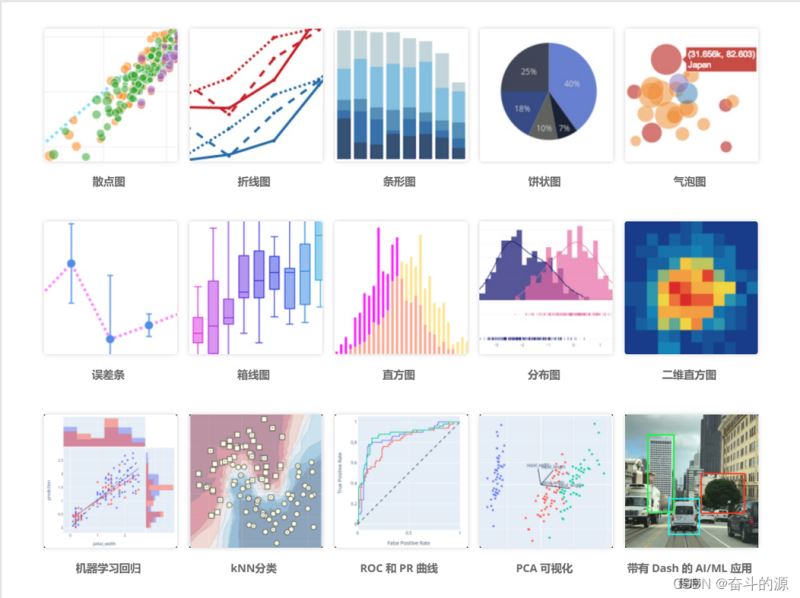
Plotly是Python 库中一种互动,开源绘图库,也是基于javascript的绘图库,支持 40 多种独特的图表类型,效果美观,其中涵盖各种统计、财务、地理、科学和三维用例。
有在线和离线模式,易于保存与分享plotly的绘图结果,并且可以与Web无缝集成;
ploty默认的绘图结果,是一个HTML网页文件,通过浏览器可以直接查看;
二.各图运用
安装:
pip install plotly下面均在Jupyter Notebook中运行
数据源:
import plotlyimport plotly.express as pximport plotly.graph_objects as goimport plotly.io as pioimport pandas as pdimport numpy as np# plotly内置了数据集,方便大家不受数据分析思路的背景下,练手用df=px.data.gapminder()df.head()运行结果:

1.柱状图
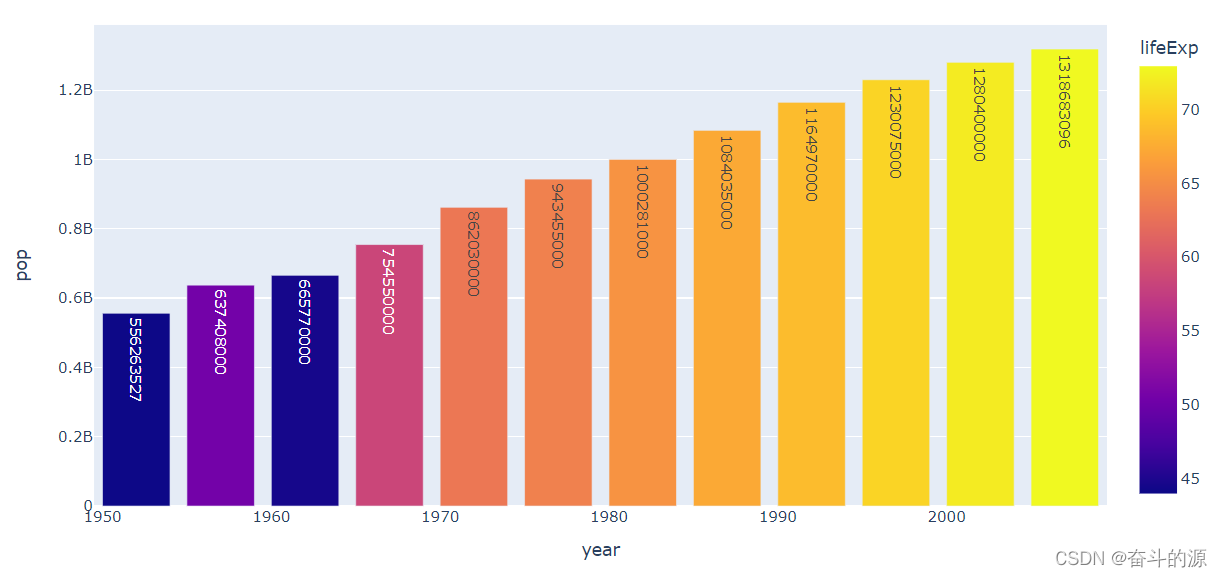
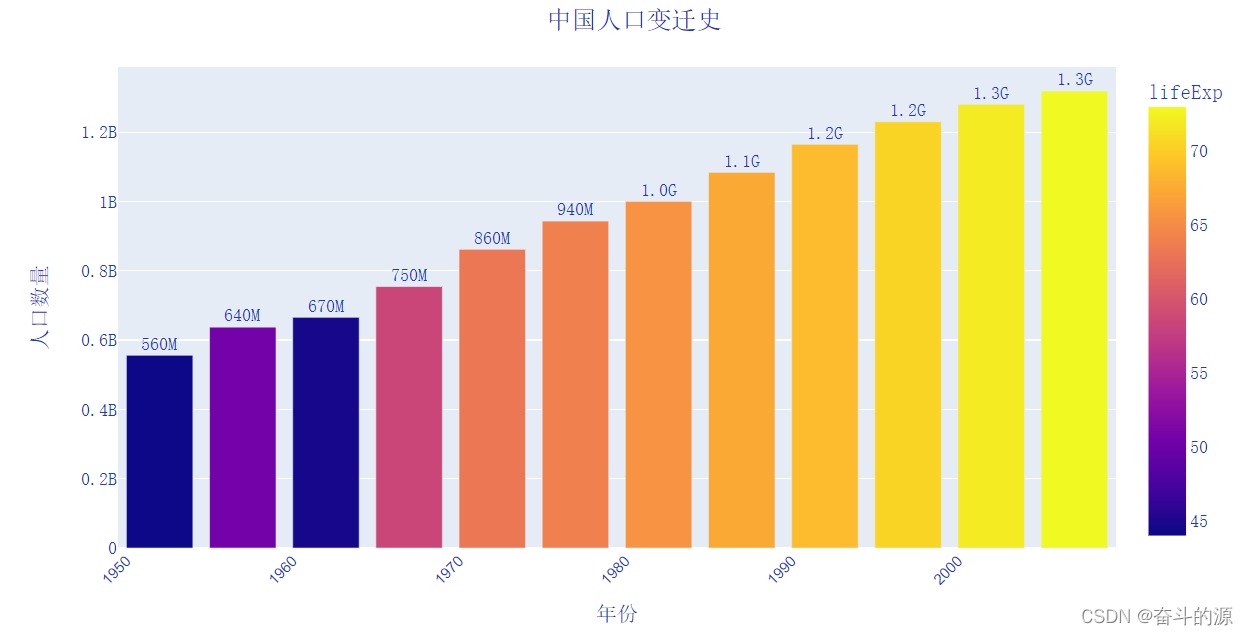
# 绘制中国历年人口变化图# df_country=df.query('country=="China"')df_country=df[df['country']=='China'] # 柱状图展示fig=px.bar(df_country, # 数据源 x='year', # 横坐标:年份 y='pop', # 纵坐标:人口 text='pop', # 说明:人口 color='lifeExp', # 颜色取值:根据平均寿命的值来取 hover_name='year', #控制点名称:年份 )fig运行结果:
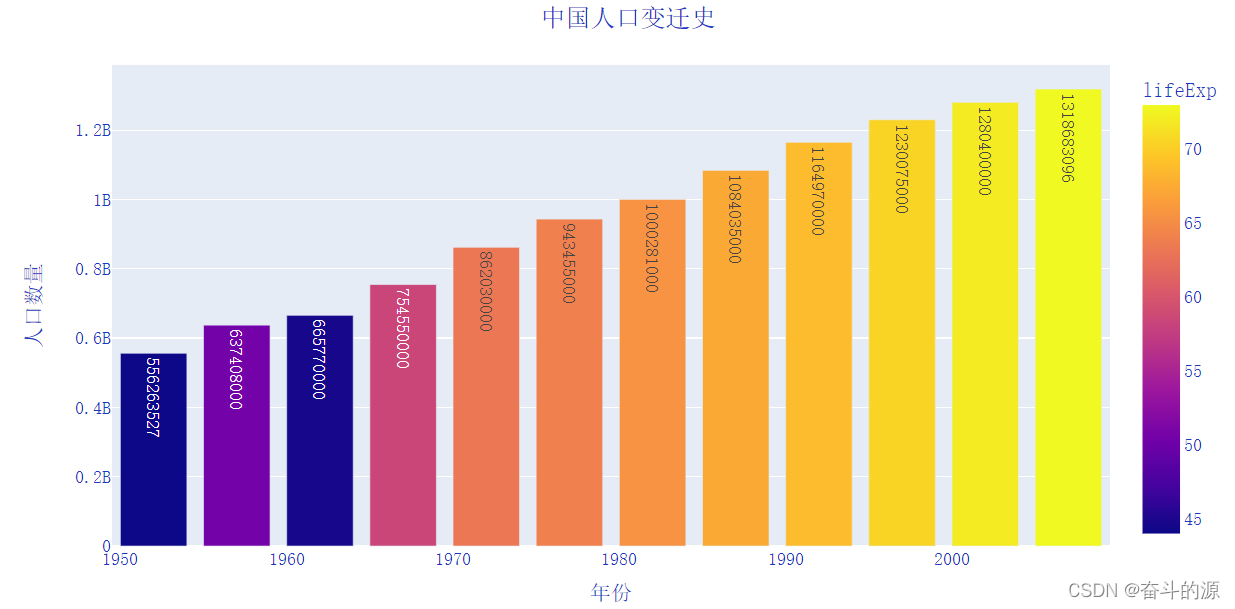
# 注释标题fig.update_layout(title_text='中国人口变迁史', title_x=.5, font=dict(family='simsun', size=14, color='#1d39c4') )# 注释坐标轴fig.update_layout(xaxis_title='年份', yaxis_title='人口数量')fig运行结果:
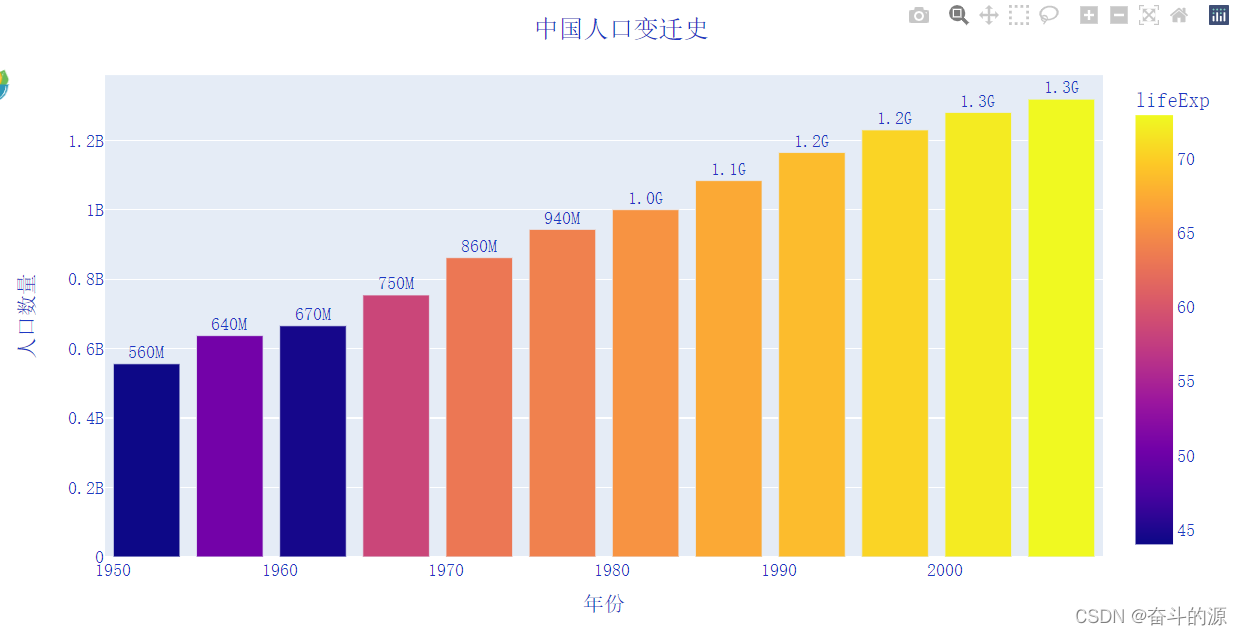
#柱形图文字格式fig.update_traces( textposition='outside', texttemplate='%{text:,.2s}')fig运行结果:
#利用customdata增加数据集fig.update_traces(customdata=df[['lifeExp','gdpPercap']])fig.update_traces(hovertemplate='Year: %{x}<br><br> Population: %{y}<br> Life Expectation: %{customdata[0]:,.2f}<br>GDP per capital: %{customdata[1]:,.2f}')# 坐标轴tick设置fig.update_xaxes(tickangle=-45,tickfont=dict(family='arial',size=12)) fig运行结果:
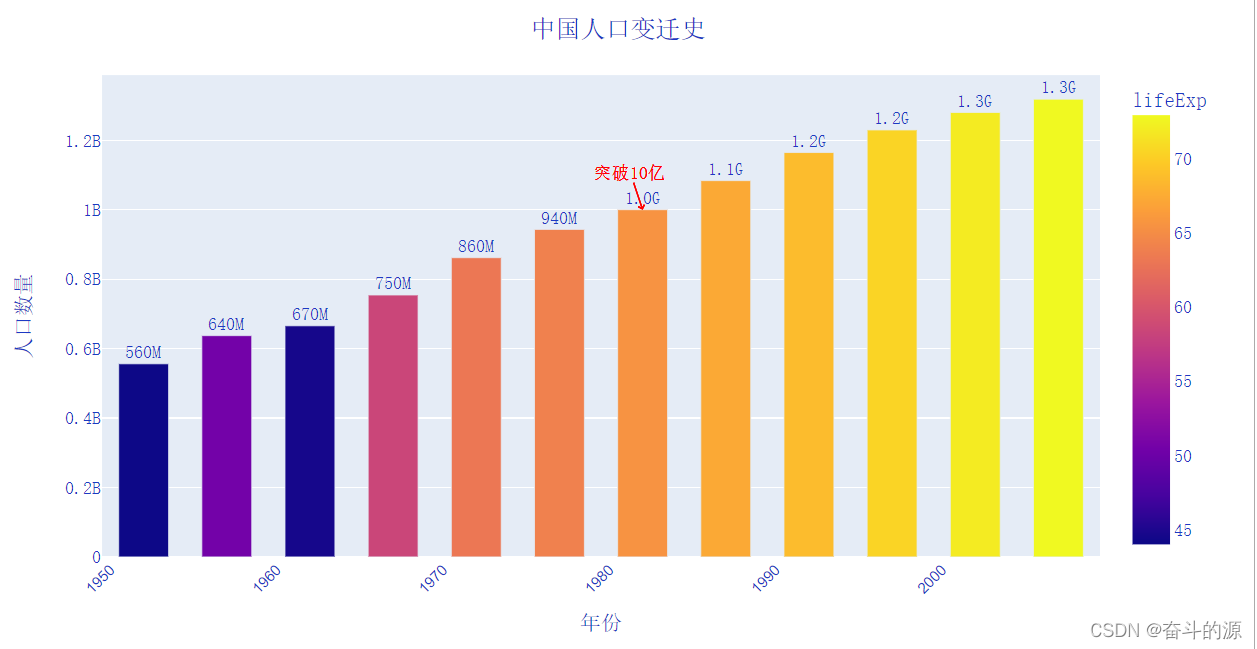
# 设置间隙大小及文本大小fig.update_layout(bargap=.4, uniformtext_minsize=8, uniformtext_mode='show')# 设置注释fig.add_annotation(x='1982', y=1000281000, text='突破10亿', font=dict(color='red'))fig.update_annotations(dict(xref='x', yref='y', showarrow=True), arrowcolor='red', arrowhead=4)fig.show()运行结果:
2.散点图
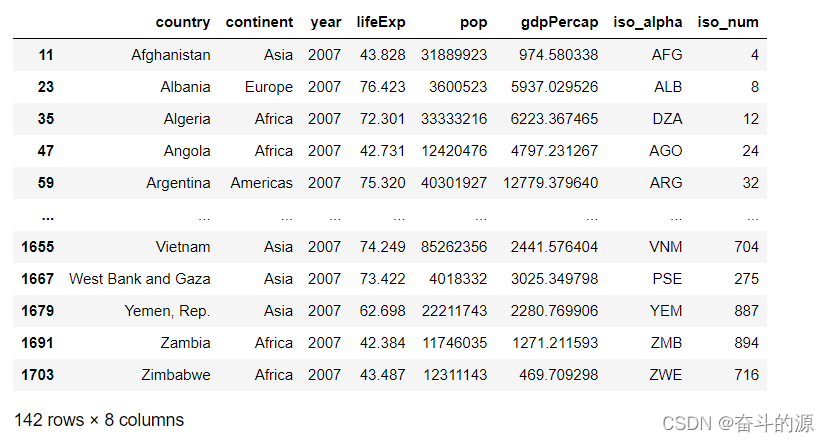
df_2007 = df[df["year"] == 2007]df_2007运行结果:
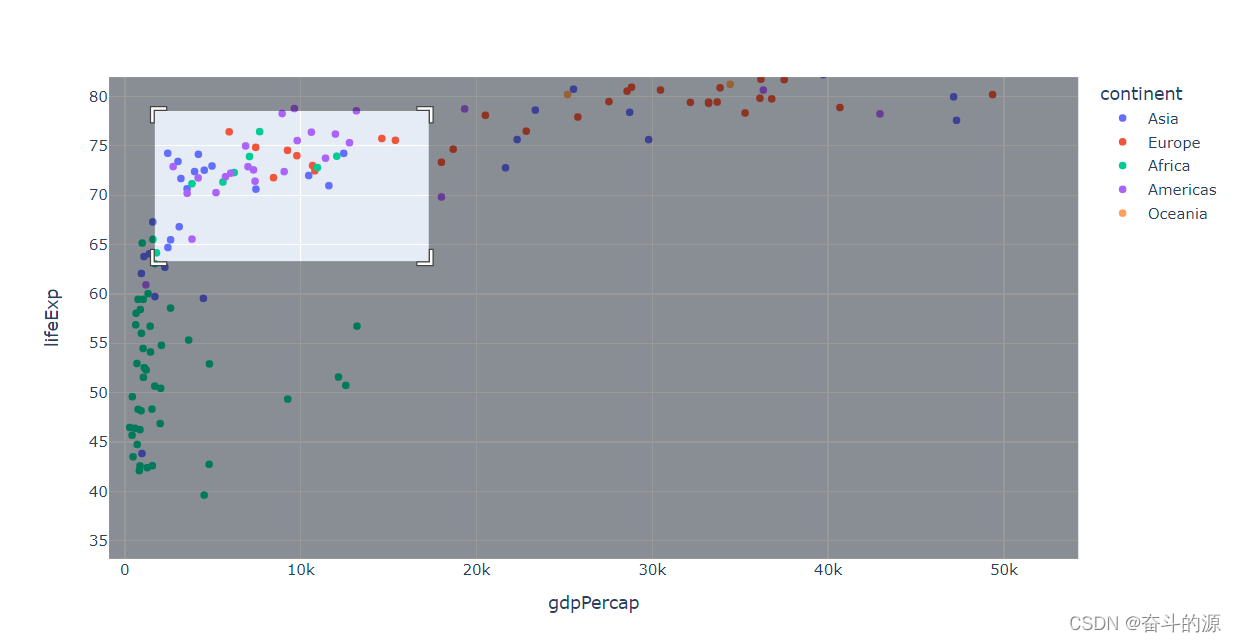
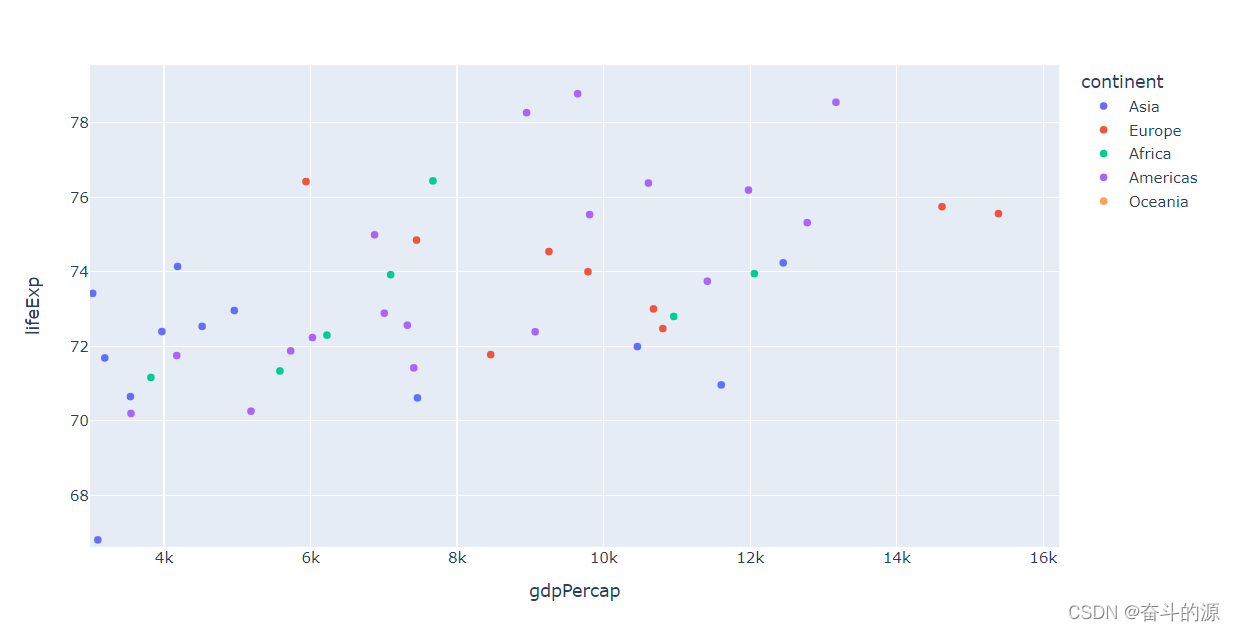
# 散点图px.scatter(df_2007, # 数据集 x="gdpPercap", # 横坐标:人均GDP y="lifeExp", # 纵坐标:平均寿命 color="continent" # 颜色取值:根据洲的值来取 )运行结果:

选择一个区域,能将其放大
3.冒泡散点图
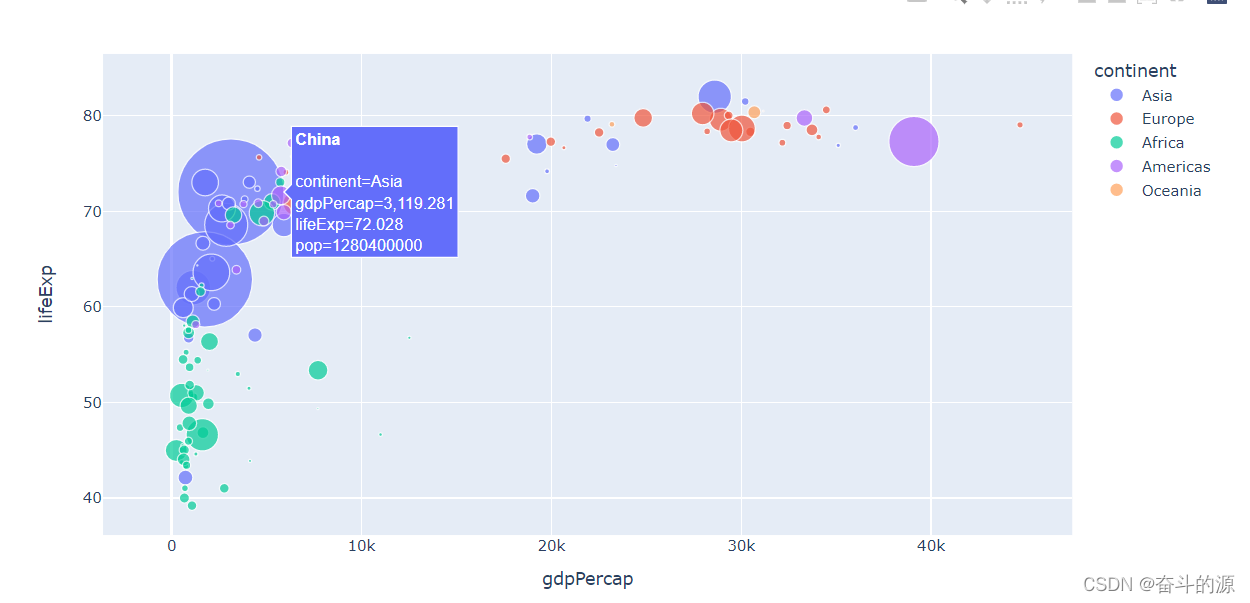
# 冒泡散点图px.scatter(df_2007, # 绘图DataFrame数据集 x="gdpPercap", # 横坐标 y="lifeExp", # 纵坐标 color="continent", # 区分颜色 size="pop", # 区分圆的大小 size_max=60, # 散点大小 hover_name="country" # 控制点名称 )运行结果:
4.旭日图
# 旭日图px.sunburst(df_2007, # 绘图数据 path=['continent', 'country'], # 指定路径:从洲到国家 values='pop', # 数据大小:人口数 color='lifeExp', # 颜色 hover_data=['iso_alpha'] # 显示数据 )运行结果:

5.地图图形
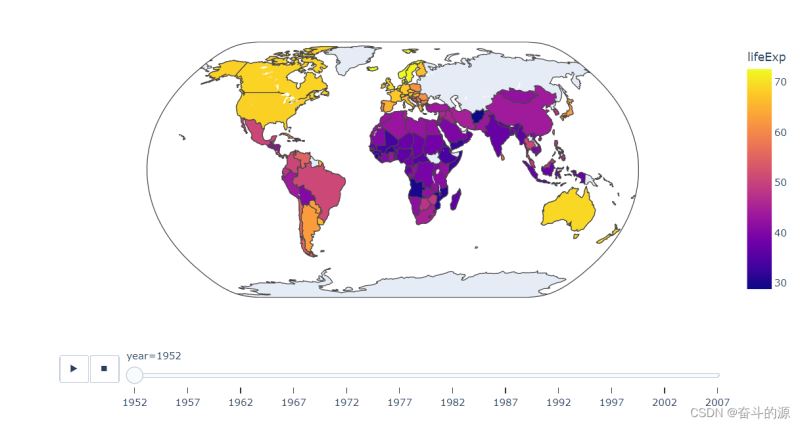
# 设置地图的图形px.choropleth( df, # 数据 locations="iso_alpha", # 简称 color="lifeExp", # 颜色取值 hover_name="country", # 悬停数据 animation_frame="year", # 播放按钮设置 color_continuous_scale=px.colors.sequential.Plasma, # 颜色变化取值 projection="natural earth" # 使用的地图设置)运行结果:
三.实战案例
使用泰坦里克号生存为例
import plotlyimport plotly.express as pximport plotly.graph_objects as goimport plotly.io as pioimport pandas as pdimport numpy as np#数据读取path2='./dataSet/test.csv'path3='./dataSet/train.csv'test=pd.read_csv(path2)train=pd.read_csv(path3)#数据合并data=pd.concat([test,train])运行结果:

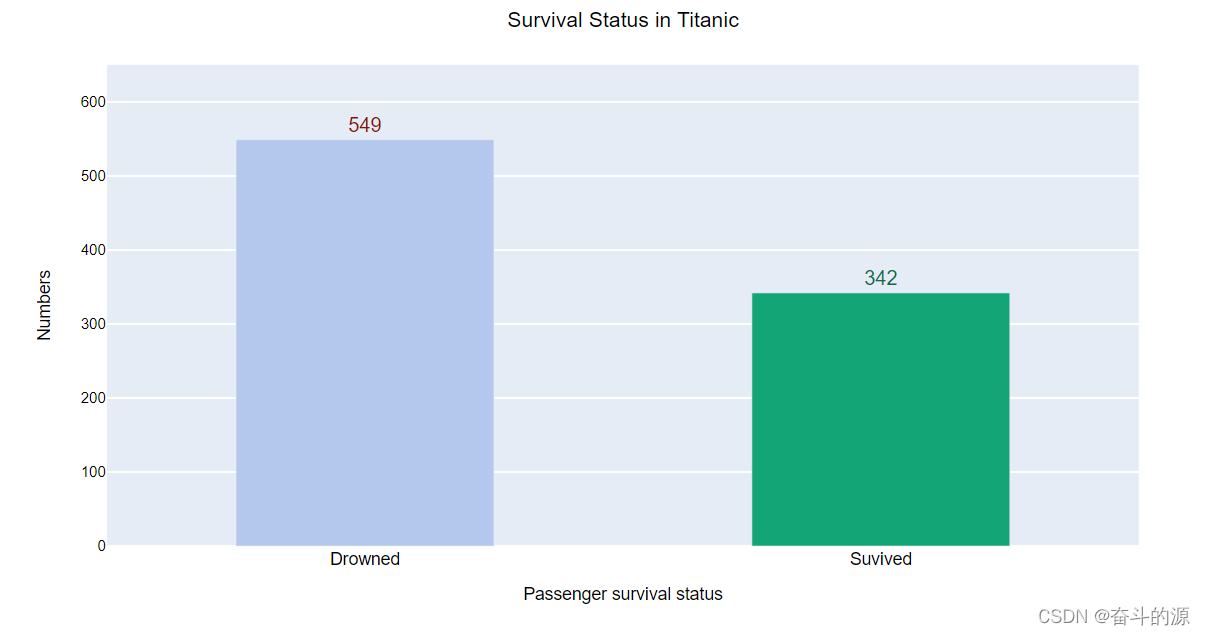
# 展示数据中survived分布情况df1=pd.DataFrame(data=data['Survived'].value_counts())df1运行结果:

fig1=px.bar(df1,y='Survived',text='Survived',color_discrete_sequence=[['#B4C7EC','#14A577']])fig1.update_layout(title='Survival Status in Titanic', title_x=.5, xaxis_title='Passenger survival status', yaxis_title='Numbers', font=dict(family='arial',color='#000000',size=12), bargap=.5)fig1.update_xaxes(tick0=0, #设置X轴起点,防止从负数开始 dtick=1, #设置间隔,防止出现0.5间隔 tickvals=[0,1], #设置tick数值,为了重命名 ticktext=['Drowned','Suvived'],#重命名系列index tickfont=dict(family='arial',color='#000000',size=14)) fig1.update_yaxes(range=[0,650]) #设置Y轴区间,使图形不至于视觉上压迫fig1.update_traces(textposition='outside', textfont_size=16, textfont_color=['#8C1004','#007046'])fig1.show()运行结果:
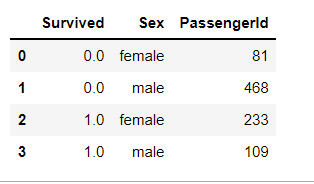
# 以survived 与sex为例,展示各性别下,生存与死亡的相对关系。df_sex=pd.DataFrame(data=data.groupby(['Survived','Sex'])['PassengerId'].count())df_sex=df_sex.reset_index()df_sex运行结果:
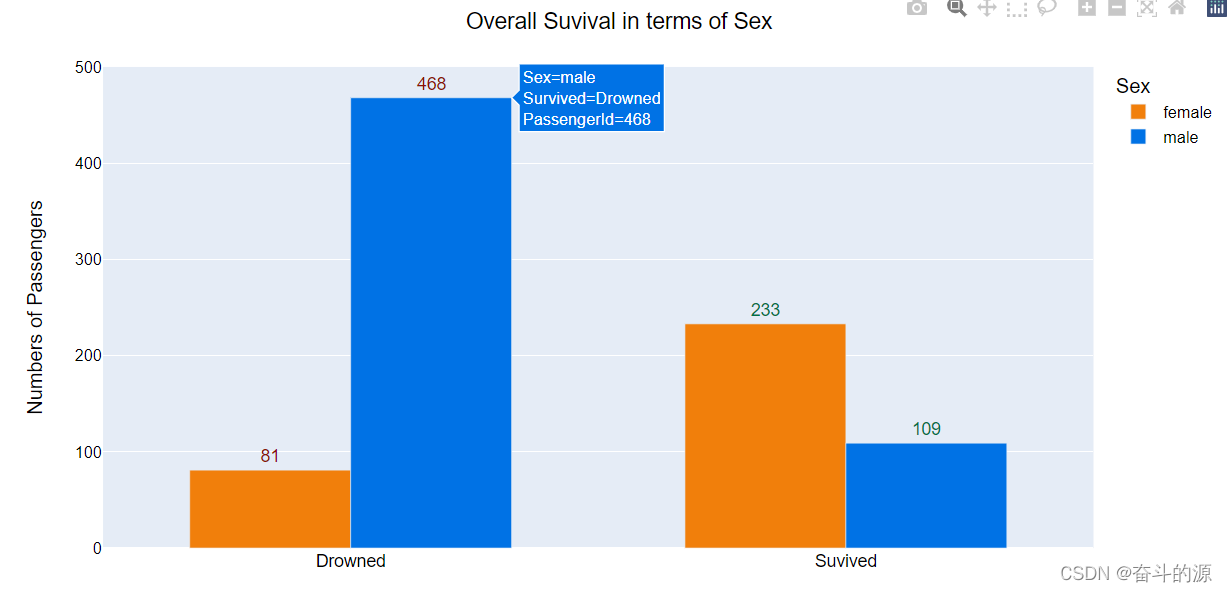
fig_sex1=px.bar(df_sex,x='Survived',y='PassengerId',color='Sex',barmode='group',text='PassengerId', color_discrete_map={'female':'#F17F0B','male':'#0072E5'})fig_sex1.update_traces(textposition='outside', textfont_size=14, textfont_color=['#8C1004','#007046'])fig_sex1.update_xaxes( tickvals=[0,1], #设置tick数值,为了重命名 ticktext=['Drowned','Suvived'],#重命名系列index tickfont=dict(family='arial', color='#000000', size=14)) fig_sex1.update_layout(title='Overall Suvival in terms of Sex', title_x=.5, bargap=.35, xaxis_title='', yaxis_title='Numbers of Passengers', font=dict(family='arial', color='#000000', size=13))fig_sex1.update_yaxes(range=[0,500], dtick=100)fig_sex1.show()运行结果:
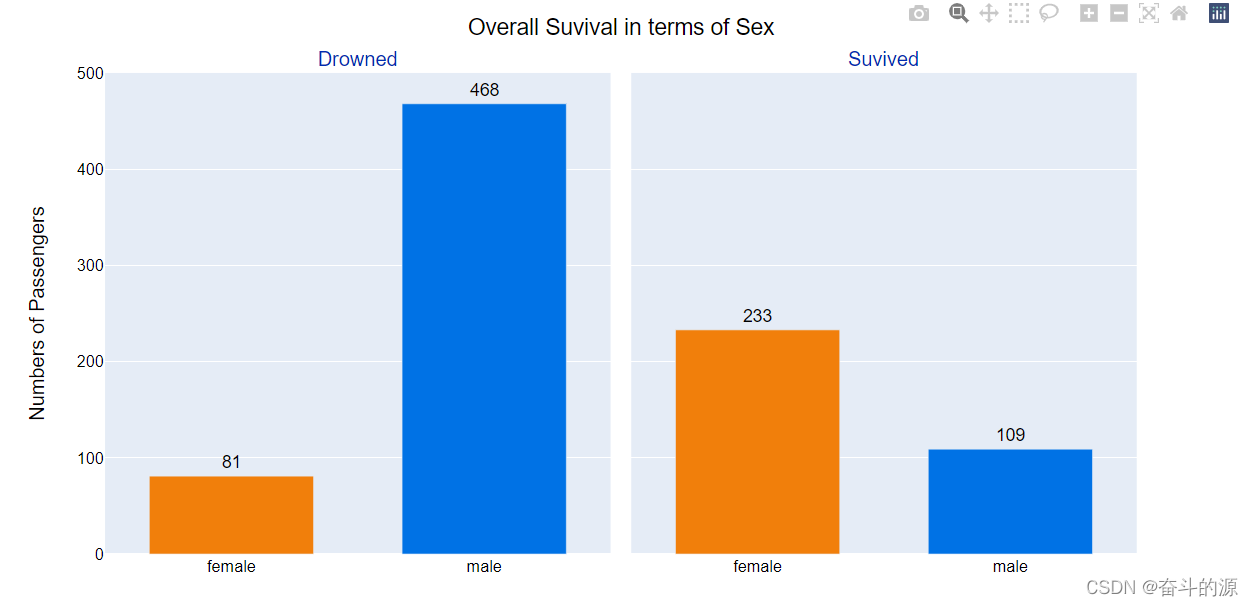
fig_sex2=px.bar(df_sex,x='Sex',y='PassengerId',facet_col='Survived',text='PassengerId', color_discrete_sequence=[['#F17F0B','#0072E5']])fig_sex2.update_traces(textposition='outside', textfont_size=14,)fig_sex2.update_layout(title='Overall Suvival in terms of Sex', title_x=.5, bargap=.35, yaxis_title='Numbers of Passengers', font=dict(family='arial', color='#000000', size=13), )#取消自带sex标题fig_sex2.update_layout(xaxis=dict(title=''), xaxis2=dict(title=''))fig_sex2.update_yaxes(range=[0,500], dtick=100)fig_sex2.for_each_annotation(lambda a:a.update(text=a.text.replace('Survived=0.0','Drowned')))fig_sex2.for_each_annotation(lambda a:a.update(text=a.text.replace('Survived=1.0','Suvived')))fig_sex2.update_layout(annotations=[dict(font=dict(size=16, color='#002CB2'))])fig_sex2.show()运行结果:
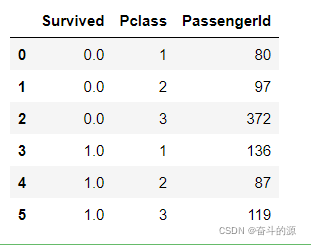
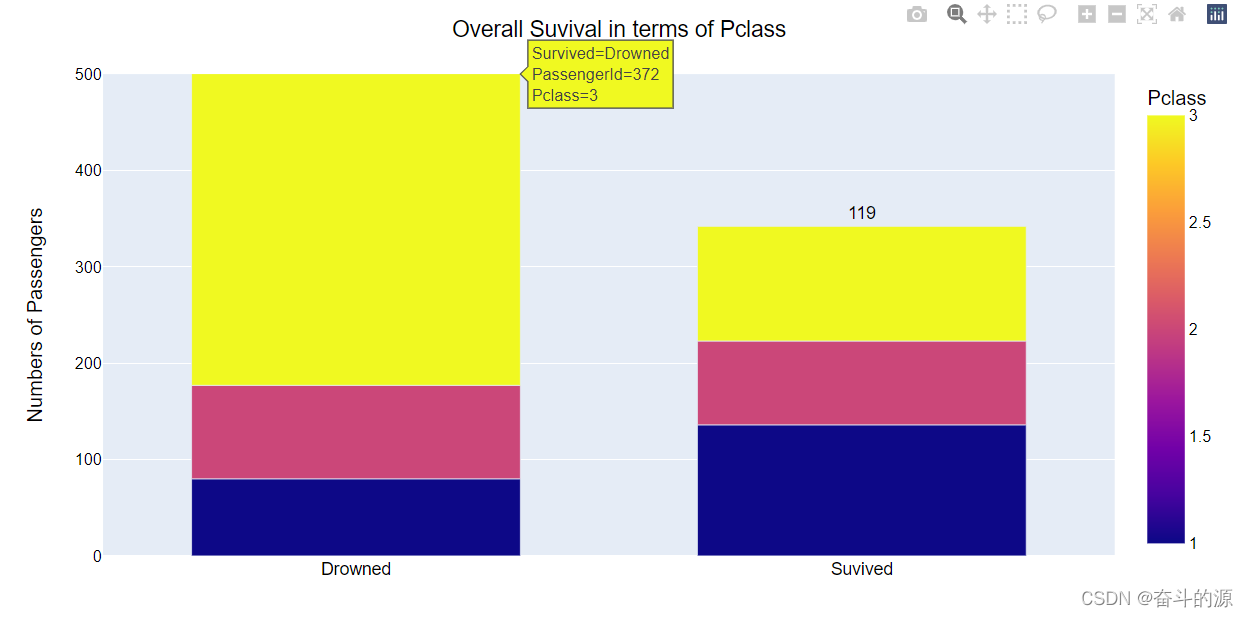
# 以survived 与pclass为例,展示各舱位等级下,生存与死亡的相对关系。df_pclass=pd.DataFrame(data=data.groupby(['Survived','Pclass'])['PassengerId'].count())df_pclass=df_pclass.reset_index()df_pclass运行结果:
fig_sex1=px.bar(df_pclass,x='Survived',y='PassengerId',color='Pclass',barmode='group',text='PassengerId', color_discrete_map={'1':'#F17F0B','2':'#0072E5','3':'#8C1004'})fig_sex1.update_traces(textposition='outside', textfont_size=14, textfont_color=['#8C1004','#007046'])fig_sex1.update_xaxes( tickvals=[0,1], #设置tick数值,为了重命名 ticktext=['Drowned','Suvived'],#重命名系列index tickfont=dict(family='arial', color='#000000', size=14)) fig_sex1.update_layout(title='Overall Suvival in terms of Pclass', title_x=.5, bargap=.35, xaxis_title='', yaxis_title='Numbers of Passengers', font=dict(family='arial', color='#000000', size=13))fig_sex1.update_yaxes(range=[0,500], dtick=100)fig_sex1.show()运行结果:
以上是“Python可视化工具Plotly怎么用”这篇文章的所有内容,感谢各位的阅读!相信大家都有了一定的了解,希望分享的内容对大家有所帮助,如果还想学习更多知识,欢迎关注编程网行业资讯频道!


