这篇文章给大家分享的是有关Hadoop高可用搭建的示例分析的内容。小编觉得挺实用的,因此分享给大家做个参考,一起跟随小编过来看看吧。
Hadoop高可用搭建超详细
实验环境
安装jdk
修改hostname
修改hosts映射,并配置ssh免密登录
设置时间同步
安装hadoop至/opt/data目录下
修改hadoop配置文件
zookeeper集群安装配置
启动集群
安装步骤
实验环境
master:192.168.10.131slave1:192.168.10.129slave2:192.168.10.130操作系统ubuntu-16.04.3hadoop-2.7.1zookeeper-3.4.8安装步骤
1.安装jd
将jdk安装到opt目录下
tar -zvxf jdk-8u221-linux-x64.tar.gz配置环境变量
vim etc/profile#jdkexport JAVA_HOME=/opt/jdk1.8.0_221export JRE_HOME=${JAVA_HOME}/jreexport CLASSPATH=.:${JAVA_HOME}/lib:${JRE_HOME}/libexport PATH=${JAVA_HOME}/bin:$PATHsource etc/profile2.修改hostname
分别将三台虚拟机的修改为master、slave1、slave2
vim /etc/hostname3.修改hosts映射,并配置ssh免密登录
修改hosts文件,每台主机都需进行以下操作
vim /etc/hosts192.168.10.131 master192.168.10.129 slave1192.168.10.130 slave2配置ssh免密
首先需要关闭防火墙
1、查看端口开启状态sudo ufw status2、开启某个端口,比如我开启的是8381sudo ufw allow 83813、开启防火墙sudo ufw enable4、关闭防火墙sudo ufw disable 5、重启防火墙 sudo ufw reload 6、禁止外部某个端口比如80 sudo ufw delete allow 80 7、查看端口ip netstat -ltn集群在启动的过程中需要ssh远程登录到别的主机上,为了避免每次输入对方主机的密码,我们需要配置免密码登录(提示操作均按回车)
ssh-keygen -t rsa将每台主机的公匙复制给自己以及其他主机
ssh-copy-id -i ~/.ssh/id_rsa.pub root@masterssh-copy-id -i ~/.ssh/id_rsa.pub root@slave1ssh-copy-id -i ~/.ssh/id_rsa.pub root@slave24.设置时间同步
安装ntpdate服务
apt-get install ntpdate修改ntp配置文件
vim /etc/ntp.conf# /etc/ntp.conf, configuration for ntpd; see ntp.conf(5) for helpdriftfile /var/lib/ntp/ntp.drift# Enable this if you want statistics to be logged.#statsdir /var/log/ntpstats/statistics loopstats peerstats clockstatsfilegen loopstats file loopstats type day enablefilegen peerstats file peerstats type day enablefilegen clockstats file clockstats type day enable# Specify one or more NTP servers.# Use servers from the NTP Pool Project. Approved by Ubuntu Technical Board# on 2011-02-08 (LP: #104525). See http://www.pool.ntp.org/join.html for# more information.#pool 0.ubuntu.pool.ntp.org iburst#pool 1.ubuntu.pool.ntp.org iburst#pool 2.ubuntu.pool.ntp.org iburst#pool 3.ubuntu.pool.ntp.org iburst# Use Ubuntu's ntp server as a fallback.#pool ntp.ubuntu.com# Access control configuration; see /usr/share/doc/ntp-doc/html/accopt.html for# details. The web page <http://support.ntp.org/bin/view/Support/AccessRestrictions># might also be helpful.## Note that "restrict" applies to both servers and clients, so a configuration# that might be intended to block requests from certain clients could also end# up blocking replies from your own upstream servers.# By default, exchange time with everybody, but don't allow configuration.restrict -4 default kod notrap nomodify nopeer noquery limitedrestrict -6 default kod notrap nomodify nopeer noquery limited# Local users may interrogate the ntp server more closely.restrict 127.0.0.1restrict ::1# Needed for adding pool entriesrestrict source notrap nomodify noquery# Clients from this (example!) subnet have unlimited access, but only if# cryptographically authenticated.# 允许局域网内设备与这台服务器进行同步时间.但是拒绝让他们修改服务器上的时间#restrict 192.168.10.131 mask 255.255.255.0 nomodify notrust#statsdir /var/log/ntpstats/statistics loopstats peerstats clockstatsfilegen loopstats file loopstats type day enablefilegen peerstats file peerstats type day enablefilegen clockstats file clockstats type day enable# Specify one or more NTP servers.# Use servers from the NTP Pool Project. Approved by Ubuntu Technical Board# on 2011-02-08 (LP: #104525). See http://www.pool.ntp.org/join.html for# more information.#pool 0.ubuntu.pool.ntp.org iburst#pool 1.ubuntu.pool.ntp.org iburst#pool 2.ubuntu.pool.ntp.org iburst#pool 3.ubuntu.pool.ntp.org iburst# Use Ubuntu's ntp server as a fallback.#pool ntp.ubuntu.com# Access control configuration; see /usr/share/doc/ntp-doc/html/accopt.html for# details. The web page <http://support.ntp.org/bin/view/Support/AccessRestrictions># might also be helpful.## Note that "restrict" applies to both servers and clients, so a configuration# that might be intended to block requests from certain clients could also end# up blocking replies from your own upstream servers.# By default, exchange time with everybody, but don't allow configuration.restrict -4 default kod notrap nomodify nopeer noquery limitedrestrict -6 default kod notrap nomodify nopeer noquery limited# Local users may interrogate the ntp server more closely.restrict 127.0.0.1restrict ::1# Needed for adding pool entriesrestrict source notrap nomodify noquery# Clients from this (example!) subnet have unlimited access, but only if# cryptographically authenticated.# 允许局域网内设备与这台服务器进行同步时间.但是拒绝让他们修改服务器上的时间#restrict 192.168.10.131 mask 255.255.255.0 nomodify notrustrestrict 192.168.10.129 mask 255.255.255.0 nomodify notrustrestrict 192.168.10.130 mask 255.255.255.0 nomodify notrust# 允许上层时间服务器修改本机时间#restrict times.aliyun.com nomodify#restrict ntp.aliyun.com nomodify#restrict cn.pool.ntp.org nomodify # 定义要同步的时间服务器server 192.168.10.131 perfer#server times.aliyun.com iburst prefer # prefer表示为优先,表示本机优先同步该服务器时间#server ntp.aliyun.com iburst#server cn.pool.ntp.org iburst#logfile /var/log/ntpstats/ntpd.log # 定义ntp日志目录#pidfile /var/run/ntp.pid # 定义pid路径# If you want to provide time to your local subnet, change the next line.# (Again, the address is an example only.)#broadcast 192.168.123.255# If you want to listen to time broadcasts on your local subnet, de-comment the# next lines. Please do this only if you trust everybody on the network!#disable auth#broadcastclient#Changes recquired to use pps synchonisation as explained in documentation:#http://www.ntp.org/ntpfaq/NTP-s-config-adv.htm#AEN3918#server 127.127.8.1 mode 135 prefer # Meinberg GPS167 with PPS#fudge 127.127.8.1 time1 0.0042 # relative to PPS for my hardware#server 127.127.22.1 # ATOM(PPS)#fudge 127.127.22.1 flag3 1 # enable PPS APIserver 127.127.1.0fudge 127.127.1.0 stratum 10启动ntpd服务,并查看ntp同步状态
service ntpd start #启动ntp服务ntpq -p #观察时间同步状况ntpstat #查看时间同步结果重启服务,与master主机时间同步
/etc/init.d/ntp restartntpdate 192.168.10.1315.安装hadoop至/opt/data目录下
在/opt目录下新建Data目录
cd /optmkdir Data下载并解压hadoop至/opt/data目录
wget https://archive.apache.org/dist/hadoop/common/hadoop-2.7.1/tar -zvxf hadoop-2.7.1.tar /opt/data配置环境变量
# HADOOPexport HADOOP_HOME=/opt/Data/hadoop-2.7.1export HADOOP_CONF_DIR=${HADOOP_HOME}/etc/hadoopexport PATH=${HADOOP_HOME}/bin:${HADOOP_HOME}/sbin:$PATHexport HADOOP_YARN_HOME=$HADOOP_HOME6.修改hadoop配置文件
文件目录hadoop-2.7.1/etc/hadoop
修改hadoop-env.sh
export JAVA_HOME=/opt/jdk1.8.0_221修改core-site.xml
<configuration><!-- 指定hdfs的nameservice为ns1 --> <property> <name>fs.defaultFS</name> <value>hdfs://ns1/</value> </property> <!-- 指定hadoop临时目录 --> <property> <name>hadoop.tmp.dir</name> <value>/opt/Data/hadoop-2.7.1/tmp</value> </property> <!-- 指定zookeeper地址 --> <property> <name>ha.zookeeper.quorum</name> <value>slave1:2181,slave2:2181</value> </property> <!--修改core-site.xml中的ipc参数,防止出现连接journalnode服务ConnectException--> <property> <name>ipc.client.connect.max.retries</name> <value>100</value> <description>Indicates the number of retries a client will make to establish a server connection.</description> </property></configuration>修改hdfs-site.xml
<configuration><!--指定hdfs的nameservice为ns1,需要和core-site.xml中的保持一致 --> <property> <name>dfs.nameservices</name> <value>ns1</value> </property><!-- ns1下面有两个NameNode,分别是nn1,nn2 --> <property> <name>dfs.ha.namenodes.ns1</name> <value>nn1,nn2</value> </property><!-- nn1的RPC通信地址 --> <property> <name>dfs.namenode.rpc-address.ns1.nn1</name> <value>master:9820</value> </property><!-- nn1的http通信地址 --> <property> <name>dfs.namenode.http-address.ns1.nn1</name> <value>master:9870</value> </property><!-- nn2的RPC通信地址 --> <property> <name>dfs.namenode.rpc-address.ns1.nn2</name> <value>slave1:9820</value> </property><!-- nn2的http通信地址 --> <property> <name>dfs.namenode.http-address.ns1.nn2</name> <value>slave1:9870</value> </property><!-- 指定NameNode的日志在JournalNode上的存放位置 --> <property> <name>dfs.namenode.shared.edits.dir</name><value>qjournal://master:8485;slave1:8485;slave2:8485/ns1</value> </property><!-- 指定JournalNode在本地磁盘存放数据的位置 --> <property> <name>dfs.journalnode.edits.dir</name> <value>/opt/Data/hadoop-2.7.1/journal</value> </property><!-- 开启NameNode失败自动切换 --> <property> <name>dfs.ha.automatic-failover.enabled</name> <value>true</value> </property><!-- 配置失败自动切换实现方式 --> <property> <name>dfs.client.failover.proxy.provider.ns1</name><value>org.apache.hadoop.hdfs.server.namenode.ha.ConfiguredFailoverProxyProvider</value> </property><!-- 配置隔离机制方法,多个机制用换行分割,即每个机制暂用一行--> <property> <name>dfs.ha.fencing.methods</name> <value> sshfence shell(/bin/true) </value> </property><!-- 使用sshfence隔离机制时需要ssh免登陆 --> <property> <name>dfs.ha.fencing.ssh.private-key-files</name> <value>/root/.ssh/id_rsa</value> </property><!-- 配置sshfence隔离机制超时时间 --> <property> <name>dfs.ha.fencing.ssh.connect-timeout</name> <value>30000</value> </property> <!--配置namenode存放元数据的目录,可以不配置,如果不配置则默认放到hadoop.tmp.dir下--> <property> <name>dfs.namenode.name.dir</name> <value>/opt/Data/hadoop-2.7.1/data/name</value> </property> <!--配置datanode存放元数据的目录,可以不配置,如果不配置则默认放到hadoop.tmp.dir下--> <property> <name>dfs.datanode.data.dir</name> <value>/opt/Data/hadoop-2.7.1/data/data</value> </property> <!--配置复本数量--> <property> <name>dfs.replication</name> <value>2</value> </property> <!--设置用户的操作权限,false表示关闭权限验证,任何用户都可以操作--> <property> <name>dfs.webhdfs.enabled</name> <value>true</value> </property> </configuration>修改mapred-site.xml
将文件名修改为mapred-site.xmlcp mapred-queues.xml.template mapred-site.xml<configuration> <property> <name>mapreduce.framework.name</name> <value>yarn</value> </property></configuration>修改yarn-site.xml
<configuration><!-- 指定nodemanager启动时加载server的方式为shuffle server --><property><name>yarn.nodemanager.aux-services</name> <value>mapreduce_shuffle</value> </property><!--配置yarn的高可用--><property> <name>yarn.resourcemanager.ha.enabled</name> <value>true</value> </property><!--执行yarn集群的别名--> <property> <name>yarn.resourcemanager.cluster-id</name> <value>cluster1</value> </property> <!--指定两个resourcemaneger的名称--><property> <name>yarn.resourcemanager.ha.rm-ids</name> <value>rm1,rm2</value> </property> <!--配置rm1的主机--><property> <name>yarn.resourcemanager.hostname.rm1</name> <value>master</value> </property> <!--配置rm2的主机--><property> <name>yarn.resourcemanager.hostname.rm2</name> <value>slave1</value> </property> <!--配置2个resourcemanager节点--> <property> <name>yarn.resourcemanager.zk-address</name> <value>slave1:2181,slave2:2181</value> </property> <!--zookeeper集群地址--><property> <name>yarn.nodemanager.vmem-check-enabled</name> <value>false</value> <description>Whether virtual memory limits will be enforced for containers</description></property><!--物理内存8G--> <property> <name>yarn.nodemanager.vmem-pmem-ratio</name> <value>8</value> <description>Ratio between virtual memory to physical memory when setting memory limits for containers</description></property></configuration>修改slave
masterslave1slave27.zookeeper集群安装配置
下载并解压zookeeper-3.4.8.tar.gz
wget https://archive.apache.org/dist/zookeeper/zookeeper-3.4.8/zookeeper-3.4.8.tar.gztar -zvxf zookeeper-3.4.8.tar.gz /opt/Data修改配置文件
#zookeeperexport ZOOKEEPER_HOME=/opt/Data/zookeeper-3.4.8export PATH=$PATH:$JAVA_HOME/bin:$ZOOKEEPER_HOME/bin进入conf目录,复制zoo-sample.cfg为zoo.cfg
cp zoo-sample.cfg zoo.cfg修改zoo.cfg
dataDir=/opt/Data/zookeeper-3.4.8/tmp //需要在zookeeper-3.4.8目录下新建tmp目录server.1=master:2888:3888server.2=slave1:2888:3888server.3=slave2:2888:3888在tmp目录中创建myid文件
vim myid 1 //其他主机需要修改该编号 2,38.启动集群
格式化master主机namenode。/etc/hadoop目录下输入该命令
hadoop namenode -format将Data目录拷贝到其他两台主机上
scp -r /opt/Data root@slave1:/optscp -r /opt/Data root@slave2:/opt启动zookeeper,所有节点均执行
hadoop-daemon.sh start zkfc格式化zookeeper,所有节点均执行
hdfs zkfc -formatZK启动journalnode,namenode备用节点相同(hadoop-2.7.1目录下执行)
hadoop-daemon.sh start journalnode启动集群
start-all.sh查看端口
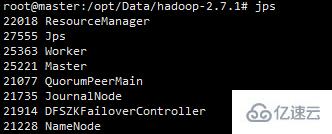
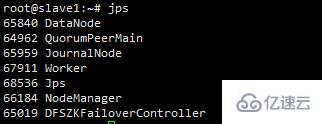
netstat -ntlup #可以查看服务端占用的端口查看进程jps


感谢各位的阅读!关于“Hadoop高可用搭建的示例分析”这篇文章就分享到这里了,希望以上内容可以对大家有一定的帮助,让大家可以学到更多知识,如果觉得文章不错,可以把它分享出去让更多的人看到吧!


