这篇文章主要介绍“Java数据结构之线索化二叉树怎么实现”,在日常操作中,相信很多人在Java数据结构之线索化二叉树怎么实现问题上存在疑惑,小编查阅了各式资料,整理出简单好用的操作方法,希望对大家解答”Java数据结构之线索化二叉树怎么实现”的疑惑有所帮助!接下来,请跟着小编一起来学习吧!
1.线索化二叉树的介绍
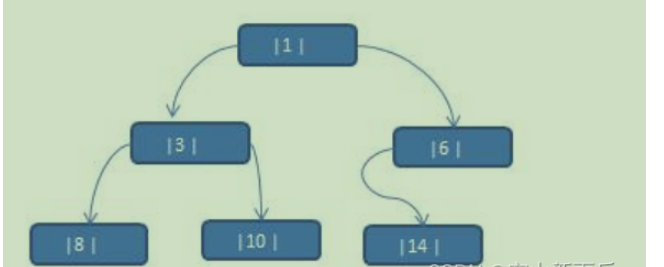
将数列 {1, 3, 6, 8, 10, 14 } 构建成一颗二叉树.

问题分析:
当我们对上面的二叉树进行中序遍历时,数列为 {8, 3, 10, 1, 6, 14 }
但是 6, 8, 10, 14 这几个节点的 左右指针,并没有完全的利用上.
如果我们希望充分的利用 各个节点的左右指针, 让各个节点可以指向自己的前后节点,怎么办?
解决方案-线索二叉树
概念:当用二叉链表作为二叉树的存储结构时,可以很方便的找到某个结点的左右孩子;但一般情况下,无法直接找到该结点在某种遍历序列中的前驱和后继结点。所以使用线索化,利用二叉树结构链表的空指针域进行线索化。
2.线索化二叉树的基本特点
n 个结点的二叉链表中含有 n+1 【公式 2n-(n-1)=n+1】 个空指针域。利用二叉链表中的空指针域,存放指向该结点在某种遍历次序下的前驱和后继结点的指针(这种附加的指针称为"线索")
这种加上了线索的二叉链表称为线索链表,相应的二叉树称为线索二叉树(Threaded BinaryTree)。根据线索性质的不同,线索二叉树可分为前序线索二叉树、中序线索二叉树和后序线索二叉树三种
3.线索化二叉树的应用案例
中序线索化二叉树并遍历
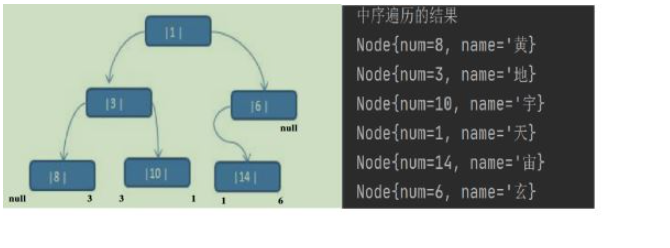
应用案例说明:将下面的二叉树,进行中序线索二叉树。中序遍历的数列为 {8, 3, 10, 1, 14, 6}

思路分析
中序遍历的结果:{8, 3, 10, 1, 14, 6}

那么线索化之后的二叉树的左右指针如上图↑
说明: 当线索化二叉树后,Node 节点的 属性 left 和 right ,有如下情况:
left 指向的是左子树,也可能是指向的前驱节点. 比如 ① 节点 left 指向的左子树, 而 ⑩ 节点的 left 指向的 就是前驱节点.
right 指向的是右子树,也可能是指向后继节点,比如 ① 节点 right 指向的是右子树,而⑩ 节点的 right 指向的是后继节点.
因此要改变原来的二叉树的结点结构
package com.studySelf.tree.threadedBinaryTree;public class Node { //唯一编号 private int num; //结点的值 private String name; //左结点 private Node left; //右节点 private Node right; //这个属性用来控制线索二叉树的结点的指向,0代表指向左结点,1代表指向前趋结点 private int leftType; //这个属性用来控制线索二叉树的结点的指向,0代表指向右结点,1代表指向后继结点 private int rightType; //构造方法 public Node(int num, String name) { this.num = num; this.name = name; } public int getLeftType() { return leftType; } public void setLeftType(int leftType) { this.leftType = leftType; } public int getRightType() { return rightType; } public void setRightType(int rightType) { this.rightType = rightType; } public int getNum() { return num; } public void setNum(int num) { this.num = num; } public String getName() { return name; } public void setName(String name) { this.name = name; } public Node getLeft() { return left; } public void setLeft(Node left) { this.left = left; } public Node getRight() { return right; } public void setRight(Node right) { this.right = right; } @Override public String toString() { return "Node{" + "num=" + num + ", name='" + name + '}'; } public void preSelect() { //首先输出根结点 System.out.println(this); //其次判断是否有左结点 if (this.left != null) { //没有左结点,就递归调用本方法输出该结点。 this.left.preSelect(); } if (this.right != null) { this.right.preSelect(); } } public void infixSelect() { //首先判断左结点 if (this.left != null) { //如果左结点不为空,递归向左子树调用 this.left.infixSelect(); } //当左结点为空,再输出根结点。当他本身就是最后一个左结点的时候,会直接输出,且没有右节点 System.out.println(this); if (this.right != null) { //右节点同样如此,递归调用。直到没有结点为止。 this.right.infixSelect(); } } public void afterSelect() { if (this.left != null) { this.left.afterSelect(); } if (this.right != null) { this.right.afterSelect(); } System.out.println(this); } public Node preSearchByNum(int num) { //首先判断传进来的num与该结点的num是否相等 //如果相等,那该结点就是我们要找的结点。 if (this.num == num) { return this; } //如果不相等,该结点就不是我们要找的结点 //那么我们就遍历该结点的左子节点,和右子结点 //定义一个结点用于接收最后的返回结果 Node resultNode = null; //如果该结点的左子结点不为空,就递归调用前序遍历,继续查找,如果找到了,那么resultNode就是我们想要的值 if (this.left != null) { resultNode = this.left.preSearchByNum(num); } //如果遍历完左子结点,已经找到了我们想要的结果,直接返回结果即可, if (resultNode != null) { return resultNode; } //如果左子结点为空,且没有找到我们想要的结点的情况下。那就判断右子结点 if (this.right != null) { resultNode = this.right.preSearchByNum(num); } //最后,如果找到了,那么resultNode一定会被赋值,如果没找到,就会返回null return resultNode; } public Node infixSearchByNum(int num) { //首先判断左子结点,如果存在左子结点,递归继续查询遍历即可即可。 Node resultNode = null; if (this.left != null) { resultNode = this.left.infixSearchByNum(num); } //如果左子结点已经找到了我们想要的结点,直接返回当前结点即可 if (resultNode != null) { return resultNode; } //判断根结点 if (this.num == num) { return this; } //判断右子结点, if (this.right != null) { resultNode = this.right.infixSearchByNum(num); } //最后返回我们的结果即可。 return resultNode; } public Node afterSearchNum(int num) { Node resultNode = null; //首先遍历左结点 if (this.left != null) { resultNode = this.left.afterSearchNum(num); } //判断左结点是否找到哦啊 if (resultNode != null) { return resultNode; } //判断右节点是否为空 if (this.right != null) { resultNode = this.right.afterSearchNum(num); } //判断右节点是否找到 if (resultNode != null) { return resultNode; } //判断根结点是否为我们找的结点 if (this.num == num) { return this; } //最后返回 return resultNode; } public void delNodeByNum(int num) { //首先,判断当前结点的左结点是否为空,并且左结点的num是否与num相等 if (this.left != null && this.left.num == num) { //如果相等,那就说明该结点就是我们要删除的结点,将其左结点置空即可 this.left = null; return; } //如果左结点没有执行,说明左结点没有我们想要的结果,也就是要删除的结点不在左结点 //那么就对右节点进行判断 if (this.right != null && this.right.num == num) { this.right = null; return; } //如果左右结点均没有找到目标结点 //那么就对左子树进行递归删除操作 if (this.left != null) { this.left.delNodeByNum(num); } //同理,如果左子树没有目标结点,向右子树进行递归删除操作 if (this.right != null) { this.right.delNodeByNum(num); } }}可以看到我们多出来了这么两个属性:
//这个属性用来控制线索二叉树的结点的指向,0代表指向左结点,1代表指向前趋结点 private int leftType; //这个属性用来控制线索二叉树的结点的指向,0代表指向右结点,1代表指向后继结点 private int rightType;中序线索化二叉树
public void infixThreadNodes(Node node) { if (node == null) { return; } infixThreadNodes(node.getLeft()); if (node.getLeft() == null) { //如果左子结点为空,说明就找到了我们需要线索化的结点 //就可以将pre也就是一直在当前结点的前趋结点设置给当前结点的左子结点, //如果这是第一个结点,那么pre为空,正好第一个结点的前趋结点也为空 node.setLeft(pre); //并且将它的左子结点的类型设置为前趋结点。1代表前趋结点 node.setLeftType(1); } if (pre != null && pre.getRight() == null) { //如果条件满足,说明前趋结点现在已经走到了值,并且还没有线索到后继结点, // 也就是当前结点的上一个结点(这个上一个结点就是当前的前趋结点)还没有后继, //那么上一个结点的后继结点就是当前结点,因此赋值前趋结点(也就是上一个结点)的后继结点为当前结点。 //这样这条线索就连接上了,并且只有满足叶子结点的结点才可以进行线索化 pre.setRight(node); pre.setRightType(1); } //当前两步走完之后,就可以将pre结点赋值为当前结点, // 因为下一个结点一走,当前结点就是前趋结点了。直到走到全部线索化结束 //这步十分重要,这一步不写,整个线索化就连接不上 pre = node; infixThreadNodes(node.getRight()); }中序线索化二叉树思路
因为中序遍历的二叉树顺序是左根右,因此,首先对左子树进行线索化,递归线索化即可;
当递归到左子树的最左结点的时候,他的左结点肯定为空,那么就对他的左结点赋值为pre(pre结点是在线索化的最后一步赋值为当前结点,这样递归才能进行下去),注意左结点的类型一定要改为1,代表他是前趋结点。前趋结点就线索掉了。
后继结点的处理则是判断前趋结点,当前趋结点不为空,并且前趋结点的右节点为空,那么设置前趋结点的右节点为当前结点,也就是上一个结点未设置的右节点,类型同样要设置为后继
最后就是对pre这个结点赋值,为当前结点,因为下一次递归,当前结点就成了上一个结点,也就是这里的pre
最后就是对二叉树的右子结点进行线索化。
中序线索化二叉树的遍历
遍历中序线索化二叉树首先应该明确的是他的遍历顺序要和遍历原来的中序二叉树遍历的结果是一样的,才是遍历成功
那么第一步应该就是判断根结点不为空,也就是循环结束条件
接着就循环查找当前结点的左子结点类型为0的也就是没有被线索化的结点,只要他为0,那么结点就一直往左子结点赋值。直到找到第一个被线索化的结点,输出他,他就是我们第一个线索化并且也是中序遍历的第一个左子结点。
输出之后,判断他的右子结点是否被线索化,如果被线索化,那么当前结点node就被赋值为它自己的右子结点,并且输出,如果他之后的结点的右子结点的类型又为1,那么继续往后走并赋值,说明他有后继
直到右子结点的类型为0,退出循环之后,也应该向右再赋值,继续向后遍历
代码演示
public void infixThreadNodesSelect() { Node node = root; while(node != null) { while(node.getLeftType() == 0) { node = node.getLeft(); } System.out.println(node); while (node.getRightType() == 1) { node = node.getRight(); System.out.println(node); } node = node.getRight(); }4.前序线索化二叉树、遍历
线索化二叉树
public void preThreadNodes(Node node) { if (node == null) { return; } if (node.getLeft() == null) { node.setLeft(pre); node.setLeftType(1); } if (pre != null && pre.getRight() == null) { pre.setRight(node); pre.setRightType(1); } pre = node; if (node.getLeftType() != 1) { preThreadNodes(node.getLeft()); } if (node.getRightType() != 1) { preThreadNodes(node.getRight()); } }遍历线索化二叉树
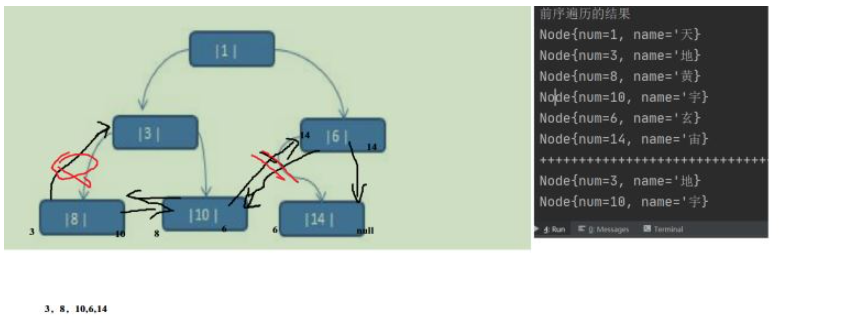
public void preThreadNodeSelect() { Node node = root; while(node !=null) { while(node.getLeftType() == 0) { System.out.println(node); node = node.getLeft(); } System.out.println(node); node = node.getRight(); } }图解

5.后序线索化二叉树
后续线索化二叉树
public void postThreadedBinaryTree(Node node) { if (node == null) { return; } postThreadedBinaryTree(node.getLeft()); postThreadedBinaryTree(node.getRight()); if (node.getLeft() == null) { node.setLeft(pre); node.setLeftType(1); } if (pre != null && pre.getRight() == null) { pre.setRight(node); pre.setRightType(1); } pre = node;}到此,关于“Java数据结构之线索化二叉树怎么实现”的学习就结束了,希望能够解决大家的疑惑。理论与实践的搭配能更好的帮助大家学习,快去试试吧!若想继续学习更多相关知识,请继续关注编程网网站,小编会继续努力为大家带来更多实用的文章!


