本文小编为大家详细介绍“python怎么使用OpenCV获取高动态范围成像HDR”,内容详细,步骤清晰,细节处理妥当,希望这篇“python怎么使用OpenCV获取高动态范围成像HDR”文章能帮助大家解决疑惑,下面跟着小编的思路慢慢深入,一起来学习新知识吧。
1 背景
1.1 什么是高动态范围(HDR)成像?
大多数数码相机和显示器将彩色图像捕获或显示为24位矩阵。每个颜色通道有8位,一共三个通道,因此每个通道的像素值在0到255之间。换句话说,普通相机或显示器具有有限的动态范围。
然而,我们周围的世界颜色有一个非常大的变化范围。当灯关闭时,车库会变黑;太阳照射下,车库看起来变得非常明亮。即使不考虑这些极端情况,在日常情况下,8位也几乎不足以捕捉场景。因此,相机会尝试估计光线并自动设置曝光,以使图像中最有用的部分具有良好的动态颜色范围,而太暗和太亮的部分分别被设置为0和255。
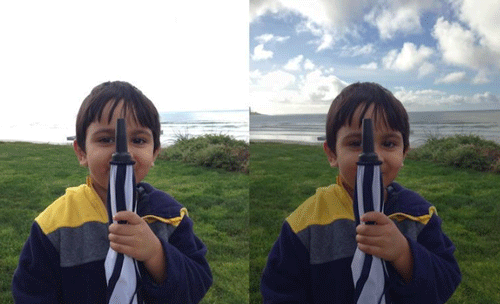
在下图中,左侧的图像是正常曝光的图像。请注意,背景中的天空已完全消失,因为相机决定使用一个能够让小孩被正确拍摄而明亮的天空被忽略的设置。右侧图像是iPhone生成的HDR图像。

iPhone如何捕获HDR图像?它实际上在三种不同的曝光下拍摄3张图像。图像是连续快速拍摄的,因此三次拍摄之间几乎没有偏移。然后组合三个图像以产生HDR图像。
1.2 高动态范围(HDR)成像如何工作?
在本节中,我们将介绍使用OpenCV创建HDR图像的步骤。
1)使用不同曝光设置拍摄多张图像
当我们使用相机拍照时,每个通道只有8位来表示场景的动态范围(亮度范围)。但是我们可以通过改变快门速度在不同曝光下拍摄场景的多个图像。大多数单反相机都有一个称为自动包围曝光(AEB)的功能,只需按一下按钮,我们就可以在不同曝光下拍摄多张照片。在相机上使用AEB或在手机上使用自动包围应用程序,我们可以一个接一个地快速拍摄多张照片,因此场景不会改变。当我们在iPhone中使用HDR模式时,它需要三张照片(安卓可以下载超级相机这个软件)。
1曝光不足的图像:此图片比正确的曝光图像暗。目标是拍摄非常明亮的图像部分。
2正确曝光的图像:这是相机根据估计的照明度拍摄的常规图像。
3过度曝光的图像:此图片比正确的曝光图像亮。目标是捕捉非常黑暗的图像部分。
但是,如果场景的动态范围非常大,我们可以拍摄三张以上的图片来构成HDR图像。在本教程中,我们将使用曝光时间为1/30,0.25,2.5和15秒拍摄的4张图像。缩略图如下所示。

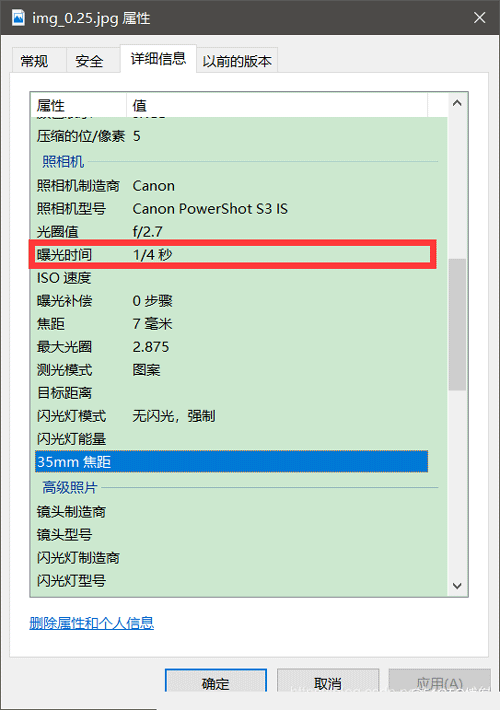
有关SLR相机或手机使用的曝光时间和其他设置的信息通常存储在JPEG文件的EXIF元数据中。通过以下链接可学习查看存储在Windows和Mac中的JPEG文件中的EXIF元数据。
windows下右键图片-属性-详细信息,有图像具体信息。如下所示:

或者,您可以使用我最喜欢的名为EXIFTOOL的EXIF命令行实用程序。
2 代码
2.1 运行环境配置
由于本文所用代码涉及到opencv非免费代码,createTonemapMantiuk这部分算法都是申请专利需要收费(本文可以不要这段代码)。在使用时编译opencv和opencv_contrib需要选择OPENCV_ENABLE_NONFREE。
如果是python,直接安装指定版本opencv就行了:
pip install opencv-contrib-python==3.4.2.17在使用非免费代码
头文件和命名空间如下:
#include <opencv2/xphoto.hpp>using namespace xphoto;2.2 读取图像和曝光时间
手动输入图像,曝光时间以及图像个数。
代码如下: C++:
void readImagesAndTimes(vector<Mat> &images, vector<float> ×){ //图像个数 int numImages = 3; //图像曝光时间 static const float timesArray[] = { 1.0 / 25 ,1.0 / 17, 1.0 / 13 }; times.assign(timesArray, timesArray + numImages); static const char* filenames[] = { "1_25.jpg", "1_17.jpg", "1_13.jpg"}; //读取图像 for (int i = 0; i < numImages; i++) { Mat im = imread(filenames[i]); images.push_back(im); }}python:
def readImagesAndTimes(): # List of exposure times times = np.array([ 1/30.0, 0.25, 2.5, 15.0 ], dtype=np.float32) # List of image filenames filenames = ["img_0.033.jpg", "img_0.25.jpg", "img_2.5.jpg", "img_15.jpg"] images = [] for filename in filenames: im = cv2.imread(filename) images.append(im) return images, times2.3 图像对齐
用于合成HDR图像的原始图像未对准可能导致严重的伪影。在下图中,左侧图像是使用未对齐图像组成的HDR图像,右侧图像是使用对齐图像的图像。通过放大图像的一部分,使用红色圆圈显示,我们在左图像中看到严重的重影瑕疵。

当然,在拍摄用于创建HDR图像的照片时,专业摄影师将相机安装在三脚架上。他们还使用一种称为反光镜锁死的功能来减少额外的振动。即使这样,图像也可能无法完美对齐,因为无法保证无振动的环境。使用手持相机或手机拍摄图像时,对齐问题会变得更糟。
幸运的是,OpenCV 提供了一种简单的方法,使用AlignMTB对齐这些图像。该算法将所有图像转换为中值阈值位图median threshold bitmaps(MTB)。图像的MTB生成方式为将比中值亮度亮的点分配为1,其余为0。MTB不随曝光时间的改变而改变。因此不需要我们指定曝光时间就可以对齐MTB。
代码如下:
C++:
// Align input imagesPtr<AlignMTB> alignMTB = createAlignMTB();alignMTB->process(images, images);python:
# Align input imagesalignMTB = cv2.createAlignMTB()alignMTB.process(images, images)2.4 恢复相机响应功能
典型相机的响应与场景亮度不是线性的。那是什么意思?假设,一个摄像机拍摄了两个物体,其中一个物体的亮度是现实世界中的两倍。当您测量照片中两个对象的像素强度时,较亮对象的像素值将不会是较暗对象的两倍。在不估计相机响应函数(CRF)的情况下,我们将无法将图像合并为一个HDR图像。将多个曝光图像合并为HDR图像意味着什么?
在图像的某个位置(x,y)仅考虑一个像素。如果CRF是线性的,则像素值将与曝光时间成正比,除非像素在特定图像中太暗(即接近0)或太亮(即接近255)。我们可以过滤出这些不好的像素(太暗或太亮),并且将像素值除以曝光时间来估计像素的亮度,然后在像素不差的所有图像(太暗或太亮)上对亮度值取平均。我们可以对所有像素进行这样的处理,并通过对“好”像素进行平均来获得所有像素的单张图像。但是CRF不是线性的,我们需要在评估CRF前把图像强度变成线性。
好消息是,如果我们知道每张图像的曝光时间,可以从图像中估算CRF。与计算机视觉中的许多问题一样,找到CRF的问题被设置为优化问题,其中目标是最小化由数据项和平滑项组成的目标函数。这些问题通常会减少到使用奇异值分解(SVD)求解的线性最小二乘问题,而奇异值分解是所有线性代数包的一部分。CRF恢复算法细节见论文Recovering High Dynamic Range Radiance Maps from Photographs。
使用CalibrateDebevec或在OpenCV中仅使用两行代码来查找CRF CalibrateRobertson。在本教程中我们将使用CalibrateDebevec。
代码如下:
C++:
// Obtain Camera Response Function (CRF)Mat responseDebevec;Ptr<CalibrateDebevec> calibrateDebevec = createCalibrateDebevec();calibrateDebevec->process(images, responseDebevec, times);python:
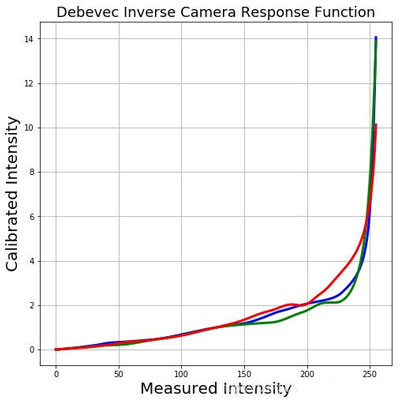
# Obtain Camera Response Function (CRF)calibrateDebevec = cv2.createCalibrateDebevec()responseDebevec = calibrateDebevec.process(images, times)下图显示了使用红色,绿色和蓝色通道图像恢复的CRF。

2.5 合并图像
一旦估计了CRF,我们就可以将曝光图像合并为一个HDR图像MergeDebevec。C ++和Python代码如下所示。
C++:
// Merge images into an HDR linear imageMat hdrDebevec;Ptr<MergeDebevec> mergeDebevec = createMergeDebevec();mergeDebevec->process(images, hdrDebevec, times, responseDebevec);// Save HDR image.imwrite("hdrDebevec.hdr", hdrDebevec);Python:
# Merge images into an HDR linear imagemergeDebevec = cv2.createMergeDebevec()hdrDebevec = mergeDebevec.process(images, times, responseDebevec)# Save HDR image.cv2.imwrite("hdrDebevec.hdr", hdrDebevec)上面保存的HDR图像可以在Photoshop中加载并进行色调映射。一个例子如下所示。

2.6 色调映射
现在我们将曝光图像合并为一个HDR图像。你能猜出这张图片的最小和最大像素值吗?对于漆黑条件,最小值显然为0。什么是理论最大值?无穷!实际上,不同情况下的最大值是不同的。如果场景包含非常明亮的光源,我们将看到非常大的最大值。尽管我们已经使用多个图像恢复了相对亮度信息,但我们现在面临的挑战是将此信息保存为24位图像以用于显示。
色调映射:将高动态范围(HDR)图像转换为每通道8位图像同时保留尽可能多的细节的过程称为色调映射。
有几种色调映射算法。OpenCV实现了其中的四个。要记住的是,没有正确的方法来进行色调映射。通常,我们希望在色调映射图像中看到比在任何一个曝光图像中更多的细节。有时,色调映射的目标是产生逼真的图像,并且通常目标是产生超现实的图像。在OpenCV中实现的算法倾向于产生逼真的,因此不那么引人注目的结果。
我们来看看各种选项。下面列出了不同色调映射算法的一些常见参数。
1)伽马gamma:此参数通过应用伽马校正来压缩动态范围。当gamma等于1时,不应用校正。小于1的灰度会使图像变暗,而大于1的灰度会使图像变亮。
2)饱和度saturation:此参数用于增加或减少饱和度。当饱和度高时,颜色更丰富,更强烈。饱和度值接近零,使颜色渐渐变为灰度。
3)对比度contrast:控制输出图像的对比度(即log(maxPixelValue / minPixelValue))。
让我们来探索OpenCV中可用的四种色调映射算法
Drago Tonemap
Drago Tonemap的参数如下所示:
createTonemapDrago(float gamma = 1.0f,float saturation = 1.0f,float bias = 0.85f)这里,bias是[0,1]范围内偏置函数的值。从0.7到0.9的值通常会得到最好的结果。默认值为0.85。有关更多技术细节,请参阅此文章。参数通过反复试验获得。最终输出乘以3只是因为它给出了最令人满意的结果。更多的技术细节见:
结果如下所示:

Durand Tonemap
Durand Tonemap的参数如下所示:
createTonemapDurand( float gamma = 1.0f, float contrast = 4.0f, float saturation = 1.0f, float sigma_space = 2.0f, float sigma_color = 2.0f);该算法基于将图像分解为基础层和细节层。使用称为双边滤波器的边缘保留滤波器获得基础层。sigma_space和sigma_color是双边滤波器的参数,分别控制空间域和颜色域中的平滑量。更多的技术细节见:
结果如下所示:

Reinhard Tonemap
Reinhard Tonemap的参数如下所示:
createTonemapReinhard(float gamma = 1.0f,float intensity = 0.0f,float light_adapt = 1.0f,float color_adapt = 0.0f)参数intensity应在[-8,8]范围内。强度值越大,结果越明亮。参数light_adapt控制灯光适应并且在[0,1]范围内。值1表示仅基于像素值的自适应,值0表示全局自适应。中间值可以用于两者的加权组合。参数color_adapt控制色度适应并且在[0,1]范围内。如果值设置为1,则独立处理通道,如果值设置为0,则每个通道的适应级别相同。中间值可用于两者的加权组合。更多的技术细节见:
结果如下所示:

Mantiuk Tonemap
Mantiuk Tonemap的参数如下所示:
createTonemapMantiuk(float gamma = 1.0f,float scale = 0.7f,float saturation = 1.0f)scale是对比度比例因子。从0.6到0.9的值产生最佳结果。更多的技术细节见:
结果如下所示:

上面所有色调映射代码见:
C++:
// Tonemap using Drago's method to obtain 24-bit color image 色调映射算法 cout << "Tonemaping using Drago's method ... "; Mat ldrDrago; Ptr<TonemapDrago> tonemapDrago = createTonemapDrago(1.0, 0.7); tonemapDrago->process(hdrDebevec, ldrDrago); ldrDrago = 3 * ldrDrago; imwrite("ldr-Drago.jpg", ldrDrago * 255); cout << "saved ldr-Drago.jpg" << endl; // Tonemap using Durand's method obtain 24-bit color image 色调映射算法 cout << "Tonemaping using Durand's method ... "; Mat ldrDurand; Ptr<TonemapDurand> tonemapDurand = createTonemapDurand(1.5, 4, 1.0, 1, 1); tonemapDurand->process(hdrDebevec, ldrDurand); ldrDurand = 3 * ldrDurand; imwrite("ldr-Durand.jpg", ldrDurand * 255); cout << "saved ldr-Durand.jpg" << endl; // Tonemap using Reinhard's method to obtain 24-bit color image 色调映射算法 cout << "Tonemaping using Reinhard's method ... "; Mat ldrReinhard; Ptr<TonemapReinhard> tonemapReinhard = createTonemapReinhard(1.5, 0, 0, 0); tonemapReinhard->process(hdrDebevec, ldrReinhard); imwrite("ldr-Reinhard.jpg", ldrReinhard * 255); cout << "saved ldr-Reinhard.jpg" << endl; // Tonemap using Mantiuk's method to obtain 24-bit color image 色调映射算法 cout << "Tonemaping using Mantiuk's method ... "; Mat ldrMantiuk; Ptr<TonemapMantiuk> tonemapMantiuk = createTonemapMantiuk(2.2, 0.85, 1.2); tonemapMantiuk->process(hdrDebevec, ldrMantiuk); ldrMantiuk = 3 * ldrMantiuk; imwrite("ldr-Mantiuk.jpg", ldrMantiuk * 255); cout << "saved ldr-Mantiuk.jpg" << endl;Python:
# Tonemap using Drago's method to obtain 24-bit color image print("Tonemaping using Drago's method ... ") tonemapDrago = cv2.createTonemapDrago(1.0, 0.7) ldrDrago = tonemapDrago.process(hdrDebevec) ldrDrago = 3 * ldrDrago cv2.imwrite("ldr-Drago.jpg", ldrDrago * 255) print("saved ldr-Drago.jpg") # Tonemap using Durand's method obtain 24-bit color image print("Tonemaping using Durand's method ... ") tonemapDurand = cv2.createTonemapDurand(1.5,4,1.0,1,1) ldrDurand = tonemapDurand.process(hdrDebevec) ldrDurand = 3 * ldrDurand cv2.imwrite("ldr-Durand.jpg", ldrDurand * 255) print("saved ldr-Durand.jpg") # Tonemap using Reinhard's method to obtain 24-bit color image print("Tonemaping using Reinhard's method ... ") tonemapReinhard = cv2.createTonemapReinhard(1.5, 0,0,0) ldrReinhard = tonemapReinhard.process(hdrDebevec) cv2.imwrite("ldr-Reinhard.jpg", ldrReinhard * 255) print("saved ldr-Reinhard.jpg") # Tonemap using Mantiuk's method to obtain 24-bit color image print("Tonemaping using Mantiuk's method ... ") tonemapMantiuk = cv2.createTonemapMantiuk(2.2,0.85, 1.2) ldrMantiuk = tonemapMantiuk.process(hdrDebevec) ldrMantiuk = 3 * ldrMantiuk cv2.imwrite("ldr-Mantiuk.jpg", ldrMantiuk * 255) print("saved ldr-Mantiuk.jpg")2.7 工程代码
本文所有代码见:
C++:
#include "pch.h"#include <opencv2/opencv.hpp>#include <opencv2/xphoto.hpp>#include <vector>#include <iostream>#include <fstream>using namespace cv;using namespace std;using namespace xphoto;void readImagesAndTimes(vector<Mat> &images, vector<float> ×){ //图像个数 int numImages = 3; //图像曝光时间 static const float timesArray[] = { 1.0 / 25 ,1.0 / 17, 1.0 / 13 }; times.assign(timesArray, timesArray + numImages); static const char* filenames[] = { "1_25.jpg", "1_17.jpg", "1_13.jpg"}; //读取图像 for (int i = 0; i < numImages; i++) { Mat im = imread(filenames[i]); images.push_back(im); }}int main(){ // Read images and exposure times 读取图像和图像曝光时间 cout << "Reading images ... " << endl; //图像 vector<Mat> images; //曝光时间 vector<float> times; //读取图像和图像曝光时间 readImagesAndTimes(images, times); // Align input images 图像对齐 cout << "Aligning images ... " << endl; Ptr<AlignMTB> alignMTB = createAlignMTB(); alignMTB->process(images, images); // Obtain Camera Response Function (CRF) 获得CRF cout << "Calculating Camera Response Function (CRF) ... " << endl; Mat responseDebevec; Ptr<CalibrateDebevec> calibrateDebevec = createCalibrateDebevec(); calibrateDebevec->process(images, responseDebevec, times); // Merge images into an HDR linear image 图像合并为HDR图像 cout << "Merging images into one HDR image ... "; Mat hdrDebevec; Ptr<MergeDebevec> mergeDebevec = createMergeDebevec(); mergeDebevec->process(images, hdrDebevec, times, responseDebevec); // Save HDR image. 保存HDR图像 imwrite("hdrDebevec.hdr", hdrDebevec); cout << "saved hdrDebevec.hdr " << endl; // Tonemap using Drago's method to obtain 24-bit color image 色调映射算法 cout << "Tonemaping using Drago's method ... "; Mat ldrDrago; Ptr<TonemapDrago> tonemapDrago = createTonemapDrago(1.0, 0.7); tonemapDrago->process(hdrDebevec, ldrDrago); ldrDrago = 3 * ldrDrago; imwrite("ldr-Drago.jpg", ldrDrago * 255); cout << "saved ldr-Drago.jpg" << endl; // Tonemap using Durand's method obtain 24-bit color image 色调映射算法 cout << "Tonemaping using Durand's method ... "; Mat ldrDurand; Ptr<TonemapDurand> tonemapDurand = createTonemapDurand(1.5, 4, 1.0, 1, 1); tonemapDurand->process(hdrDebevec, ldrDurand); ldrDurand = 3 * ldrDurand; imwrite("ldr-Durand.jpg", ldrDurand * 255); cout << "saved ldr-Durand.jpg" << endl; // Tonemap using Reinhard's method to obtain 24-bit color image 色调映射算法 cout << "Tonemaping using Reinhard's method ... "; Mat ldrReinhard; Ptr<TonemapReinhard> tonemapReinhard = createTonemapReinhard(1.5, 0, 0, 0); tonemapReinhard->process(hdrDebevec, ldrReinhard); imwrite("ldr-Reinhard.jpg", ldrReinhard * 255); cout << "saved ldr-Reinhard.jpg" << endl; // Tonemap using Mantiuk's method to obtain 24-bit color image 色调映射算法 cout << "Tonemaping using Mantiuk's method ... "; Mat ldrMantiuk; Ptr<TonemapMantiuk> tonemapMantiuk = createTonemapMantiuk(2.2, 0.85, 1.2); tonemapMantiuk->process(hdrDebevec, ldrMantiuk); ldrMantiuk = 3 * ldrMantiuk; imwrite("ldr-Mantiuk.jpg", ldrMantiuk * 255); cout << "saved ldr-Mantiuk.jpg" << endl; return 0;}Python:
import cv2import numpy as npdef readImagesAndTimes(): times = np.array([ 1/30.0, 0.25, 2.5, 15.0 ], dtype=np.float32) filenames = ["img_0.033.jpg", "img_0.25.jpg", "img_2.5.jpg", "img_15.jpg"] images = [] for filename in filenames: im = cv2.imread(filename) images.append(im) return images, timesif __name__ == '__main__': # Read images and exposure times print("Reading images ... ") images, times = readImagesAndTimes() # Align input images print("Aligning images ... ") alignMTB = cv2.createAlignMTB() alignMTB.process(images, images) # Obtain Camera Response Function (CRF) print("Calculating Camera Response Function (CRF) ... ") calibrateDebevec = cv2.createCalibrateDebevec() responseDebevec = calibrateDebevec.process(images, times) # Merge images into an HDR linear image print("Merging images into one HDR image ... ") mergeDebevec = cv2.createMergeDebevec() hdrDebevec = mergeDebevec.process(images, times, responseDebevec) # Save HDR image. cv2.imwrite("hdrDebevec.hdr", hdrDebevec) print("saved hdrDebevec.hdr ") # Tonemap using Drago's method to obtain 24-bit color image print("Tonemaping using Drago's method ... ") tonemapDrago = cv2.createTonemapDrago(1.0, 0.7) ldrDrago = tonemapDrago.process(hdrDebevec) ldrDrago = 3 * ldrDrago cv2.imwrite("ldr-Drago.jpg", ldrDrago * 255) print("saved ldr-Drago.jpg") # Tonemap using Durand's method obtain 24-bit color image print("Tonemaping using Durand's method ... ") tonemapDurand = cv2.createTonemapDurand(1.5,4,1.0,1,1) ldrDurand = tonemapDurand.process(hdrDebevec) ldrDurand = 3 * ldrDurand cv2.imwrite("ldr-Durand.jpg", ldrDurand * 255) print("saved ldr-Durand.jpg") # Tonemap using Reinhard's method to obtain 24-bit color image print("Tonemaping using Reinhard's method ... ") tonemapReinhard = cv2.createTonemapReinhard(1.5, 0,0,0) ldrReinhard = tonemapReinhard.process(hdrDebevec) cv2.imwrite("ldr-Reinhard.jpg", ldrReinhard * 255) print("saved ldr-Reinhard.jpg") # Tonemap using Mantiuk's method to obtain 24-bit color image print("Tonemaping using Mantiuk's method ... ") tonemapMantiuk = cv2.createTonemapMantiuk(2.2,0.85, 1.2) ldrMantiuk = tonemapMantiuk.process(hdrDebevec) ldrMantiuk = 3 * ldrMantiuk cv2.imwrite("ldr-Mantiuk.jpg", ldrMantiuk * 255) print("saved ldr-Mantiuk.jpg")读到这里,这篇“python怎么使用OpenCV获取高动态范围成像HDR”文章已经介绍完毕,想要掌握这篇文章的知识点还需要大家自己动手实践使用过才能领会,如果想了解更多相关内容的文章,欢迎关注编程网行业资讯频道。


