本文将会用typescript+react+react-dropzone+express.js实现前后端上传图片。当然是用typescript需要提前下载相应的模块,在这里就不依依介绍了。
第一步,配置tsconfig.js
  "compilerOptions": {
      "outDir": "./public/",
      "sourceMap": true,
      "noImplicitAny": true,
      "module": "commonjs",
      "target": "es5",
      "jsx": "react" ,
      "noImplicitAny": false,
      "suppressImplicitAnyIndexErrors": true
  },
  "files": [ "./views/home/main.tsx" ],
  "exclude": [
    "node_modules"
  ]
}
2.配置webpack
var path = require('path');
var webpack = require('webpack');
var ExtractTextPlugin = require("extract-text-webpack-plugin");
var HtmlWebpackPlugin = require('html-webpack-plugin');
var title = {
  home: '首页',
}
module.exports = {
  entry: {
    home: [
      'babel-polyfill',
      './views/home/main.tsx'
    ],
    common: ['react','babel-polyfill']
  },
  output: {
    path: path.join(__dirname, 'views/wap'),
    filename: '[name].js',
    chunkFilename: '[id].build.js?[chunkhash]',
    publicPath: '/views/wap/',
  },
  module: {
    loaders: [
      {
        test: /.tsx?$/,
        loader: 'ts-loader'
      },
      {
        test: /.(less|css)$/,
        loader: ExtractTextPlugin.extract('style', 'css!less'),
      },
      {
       test:/.(js|jsx)?$/,
       loader:'babel',
       exclude:/node_modules/,
       query:{compact:false,presets:['es2015','react','stage-0','stage-1','stage-2']}
      },
      {
        test: /.(png|jpg|gif)?$/,
        loaders: ['url?limit=8192&name=[name]_[sha512:hash:base64:7].[ext]'],
      },
      {
        test: /.(eot|woff|ttf|svg)$/,
        loader: 'file?limit=81920&name=[name]_[sha512:hash:base64:7].[ext]'
      },
    ]
  },
  resolve: {
    root: ['node_modules'],
    extensions: ['', '.js', '.jsx', '.html', '.json','.ts', '.tsx'],
    modulesDirectories: ['node_modules'],
    alias: {}
  },
  externals: {},
  plugins: [
    new webpack.DefinePlugin({
      'process.env.NODE_ENV': '"production"'
    }),
    new webpack.HotModuleReplacementPlugin(),
    new ExtractTextPlugin('[name].[contenthash:20].css'),
    new webpack.optimize.UglifyJsPlugin({
      compress: {warnings: false}
    }),
    new webpack.optimize.CommonsChunkPlugin('common', 'common.js'),
      new HtmlWebpackPlugin(
      {
         title: "",
         template: path.join(path.resolve(__dirname),'views/wap/myApp.html'), //模板文件
         inject:'body',
         hash:true,  //为静态资源生成hash值
         minify:{  //压缩HTML文件
          removeComments:false,  //移除HTML中的注释
          collapseWhitespace:false  //删除空白符与换行符
         }
      }
      )
  ]
};
3.react-dropzone
import * as Dropzone from 'react-dropzone';

<Dropzone  accept="image/jpeg, image/png"
      onDrop={(accepted, rejected) => { this.setState({ accepted, rejected });this.drop(accepted[0].preview) }}
      style={{width:"100%",height:"120px",background:"#f2f2f2","padding-top":'90px',"cursor":"pointer","box-sizing":"content-box"}} >
</Dropzone>
accept:表示图片的接受类型
onDrop代表图片加载以后触发
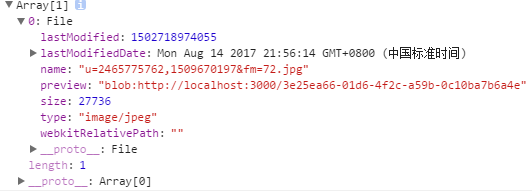
accepted:表示加载图片成功后相关信息,打印出来如下:

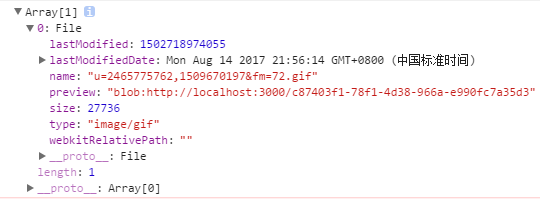
rejected:表示加载图片失败后,相关信息:

4.图片处理、上传
新建一个drop方法在触发onDrop后。
drop(src : any) : any{
    const that = this;
    let img = src;
    let image = new Image();
    image.crossOrigin = 'Anonymous';
    image.src = img;
    image.onload = function(){
      let base64 = that.getBase64Image(image);
      that.upLoadImg({imgData:base64})
    }
}
在这里我们使用base64传递,所以我们需要把图片转成base64,定义getBase64Image处理
getBase64Image(img :any) : string {
    let canvas = document.createElement("canvas");
    canvas.width = img.width;
    canvas.height = img.height;
    let ctx = canvas.getContext("2d");
    ctx.drawImage(img, 0, 0, img.width, img.height);
    let ext = img.src.substring(img.src.lastIndexOf(".")+1).toLowerCase();
    let dataURL = canvas.toDataURL("image/"+ext);
    return dataURL;
}
最终返回的是处理后图片的地址,然后上传
async upLoadImg(params : object) : Promise<any>{
    let res = await axios.post('http://localhost:3000/upLoadImg',params);
}
5.node部分
router/index.js
var express = require('express');
var router = express.Router();
var rf = require('fs');
var SetImg = require('./controller/uploadImg');
var setImg = new SetImg;
router.post('/upLoadImg',setImg.setUploadImg);
module.exports = router;
./controller/uploadImg.js
var rf = require('fs');
class SetImg {
  setUploadImg(req, res, next) {
    let imgData = req.body.imgData;
    let base64Data = imgData.replace(/^data:image/w+;base64,/, "");
    let dataBuffer = new Buffer(base64Data, 'base64');
    let timer = Number( new Date() );
    rf.writeFile("views/images/artCover"+timer+".png",dataBuffer, function(err) {
      if(err) {
       res.json({"code":400,"verson":false,"msg":err});
      }else {
       res.json({"code":100,"verson":true,"url":"views/src/common/images/artCover/"+timer+".png"});
      }
    });
  }
}
module.exports = SetImg;
拿到图片后先进行格式转换,然后将图片写入到本地,返回图片路径。
import * as React from 'react';
import * as ReactDom  from 'react-dom';

import * as Dropzone from 'react-dropzone';
import * as axios from 'axios';

import './main.less';

declare var document;
declare var Image;
class ImgUpload extends React.Component<any,any> {
  constructor(){
    super()
    this.state = {
     accepted: [],
     rejected: []
    }
  }
  public drop(src : any) : any{
    const that = this;
    let img = src;
    let image = new Image();
    image.crossOrigin = 'Anonymous';
    image.src = img;
    image.onload = function(){
      let base64 = that.getBase64Image(image);
      console.log(base64)
      that.upLoadImg({imgData:base64})
    }
  }
  //转base64
  public getBase64Image(img :any) : string {
    let canvas = document.createElement("canvas");
    canvas.width = img.width;
    canvas.height = img.height;
    let ctx = canvas.getContext("2d");
    ctx.drawImage(img, 0, 0, img.width, img.height);
    let ext = img.src.substring(img.src.lastIndexOf(".")+1).toLowerCase();
    let dataURL = canvas.toDataURL("image/"+ext);
    return dataURL;
  }
  public async upLoadImg(params : object) : Promise<any>{
    let res = await axios.post('http://localhost:3000/upLoadImg',params);

  }
  render(){
    const that = this;
    let imgs;
    if(this.state.accepted.length > 0){
      imgs = (
        <ul>
          {this.state.accepted.map( (f) => {
            return <img key={f.name} src={f.preview} />
          })}
        </ul>
      )
    }
    return (
      <div>
        <div className="wrap">
          <Dropzone
          accept="image/jpeg, image/png"
          onDrop={(accepted, rejected) => { console.log(accepted);console.log(rejected);this.setState({ accepted, rejected });this.drop(accepted[0].preview) }}
          style={{width:"100%",height:"120px",background:"#f2f2f2","padding-top":'90px',"cursor":"pointer","box-sizing":"content-box"}}
           >
            <p className="upload">请添加主题图片</p>
          </Dropzone>
        </div>
        <div className="show">{imgs}
        </div>
      </div>

    )
  }

}
ReactDom.render(
  <ImgUpload />,
  document.getElementById('app')
)
以上就是本文的全部内容,希望对大家的学习有所帮助,也希望大家多多支持编程网。


