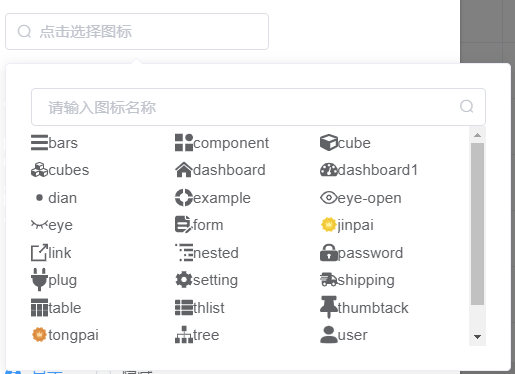
这篇文章主要讲解了“怎么实现vue图标选择器”,文中的讲解内容简单清晰,易于学习与理解,下面请大家跟着小编的思路慢慢深入,一起来研究和学习“怎么实现vue图标选择器”吧!


import Vue from 'vue'import SvgIcon from '@/components/SvgIcon'// svg component // register globallyVue.component('svg-icon', SvgIcon) const req = require.context('./svg', false, /\.svg$/)const requireAll = requireContext => requireContext.keys().map(requireContext)requireAll(req) 
# replace default config # multipass: true# full: true plugins: # - name # # or: # - name: false # - name: true # # or: # - name: # param1: 1 # param2: 2 - removeAttrs: attrs: - 'fill' - 'fill-rule' 
<template> <div v-if="isExternal" : class="svg-external-icon svg-icon" v-on="$listeners" /> <svg v-else :class="svgClass" aria-hidden="true" v-on="$listeners"> <use :xlink:href="iconName" rel="external nofollow" /> </svg></template> <script>// doc: https://panjiachen.github.io/vue-element-admin-site/feature/component/svg-icon.html#usageimport { isExternal } from '@/utils/validate' export default { name: 'SvgIcon', props: { iconClass: { type: String, required: true }, className: { type: String, default: '' } }, computed: { isExternal() { return isExternal(this.iconClass) }, iconName() { return `#icon-${this.iconClass}` }, svgClass() { if (this.className) { return 'svg-icon ' + this.className } else { return 'svg-icon' } }, styleExternalIcon() { return { mask: `url(${this.iconClass}) no-repeat 50% 50%`, '-webkit-mask': `url(${this.iconClass}) no-repeat 50% 50%` } } }}</script> <style scoped>.svg-icon { width: 1em; height: 1em; vertical-align: -0.15em; fill: currentColor; overflow: hidden;} .svg-external-icon { background-color: currentColor; mask-size: cover!important; display: inline-block;}</style> 
<!-- @author zhengjie --><template> <div class="icon-body"> <el-input v-model="name" clearable placeholder="请输入图标名称" @clear="filterIcons" @input.native="filterIcons"> <i slot="suffix" class="el-icon-search el-input__icon" /> </el-input> <div class="icon-list"> <div v-for="(item, index) in iconList" :key="index" @click="selectedIcon(item)"> <svg-icon :icon-class="item" /> <span>{{ item }}</span> </div> </div> </div></template> <script>import icons from './requireIcons'export default { name: 'IconSelect', data() { return { name: '', iconList: icons } }, methods: { filterIcons() { this.iconList = icons if (this.name) { this.iconList = this.iconList.filter(item => item.includes(this.name)) } }, selectedIcon(name) { this.$emit('selected', name) document.body.click() }, reset() { this.name = '' this.iconList = icons } }}</script> <style rel="stylesheet/scss" lang="scss" scoped> .icon-body { width: 100%; padding: 10px; .icon-list { height: 200px; overflow-y: scroll; div { height: 30px; line-height: 30px; margin-bottom: -5px; cursor: pointer; width: 33%; float: left; } span { display: inline-block; vertical-align: -0.15em; fill: currentColor; overflow: hidden; } } }</style> 
感谢各位的阅读,以上就是“怎么实现vue图标选择器”的内容了,经过本文的学习后,相信大家对怎么实现vue图标选择器这一问题有了更深刻的体会,具体使用情况还需要大家实践验证。这里是编程网,小编将为大家推送更多相关知识点的文章,欢迎关注!


