这篇文章主要介绍“Python如何利用PaddleOCR制作个搜题小工具”的相关知识,小编通过实际案例向大家展示操作过程,操作方法简单快捷,实用性强,希望这篇“Python如何利用PaddleOCR制作个搜题小工具”文章能帮助大家解决问题。
安装
虽然PaddleOCR支持服务端部署并提供识别API,但根据我们的需求,搭建一个本地离线的OCR识别环境,所以此次我们只介绍如何在本地安装并使用的做法。
安装PaddlePaddle飞桨框架
一、环境准备
1 目前飞桨支持的环境
Windows 7/8/10 专业版/企业版 (64bit)
GPU版本支持CUDA 10.1/10.2/11.0/11.2,且仅支持单卡
Python 版本 3.6+/3.7+/3.8+/3.9+ (64 bit)
pip 版本 20.2.2或更高版本 (64 bit)
二、安装命令
pip install paddlepaddle -i https://mirror.baidu.com/pypi/simple(注意此版本为CPU版本,如需GPU版本请查看PaddlePaddle文档)
安装完成后您可以使用 python 进入python解释器,输入import paddle ,再输入 paddle.utils.run_check()
如果出现PaddlePaddle is installed successfully!,说明您已成功安装。
安装PaddleOCR
pip install "paddleocr>=2.0.1" # 推荐使用2.0.1+版本代码使用
安装完成后你可以使用以下代码来进行简单的功能测试
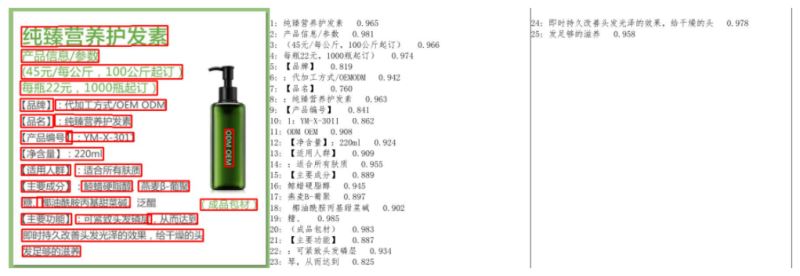
from paddleocr import PaddleOCR, draw_ocr# Paddleocr目前支持中英文、英文、法语、德语、韩语、日语,可以通过修改lang参数进行切换# 参数依次为`ch`, `en`, `french`, `german`, `korean`, `japan`。ocr = PaddleOCR(use_angle_cls=True, lang="ch") # need to run only once to download and load model into memory# 选择你要识别的图片路径img_path = '11.jpg'result = ocr.ocr(img_path, cls=True)for line in result: print(line)# 显示结果from PIL import Imageimage = Image.open(img_path).convert('RGB')boxes = [line[0] for line in result]txts = [line[1][0] for line in result]scores = [line[1][1] for line in result]im_show = draw_ocr(image, boxes, txts, scores, font_path='/path/to/PaddleOCR/doc/fonts/simfang.ttf')im_show = Image.fromarray(im_show)im_show.save('result.jpg')结果是一个list,每个item包含了文本框,文字和识别置信度
[[[24.0, 36.0], [304.0, 34.0], [304.0, 72.0], [24.0, 74.0]], ['纯臻营养护发素', 0.964739]]
[[[24.0, 80.0], [172.0, 80.0], [172.0, 104.0], [24.0, 104.0]], ['产品信息/参数', 0.98069626]]
[[[24.0, 109.0], [333.0, 109.0], [333.0, 136.0], [24.0, 136.0]], ['(45元/每公斤,100公斤起订)', 0.9676722]]
......
可视化效果

至此我们就掌握了 PaddleOCR 的基本使用,基于这个我们就能开发出一个OCR的搜题小工具了。
搜题小工具
现在有很多那种答题竞赛的小游戏,在限定时间内看谁答题正确率更高。或者现在一些单位会搞一些大练兵什么的竞赛,需要在网上答题,这个时候手动输入题目去搜索就很慢,效率也不会太高,所以我们就可以来写一个脚本,帮助我们完成搜题的过程。
基本思路就是通过ADB截取当前屏幕,然后剪切出题目所在位置,然后通过PaddleOCR来获取题目文字,之后打开搜索引擎搜索或者打开题库搜索。
安装ADB
你可以到这里下载安装ADB之后配置环境变量。
配置完环境变量后在终端输入adb,如果出现以下字符则证明adb安装完成。
Android Debug Bridge version 1.0.41Version 31.0.3-7562133截图并保存题目区域图片
import osfrom PIL import Image# 截图def pull_screenshot(): os.system('adb shell screencap -p /sdcard/screenshot.png') os.system('adb pull /sdcard/screenshot.png .')img = Image.open("./screenshot.png")# 切割问题区域# (起始点的横坐标,起始点的纵坐标,宽度,高度)question = img.crop((10, 400, 1060, 1000))# 保存问题区域question.save("./question.png")OCR识别,获取题目
ocr = PaddleOCR(use_angle_cls=False, lang="ch", show_log=False ) # need to run only once to download and load model into memoryimg_path = 'question.png'result = ocr.ocr(img_path, cls=False)# 获取题目文本questionList = [line[1][0] for line in result]text = ""# 将数组转换为字符串for str in questionList : text += strprint(text)打开浏览器搜索
import webbrowserwebbrowser.open('https://baidu.com/s?wd=' + urllib.parse.quote(question))之后你就可以查看搜索结果了
如果有题库,你还可以使用pyautogui来模拟鼠标键盘操作,去操作Word等软件在题库中进行搜索。
完整代码
# -*- coding: utf-8 -*-# @Author : Pu Zhiwei# @Time : 2021-09-02 20:29from PIL import Imageimport osimport matplotlib.pyplot as pltfrom paddleocr import PaddleOCR, draw_ocrimport pyperclipimport pyautoguiimport timeimport webbrowserimport urllib.parse# 鼠标位置currentMouseX, currentMouseY = 60, 282# 截图获取当前题目def pull_screenshot(): os.system('adb shell screencap -p /sdcard/screenshot.png') os.system('adb pull /sdcard/screenshot.png .')# 移动鼠标到搜索框搜索def MoveMouseToSearch(): # duration 参数,移动时间,即用时0.1秒移动到对应位置 pyautogui.moveTo(currentMouseX, currentMouseY, duration=0.1) # 左键点击 pyautogui.click() pyautogui.click() # 模拟组合键,粘贴 pyautogui.hotkey('ctrl', 'v')# 扩充问题def AddText(list, length, text): if length > 3: return text + list[3] else: return text# 打开浏览器def open_webbrowser(question): webbrowser.open('https://baidu.com/s?wd=' + urllib.parse.quote(question))# 显示所识别的题目def ShowAllQuestionText(list): text = "" for str in list: text += str print(text)if __name__ == "__main__": while True: print("\n\n请将鼠标放在Word的搜索框上,三秒后脚本将自动获取Word搜索框位置!\n\n") # 延时三秒输出鼠标位置 time.sleep(3) # 获取当前鼠标位置 currentMouseX, currentMouseY = pyautogui.position() print('当前鼠标位置为: {0} , {1}'.format(currentMouseX, currentMouseY)) start = input("按y键程序开始运行,按其他键重新获取搜索框位置:") if start == 'y': break while True: t = time.perf_counter() pull_screenshot() img = Image.open("./screenshot.png") # 切割问题区域 # (起始点的横坐标,起始点的纵坐标,宽度,高度) question = img.crop((10, 400, 1060, 1000)) # 保存问题区域 question.save("./question.png") # 加载 PaddleOCR # Paddleocr目前支持中英文、英文、法语、德语、韩语、日语,可以通过修改lang参数进行切换 # 参数依次为`ch`, `en`, `french`, `german`, `korean`, `japan`。 # 自定义模型地址 # det_model_dir='./inference/ch_ppocr_server_v2.0_det_train', # rec_model_dir='./inference/ch_ppocr_server_v2.0_rec_pre', # cls_model_dir='./inference/ch_ppocr_mobile_v2.0_cls_train', ocr = PaddleOCR(use_angle_cls=False, lang="ch", show_log=False ) # need to run only once to download and load model into memory img_path = 'question.png' result = ocr.ocr(img_path, cls=False) questionList = [line[1][0] for line in result] length = len(questionList) text = "" if length < 1: text = questionList[0] elif length == 2: text = questionList[1] else: text = questionList[1] + questionList[2] print('\n\n') ShowAllQuestionText(questionList) # 将结果写入剪切板 pyperclip.copy(text) # 点击搜索 MoveMouseToSearch() # 计算时间 print('\n\n') end_time3 = time.perf_counter() print('用时: {0}'.format(end_time3 - t)) go = input('输入回车继续运行,输入 e 打开浏览器搜索,输入 a 增加题目长度,输入 n 结束程序运行: ') if go == 'n': break if go == 'a': text = AddText(questionList, length, text) pyperclip.copy(text) # 点击搜索 MoveMouseToSearch() stop = input("输入回车继续") elif go == 'e': # 打开浏览器 open_webbrowser(text) stop = input("输入回车继续") print('\n------------------------\n\n')关于“Python如何利用PaddleOCR制作个搜题小工具”的内容就介绍到这里了,感谢大家的阅读。如果想了解更多行业相关的知识,可以关注编程网行业资讯频道,小编每天都会为大家更新不同的知识点。


