这篇文章主要介绍了pytorch液态算法如何实现瘦脸效果,具有一定借鉴价值,感兴趣的朋友可以参考下,希望大家阅读完这篇文章之后大有收获,下面让小编带着大家一起了解一下。
算法思路:

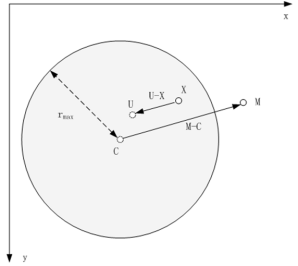
假设当前点为(x,y),手动指定变形区域的中心点为C(cx,cy),变形区域半径为r,手动调整变形终点(从中心点到某个位置M)为M(mx,my),变形程度为strength,当前点对应变形后的目标位置为U。变形规律如下,
圆内所有像素均沿着变形向量的方向发生偏移
距离圆心越近,变形程度越大
距离圆周越近,变形程度越小,当像素点位于圆周时,该像素不变形
圆外像素不发生偏移

其中,x是圆内任意一点坐标,c是圆心点,rmax为圆心半径,m为调整变形的终点,u为圆内任意一点x对应的变形后的位置。
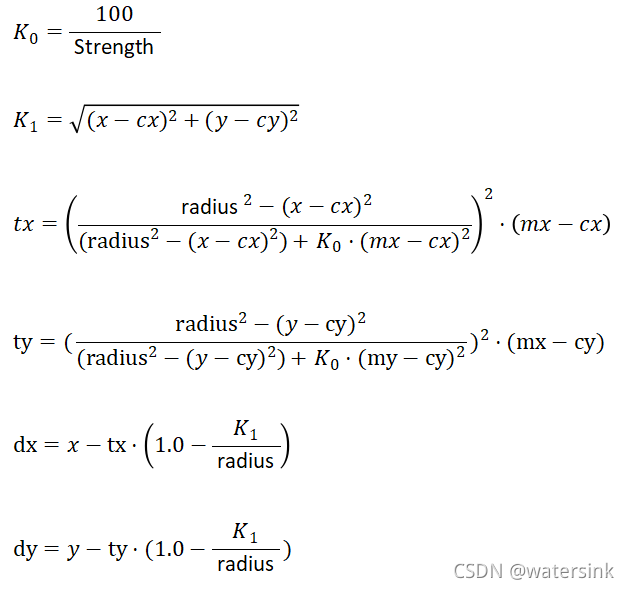
对上面公式进行改进,加入变形程度控制变量strength,改进后瘦脸公式如下,

优缺点:
优点:形变思路简单直接
缺点:
局部变形算法,只能基于一个中心点,向另外一个点的方向啦。如果想多个点一起拉伸,只能每个点分别做一次液化,通过针对多个部位多次液化来实现。
单点拉伸的变形,可以实现瘦脸的效果,但是效果自然度有待提升。
代码实现:
import cv2import mathimport numpy as np def localTranslationWarpFastWithStrength(srcImg, startX, startY, endX, endY, radius, strength): ddradius = float(radius * radius) copyImg = np.zeros(srcImg.shape, np.uint8) copyImg = srcImg.copy() maskImg = np.zeros(srcImg.shape[:2], np.uint8) cv2.circle(maskImg, (startX, startY), math.ceil(radius), (255, 255, 255), -1) K0 = 100/strength # 计算公式中的|m-c|^2 ddmc_x = (endX - startX) * (endX - startX) ddmc_y = (endY - startY) * (endY - startY) H, W, C = srcImg.shape mapX = np.vstack([np.arange(W).astype(np.float32).reshape(1, -1)] * H) mapY = np.hstack([np.arange(H).astype(np.float32).reshape(-1, 1)] * W) distance_x = (mapX - startX) * (mapX - startX) distance_y = (mapY - startY) * (mapY - startY) distance = distance_x + distance_y K1 = np.sqrt(distance) ratio_x = (ddradius - distance_x) / (ddradius - distance_x + K0 * ddmc_x) ratio_y = (ddradius - distance_y) / (ddradius - distance_y + K0 * ddmc_y) ratio_x = ratio_x * ratio_x ratio_y = ratio_y * ratio_y UX = mapX - ratio_x * (endX - startX) * (1 - K1/radius) UY = mapY - ratio_y * (endY - startY) * (1 - K1/radius) np.copyto(UX, mapX, where=maskImg == 0) np.copyto(UY, mapY, where=maskImg == 0) UX = UX.astype(np.float32) UY = UY.astype(np.float32) copyImg = cv2.remap(srcImg, UX, UY, interpolation=cv2.INTER_LINEAR) return copyImg image = cv2.imread("./tests/images/klst.jpeg")processed_image = image.copy()startX_left, startY_left, endX_left, endY_left = 101, 266, 192, 233startX_right, startY_right, endX_right, endY_right = 287, 275, 192, 233radius = 45strength = 100# 瘦左边脸 processed_image = localTranslationWarpFastWithStrength(processed_image, startX_left, startY_left, endX_left, endY_left, radius, strength)# 瘦右边脸 processed_image = localTranslationWarpFastWithStrength(processed_image, startX_right, startY_right, endX_right, endY_right, radius, strength)cv2.imwrite("thin.jpg", processed_image)实验效果:

感谢你能够认真阅读完这篇文章,希望小编分享的“pytorch液态算法如何实现瘦脸效果”这篇文章对大家有帮助,同时也希望大家多多支持编程网,关注编程网行业资讯频道,更多相关知识等着你来学习!


